通过Jenkins部署SpringBoot项目
前言:
官方:https://www.jenkins.io
下载地址:https://www.jenkins.io/download/
官方中文文档: https://www.jenkins.io/zh/doc/
# Jenkins 是什么?
Jenkins是一款开源 CI&CD 软件,用于自动化各种任务,包括构建、测试和部署软件。
Jenkins 支持各种运行方式,可通过系统包、Docker 或者通过一个独立的 Java 程序。
# 系统要求
最低推荐配置:
- 256MB可用内存
- 1GB可用磁盘空间(作为一个Docker (opens new window)容器运行jenkins的话推荐10GB)
为小团队推荐的硬件配置:
- 1GB+可用内存
- 50 GB+ 可用磁盘空间
软件配置:
- Java 8—无论是Java运行时环境(JRE)还是Java开发工具包(JDK)都可以。
注意: 如果将Jenkins作为Docker 容器运行,这不是必需的
jenkins提供了多个平台的安装方式 这篇文章主要围绕 docker方式以及war包方式启动。
# War安装
Jenkins的Web应用程序ARchive(WAR)文件版本可以安装在任何支持Java的操作系统或平台上。
要下载并运行Jenkins的War文件版本,请执行以下操作:
- 将最新的稳定Jenkins WAR包 (opens new window) 下载到您计算机上的相应目录。
- 在下载的目录内打开一个终端/命令提示符窗口到。
- 运行命令java -jar jenkins.war 或者 把war放到 tomcat里运行
- 浏览http://localhost:8080并等到Unlock Jenkins页面出现。
- 继续使用Post-installation setup wizard (opens new window)后面步骤设置向导。
将最新的稳定Jenkins WAR包 (opens new window)下载到您计算机上的相应目录。
安装之前我们需要安装一些必要的环境 tomcat jdk maven git
首先先准备好要安装的文件
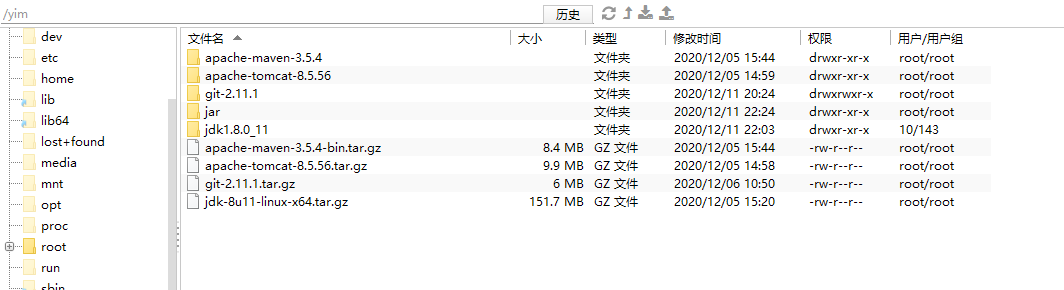
# (1)安装jdk环境
#把安装文件放到该目录
tar -zxvf /yim/jdk-8u11-linux-x64.tar.gz

#编辑环境变量文件
vim /etc/profile

#配置java环境变量
export JAVA_HOME=/yim/jdk-8u11-linux-x64.tar.gz
export JRE_HOME=${JAVA_HOME}/jre
export CLASSPATH=.:${JAVA_HOME}/lib:${JRE_HOME}/lib:$CLASSPATH
export JAVA_PATH=${JAVA_HOME}/bin:${JRE_HOME}/bin
export PATH=$PATH:${JAVA_PATH}

#环境文件生效
source /etc/profile

#查看jdk版本
java -version
2
3
4
5
6
7
8
9
10
11
12
13
14
15
16
17
18
# (2)安装maven
#-C 表示解压到哪个目录
tar -zxvf /yim/apache-maven-3.5.4-bin.tar.gz -C /yim/apache-maven-3.5.4
#编辑环境变量文件
vim /etc/profile

MAVEN_HOME=/yim/apache-maven-3.5.4
export MAVEN_HOME
export PATH=${PATH}:${MAVEN_HOME}/bin

#环境文件生效
source /etc/profile

#查看maven版本
mvn -v
2
3
4
5
6
7
8
9
10
11
12
13
14
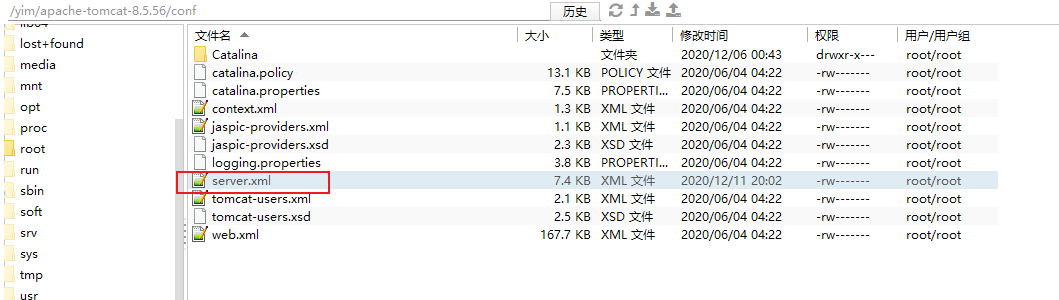
# (3)安装tomcat
#-C 表示解压到哪个目录
tar -zxvf /yim/apache-tomcat-8.5.56.tar.gz -C /yim/apache-tomcat-8.5.56
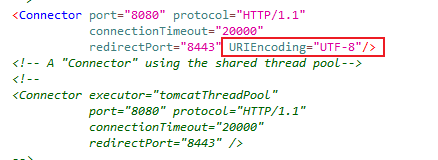
#需要修改server.xml的文件 加上 URIEncoding="UTF-8"
<Connector port="8080" protocol="HTTP/1.1"
connectionTimeout="20000"
redirectPort="8443" URIEncoding="UTF-8" />
2
3
4
5
6
7
8
# (4)安装git
安装git有两种方法
方法一:通过解压安装(测试通过) 本教程使用这种方法
#安装前先安装依赖包 不然会报错
#如果装完这些依赖 编译的时候还是有错误 就自行百度 还缺哪些包

yum install openssl-devel
yum install expat-devel
yum install curl-devel -y
yum install perl-ExtUtils-CBuilder perl-ExtUtils-MakeMaker

tar -zxvf /yim/git-2.11.1.tar.gz -C /yim/git-2.11.1

cd /yim/git-2.11.1

##编译
make prefix=/usr/local/git all

#安装
make prefix=/usr/local/git install

vi /etc/profile

export PATH=/usr/local/git/bin:$PATH

GIT_HOME=/usr/local/git
export PATH=$PATH:$GIT_HOME/bin

source /etc/profile
2
3
4
5
6
7
8
9
10
11
12
13
14
15
16
17
18
19
20
21
22
23
24
25
26
方法二:通过yum直接拉取git,但是git版本会比较老(待测试)
#查看系统是否已经安装git
git --version

#yum 安装git
yum install -y git
2
3
4
5
# (5.1) tomcat方式部署
使用tomcat方式部署的话要用解压之后的tomcat,把Jenkins.war放入webapps目录下,tomcat会自动进行解压
# 先把tomcat的webapps里多余的东西清理掉,剩下一个ROOT包,然后把war复制到解压好的tomcat目录ROOT底下
cp /yim/jenkins.war /yim/apache-tomcat-8.5.56/webapps/ROOT
#解压war
cd /yim/apache-tomcat-8.5.56/webapps/ROOT
#解压war
jar -zxvf jenkins.war
#删除war
rm -f jenkins.war

cd /yim/apache-tomcat-8.5.60/bin

#启动
./startup.sh
2
3
4
5
6
7
8
9
10
11
12
13
# (5.2) tomcat+docker挂载方式部署
这个是我遇到的第一个坑,由于设置了tomcat与docker里面的tomcat镜像挂载的原因,导致后方很多配置没有生效。
这里先放一放,后续再说说是怎么解决的。
好了,然后http://ip:8080 访问我们的Jenkins
如果访问不了,看是否是因为没有打开安全组以及防火墙
# 安装后设置向导
下载安装并运行Jenkins后,即将开始进入安装向导。
此安装向导会引导您完成几个快速"一次性"步骤来解锁Jenkins, 使用插件对其进行自定义,并创建第一个可以继续访问Jenkins的管理员用户。
# 解锁 Jenkins
当您第一次访问新的Jenkins实例时,系统会要求您使用自动生成的密码对其进行解锁。
浏览到
http://ip:8080(或安装时为Jenkins配置的任何端口),并等待 解锁 Jenkins 页面出现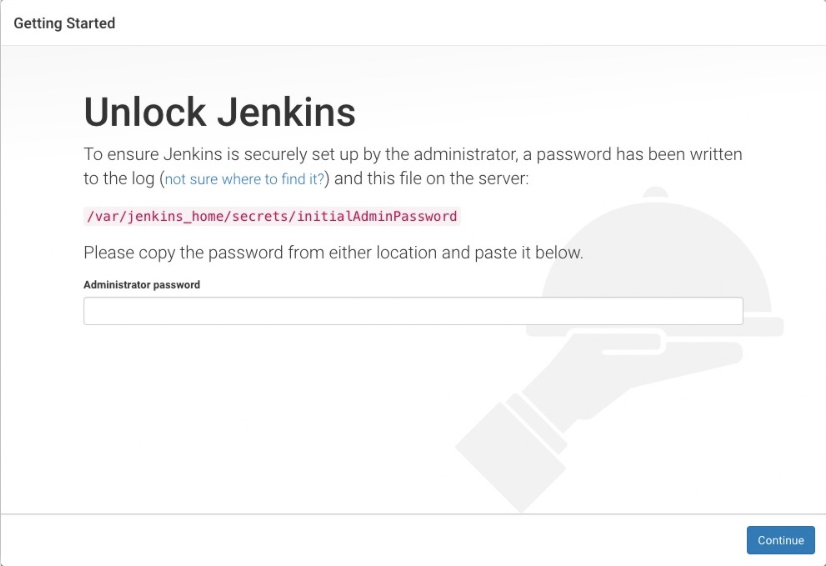
根据他的提示信息 去 cat +路径 查看密码
# 安装插件
解锁 Jenkins (opens new window)之后,在 Customize Jenkins 页面内, 您可以安装任何数量的有用插件作为您初始步骤的一部分。
两个选项可以设置:
- 安装建议的插件 - 安装推荐的一组插件,这些插件基于最常见的用例.
- 选择要安装的插件 - 选择安装的插件集。当你第一次访问插件选择页面时,默认选择建议的插件。
如果jenkins 安装插件报错的话。那么很有可能是因为 插件地址错误。
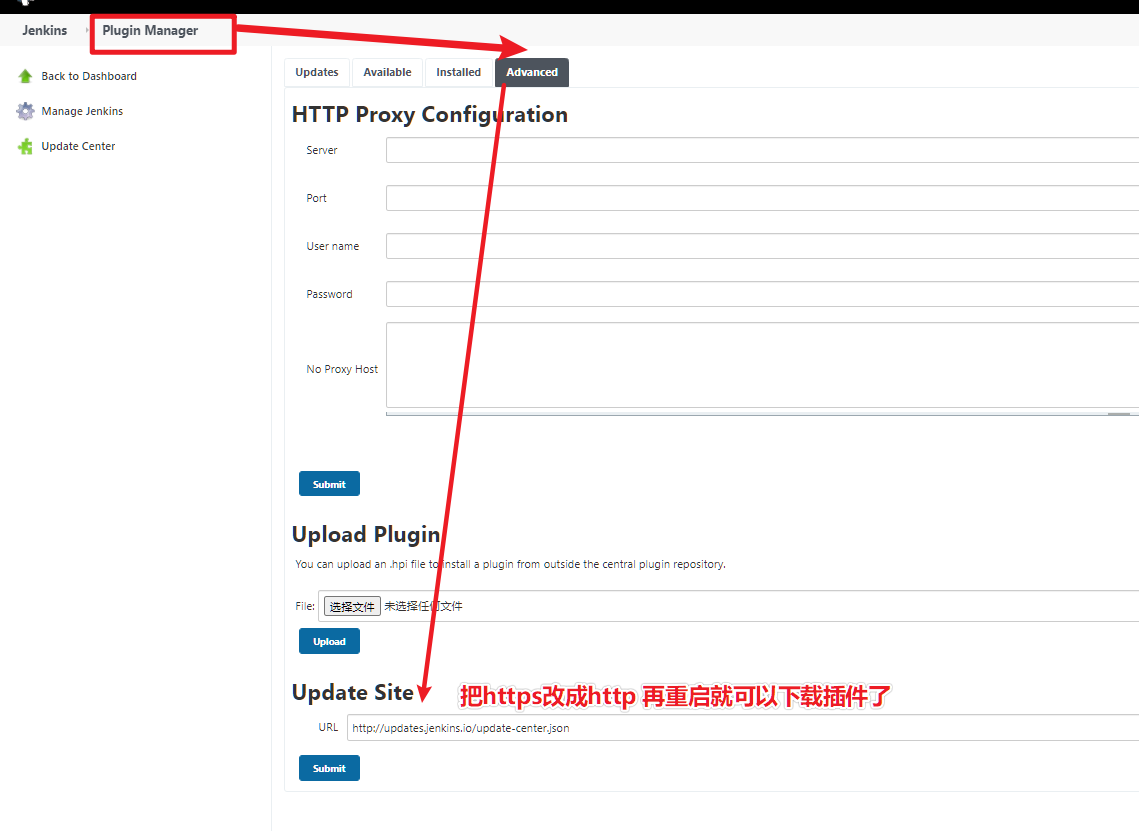
重启之前 先设置一下全局设置里的 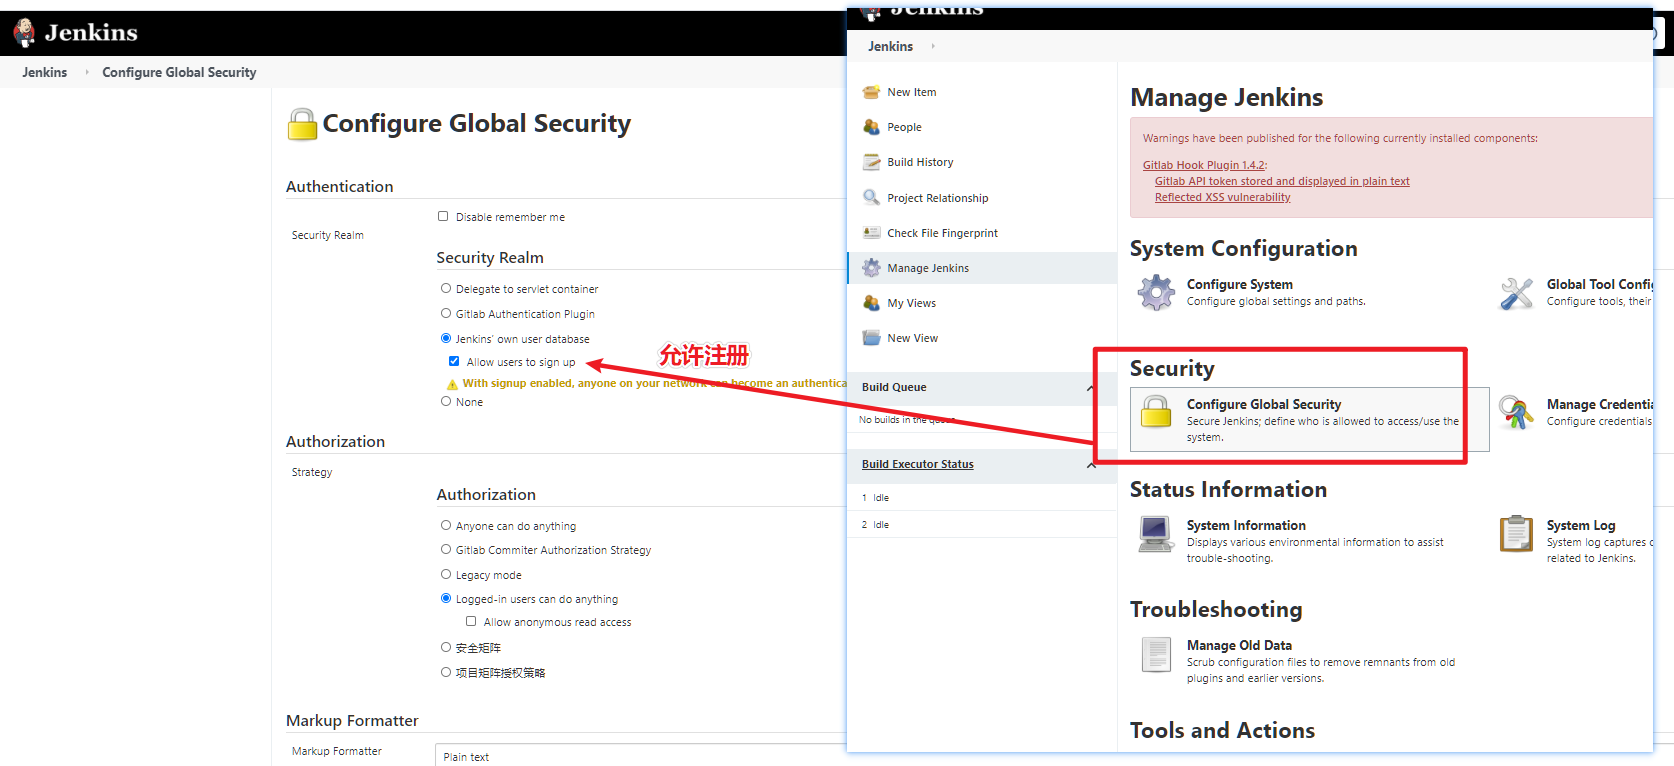
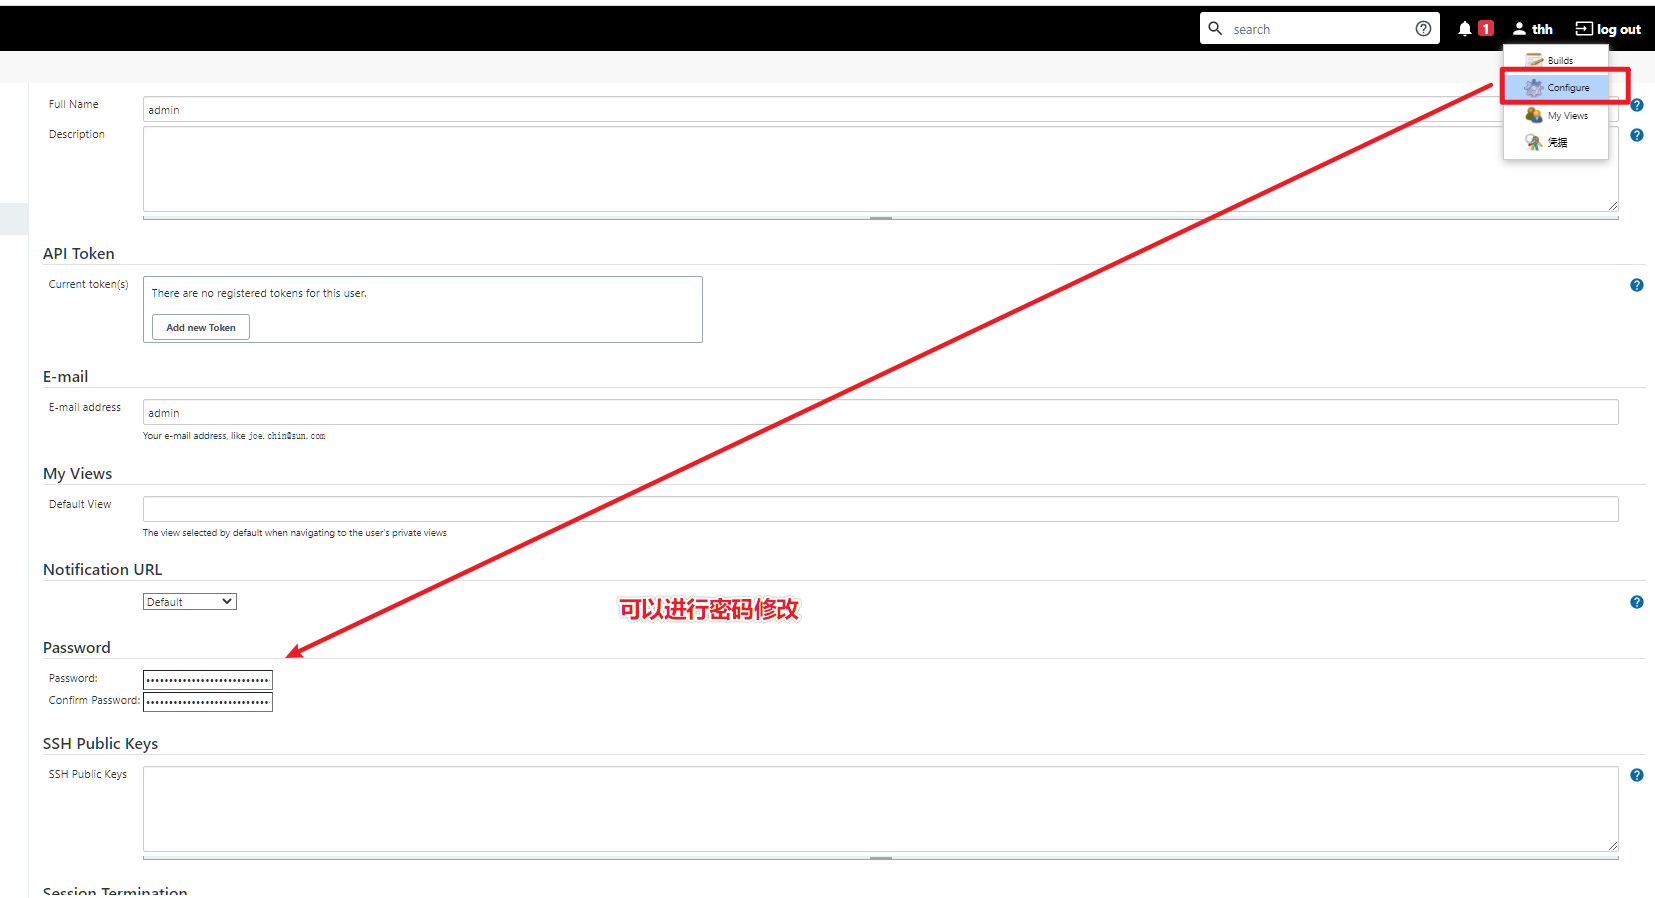
防止我们忘记密码无法登陆
还是要修改我们的管理员admin密码的。
一般我们会安装 这几个插件
- jdk
- maven
- git
- gitee
- gitlab
- svn
插件的意义就是配合我们安装的软件来配置软件路径的。
有一些插件是为了==第三方==
比如钩子程序==gitee==的==webhooks==插件
可以实现==钩子程序==自己触发构建的效果。
# 配置jenkins
好了这里开始有坑,注意看
我们开始在系统配置中配置Jenkins,达到自动化部署的目的
首先选择系统设置,这里只需要配置Jenkins location,也就是Jenkins的位置

配置好了Jenkins的位置之后,我们要去配置全局工具,这个也是最重要的,关乎到Jenkins能不能用的问题
由于是通过tomcat+docker挂载的方式部署的,所以我们配置的路径一定要进入到docker容器查看
查看docker的tomcat容器命令
#查看docker容器创建的镜像
docker ps

#进入镜像(已经配置了容器的情况下)
#我这里的容器名称叫做tomcat
# -it 参数是创建守护式进程
docker exec -it tomcat /bin/bash
2
3
4
5
6
7
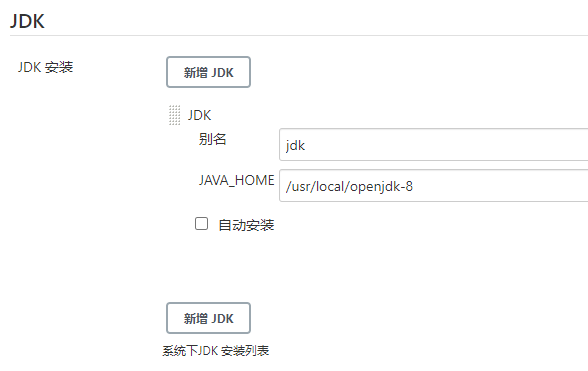
进入了tomcat容器之后我要打印一下JAVA_HOME,看看jdk的全局变量有没有生效
echo $JAVA_HOME
打印出来的结果是

好的,JAVA_HOME生效了,接下来我们配置的JDK路径就是这个
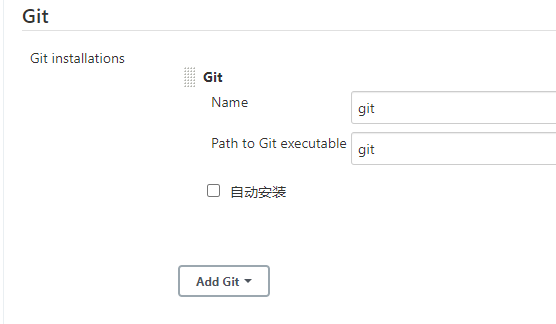
# Git配置
重要!!!!!
我们在配置git的时候有两种方式配置,第一种是使用yum直接安装的镜像,第二种是通过tar -zxvf的形式解压git的tar压缩包。
查看git安装的目录
whereis git

把这个路径拷贝到git的路径里面,发现:==报错==

这个与挂载的tomcat有关(踩坑)
==正确的路径应该是docker容器里面的whereis git命令==

所以git的这个path应该是这样配置
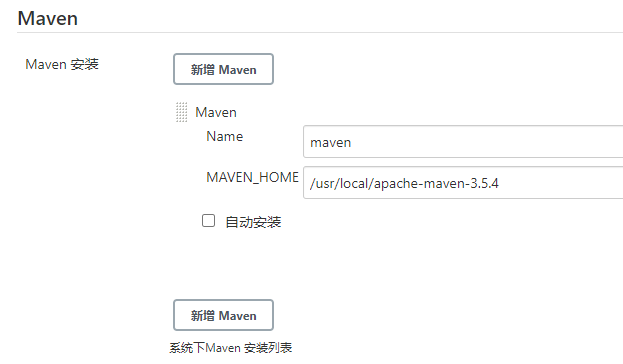
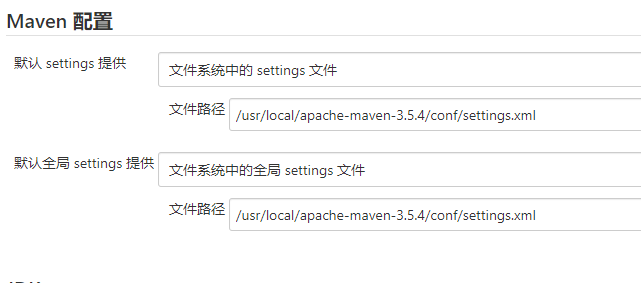
# Maven配置
同样的配置到docker的tomcat容器里面
最后配置maven的settingss
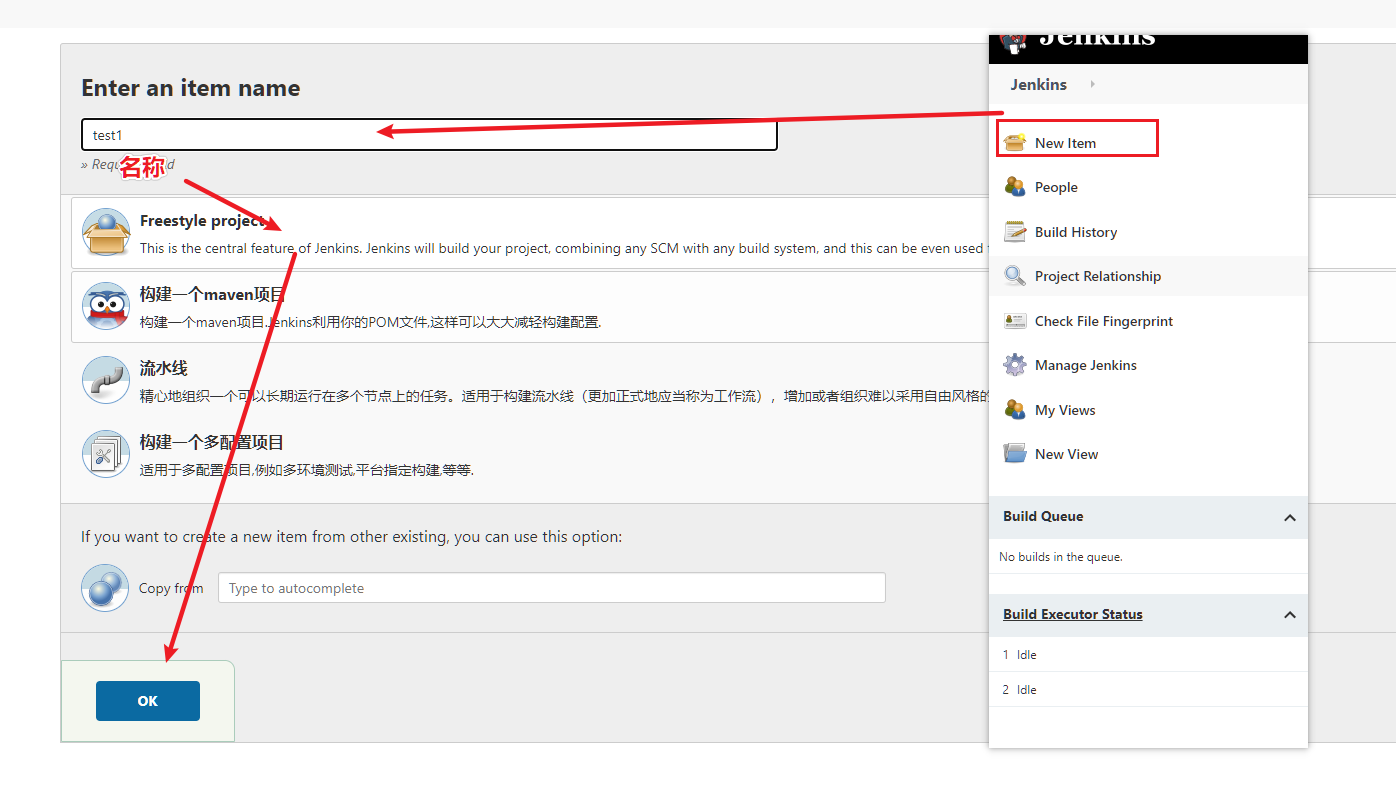
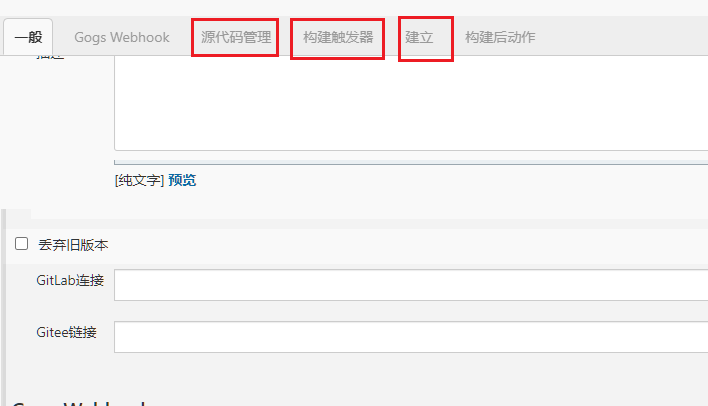
# 构建项目流水线
配置好了Jenkins所需的环境之后我们就开始新建一个job
创建一个流水线的job
配置源代码管理
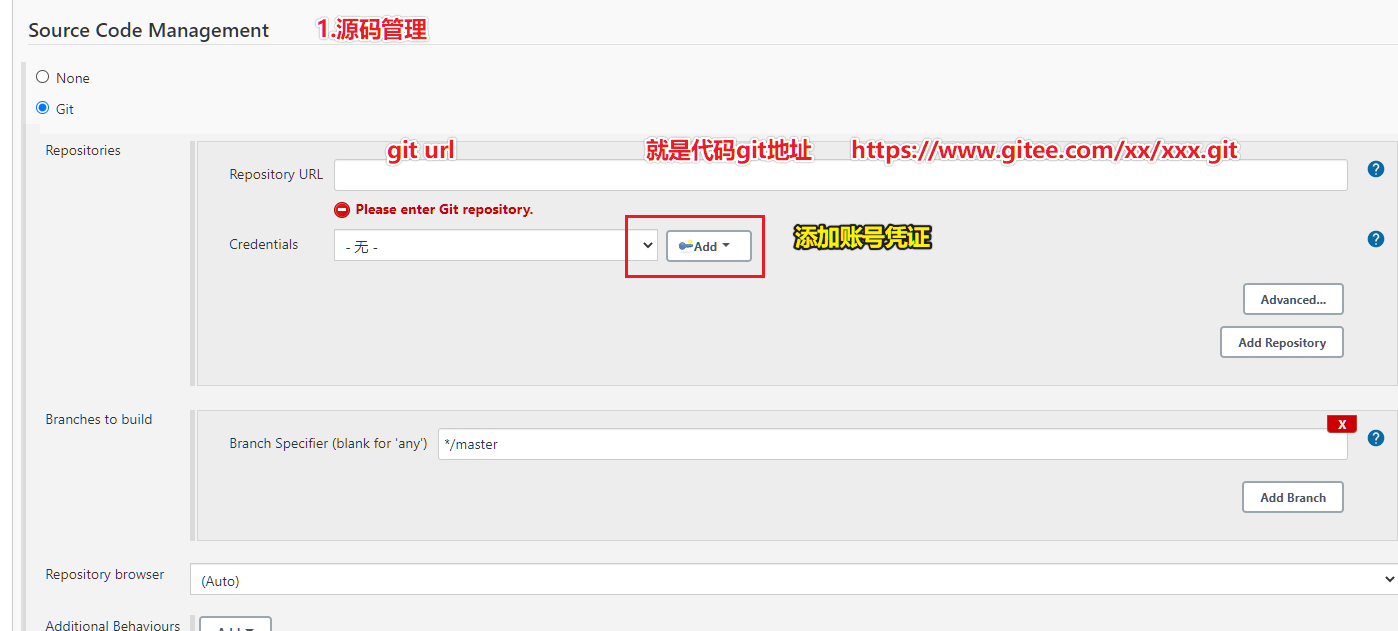
输入仓库地址和进入仓库的credentials(凭证)

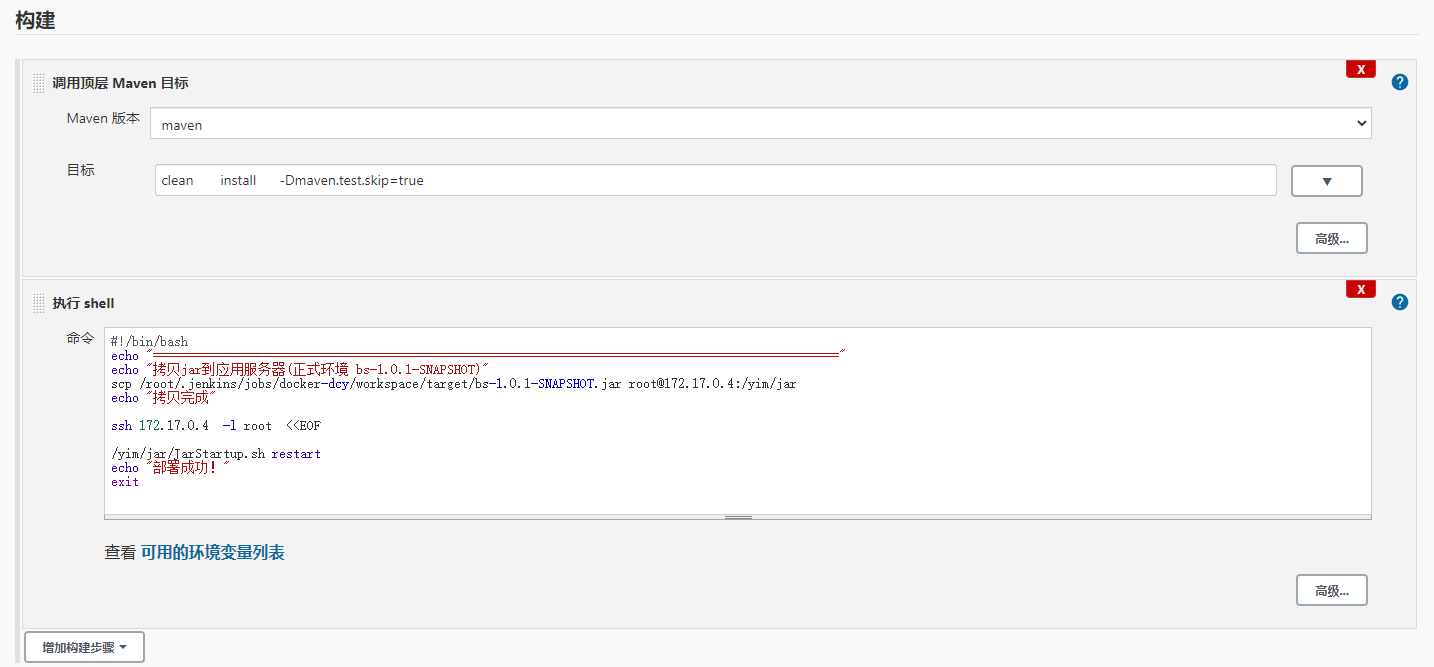
(3)构建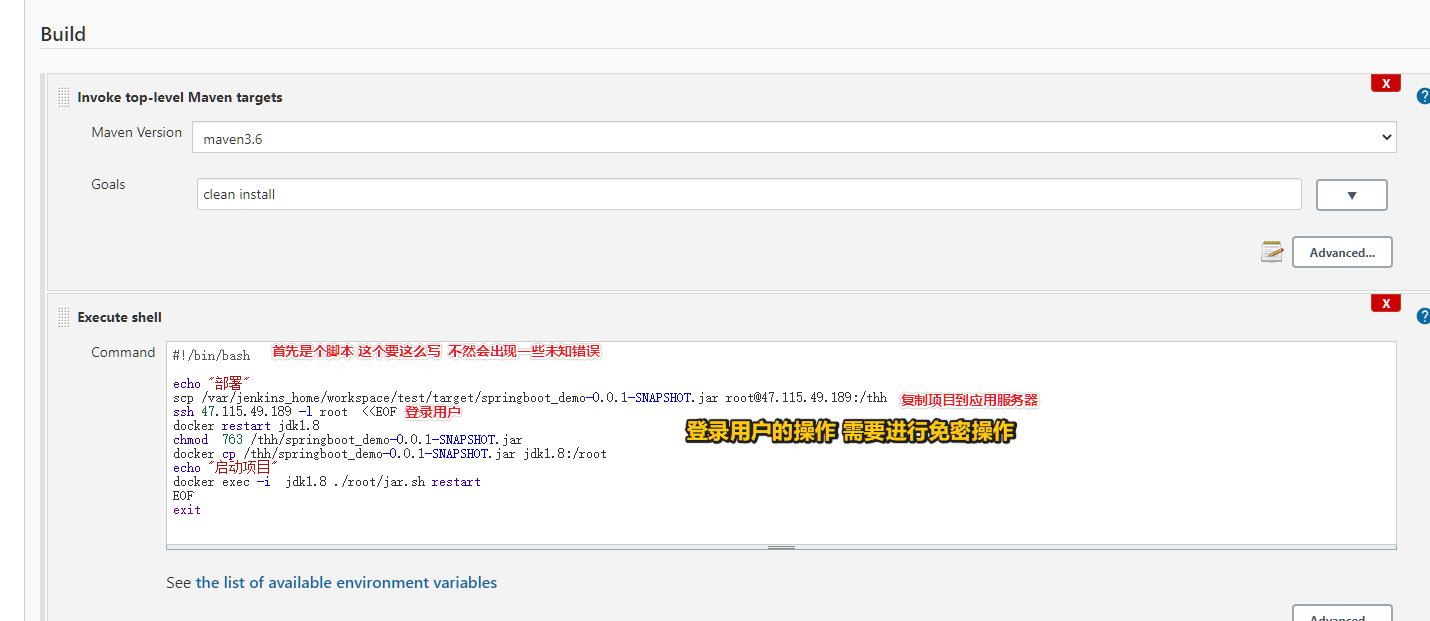
==注意==
Maven目标一定要隔开,不隔开的话会有bug
(4)免密操作
#ssh免登录
ssh-keygen -t rsa 再来三次enter
cd ~
cd .ssh
拷贝相同的文件
cat ~/.ssh/id_rsa.pub >> ~/.ssh/authorized_keys
chmod 700 ~/.ssh
chmod 600 ~/.ssh/authorized_keys

#把生成的公钥复制到需要免登陆的linux中
scp ~/.ssh/authorized_keys root@47.115.49.189:~/.ssh/authorized_keys

#第一次需要登录密码之后就不再需要
2
3
4
5
6
7
8
9
10
11
12
13
# 附件:
- Jenkins的启动脚本
- Maven仓库文件
我们可以进入对应的路径直接执行
./jenkins.sh start
# Jenkins.sh
#!/bin/bash

#这里需要替换为你自己的java路径
export JAVA_HOME=/yim/jdk1.8.0_11

export JRE_HOME=/$JAVA_HOME/jre
export CLASSPATH=.:$JAVA_HOME/jre/lib/rt.jar:$JAVA_HOME/lib/dt.jar:$JAVA_HOME/lib/tools.jar
export PATH=$PATH:$JAVA_HOME/bin:$JRE_HOME/bin

#这里需要替换为你自己的执行程序
APP_NAME=/yim/jar/bs-1.0.1-SNAPSHOT.jar

#使用说明,用来提示输入参数
usage(){
    echo "Usage: sh robotcenter.sh [start|stop|restart|status]"
    exit 1
}

#检查程序是否在运行
is_exist(){
  pid=`ps -ef|grep $APP_NAME|grep -v grep|awk '{print $2}'`
  #如果不存在返回1,存在返回0
  if [ -z "${pid}" ]; then
   return 1
  else
    return 0
  fi
}

#启动方法
start(){
  is_exist
  if [ $? -eq 0 ]; then
    echo "${APP_NAME} is already running. pid=${pid}"
  else
    nohup java -jar ${APP_NAME}  >/dev/null 2>&1 &
    #Xms Xmx  指定虚拟内存上下限
    #nohup ${JRE_HOME}/bin/java -Xms128m -Xmx512m -jar ${APP_NAME} >/dev/null 2>&1 &
    echo "..."
    sleep 2
    echo "..."
    sleep 3
    is_exist
    if [ $? -eq 0 ]; then
      echo "${APP_NAME} is running success. pid=${pid}"
    fi
  fi
}

#停止方法
stop(){
  is_exist
  if [ $? -eq "0" ]; then
    kill -9 $pid
    echo "..."
    sleep 2
    is_exist
    if [ $? -eq 0 ]; then
      echo "${APP_NAME} still in the running. pid=${pid}"
    else
      echo "${APP_NAME} has stopped running."
    fi
  else
    echo "${APP_NAME} is not running"
  fi
}

#输出运行状态
status(){
  is_exist
  if [ $? -eq "0" ]; then
    echo "${APP_NAME} is running. Pid is ${pid}"
  else
    echo "${APP_NAME} is NOT running."
  fi
}

#重启
restart(){
  stop
  #sleep 5
  start
}

#根据输入参数,选择执行对应方法,不输入则执行使用说明
case "$1" in
  "start")
    start
    ;;
  "stop")
    stop
    ;;
  "status")
    status
    ;;
  "restart")
    restart
    ;;
  *)
    usage
    ;;
esac
2
3
4
5
6
7
8
9
10
11
12
13
14
15
16
17
18
19
20
21
22
23
24
25
26
27
28
29
30
31
32
33
34
35
36
37
38
39
40
41
42
43
44
45
46
47
48
49
50
51
52
53
54
55
56
57
58
59
60
61
62
63
64
65
66
67
68
69
70
71
72
73
74
75
76
77
78
79
80
81
82
83
84
85
86
87
88
89
90
91
92
93
94
95
96
97
98
99
100
101
102
103
# Maven配置文件
<?xml version="1.0" encoding="UTF-8"?>

<!--
Licensed to the Apache Software Foundation (ASF) under one
or more contributor license agreements.  See the NOTICE file
distributed with this work for additional information
regarding copyright ownership.  The ASF licenses this file
to you under the Apache License, Version 2.0 (the
"License"); you may not use this file except in compliance
with the License.  You may obtain a copy of the License at

    http://www.apache.org/licenses/LICENSE-2.0

Unless required by applicable law or agreed to in writing,
software distributed under the License is distributed on an
"AS IS" BASIS, WITHOUT WARRANTIES OR CONDITIONS OF ANY
KIND, either express or implied.  See the License for the
specific language governing permissions and limitations
under the License.
-->

<!--
 | This is the configuration file for Maven. It can be specified at two levels:
 |
 |  1. User Level. This settings.xml file provides configuration for a single user,
 |                 and is normally provided in ${user.home}/.m2/settings.xml.
 |
 |                 NOTE: This location can be overridden with the CLI option:
 |
 |                 -s /path/to/user/settings.xml
 |
 |  2. Global Level. This settings.xml file provides configuration for all Maven
 |                 users on a machine (assuming they're all using the same Maven
 |                 installation). It's normally provided in
 |                 ${maven.conf}/settings.xml.
 |
 |                 NOTE: This location can be overridden with the CLI option:
 |
 |                 -gs /path/to/global/settings.xml
 |
 | The sections in this sample file are intended to give you a running start at
 | getting the most out of your Maven installation. Where appropriate, the default
 | values (values used when the setting is not specified) are provided.
 |
 |-->
<settings xmlns="http://maven.apache.org/SETTINGS/1.0.0"
          xmlns:xsi="http://www.w3.org/2001/XMLSchema-instance"
          xsi:schemaLocation="http://maven.apache.org/SETTINGS/1.0.0 http://maven.apache.org/xsd/settings-1.0.0.xsd">
  <!-- localRepository
   | The path to the local repository maven will use to store artifacts.
   |
   | Default: ${user.home}/.m2/repository
  <localRepository>/path/to/local/repo</localRepository>
  -->

    <!--这里配置仓库-->
  <localRepository>/usr/local/repository</localRepository>


  <!-- interactiveMode
   | This will determine whether maven prompts you when it needs input. If set to false,
   | maven will use a sensible default value, perhaps based on some other setting, for
   | the parameter in question.
   |
   | Default: true
  <interactiveMode>true</interactiveMode>
  -->

  <!-- offline
   | Determines whether maven should attempt to connect to the network when executing a build.
   | This will have an effect on artifact downloads, artifact deployment, and others.
   |
   | Default: false
  <offline>false</offline>
  -->

  <!-- pluginGroups
   | This is a list of additional group identifiers that will be searched when resolving plugins by their prefix, i.e.
   | when invoking a command line like "mvn prefix:goal". Maven will automatically add the group identifiers
   | "org.apache.maven.plugins" and "org.codehaus.mojo" if these are not already contained in the list.
   |-->
  <pluginGroups>
    <!-- pluginGroup
     | Specifies a further group identifier to use for plugin lookup.
    <pluginGroup>com.your.plugins</pluginGroup>
    -->
  </pluginGroups>

  <!-- proxies
   | This is a list of proxies which can be used on this machine to connect to the network.
   | Unless otherwise specified (by system property or command-line switch), the first proxy
   | specification in this list marked as active will be used.
   |-->
  <proxies>
    <!-- proxy
     | Specification for one proxy, to be used in connecting to the network.
     |
    <proxy>
      <id>optional</id>
      <active>true</active>
      <protocol>http</protocol>
      <username>proxyuser</username>
      <password>proxypass</password>
      <host>proxy.host.net</host>
      <port>80</port>
      <nonProxyHosts>local.net|some.host.com</nonProxyHosts>
    </proxy>
    -->
  </proxies>

  <!-- servers
   | This is a list of authentication profiles, keyed by the server-id used within the system.
   | Authentication profiles can be used whenever maven must make a connection to a remote server.
   |-->
  <servers>
    <!-- server
     | Specifies the authentication information to use when connecting to a particular server, identified by
     | a unique name within the system (referred to by the 'id' attribute below).
     |
     | NOTE: You should either specify username/password OR privateKey/passphrase, since these pairings are
     |       used together.
     |
    <server>
      <id>deploymentRepo</id>
      <username>repouser</username>
      <password>repopwd</password>
    </server>
    -->

    <!-- Another sample, using keys to authenticate.
    <server>
      <id>siteServer</id>
      <privateKey>/path/to/private/key</privateKey>
      <passphrase>optional; leave empty if not used.</passphrase>
    </server>
    -->
  </servers>

  <!-- mirrors
   | This is a list of mirrors to be used in downloading artifacts from remote repositories.
   |
   | It works like this: a POM may declare a repository to use in resolving certain artifacts.
   | However, this repository may have problems with heavy traffic at times, so people have mirrored
   | it to several places.
   |
   | That repository definition will have a unique id, so we can create a mirror reference for that
   | repository, to be used as an alternate download site. The mirror site will be the preferred
   | server for that repository.
   |-->
  <mirrors>
    <!-- mirror
     | Specifies a repository mirror site to use instead of a given repository. The repository that
     | this mirror serves has an ID that matches the mirrorOf element of this mirror. IDs are used
     | for inheritance and direct lookup purposes, and must be unique across the set of mirrors.
     |
    <mirror>
      <id>mirrorId</id>
      <mirrorOf>repositoryId</mirrorOf>
      <name>Human Readable Name for this Mirror.</name>
      <url>http://my.repository.com/repo/path</url>
    </mirror>
     -->
     <!--这里配置拉取的镜像-->
	<mirror>
    <id>alimaven</id>
    <mirrorOf>central</mirrorOf>
    <name>aliyun maven</name>
    <url>http://maven.aliyun.com/nexus/content/repositories/central/</url>
  </mirror>

        <!-- 中央仓库1 -->
        <mirror>
            <id>repo1</id>
            <mirrorOf>central</mirrorOf>
            <name>Human Readable Name for this Mirror.</name>
            <url>http://repo1.maven.org/maven2/</url>
        </mirror>

        <!-- 中央仓库2 -->
        <mirror>
            <id>repo2</id>
            <mirrorOf>central</mirrorOf>
            <name>Human Readable Name for this Mirror.</name>
            <url>http://repo2.maven.org/maven2/</url>
        </mirror>

 		 <mirror>
            <id>repo3</id>
            <mirrorOf>central</mirrorOf>
            <name>Human Readable Name for this Mirror.</name>
            <url>http://maven.apache.org/</url>
        </mirror>

  </mirrors>

  <!-- profiles
   | This is a list of profiles which can be activated in a variety of ways, and which can modify
   | the build process. Profiles provided in the settings.xml are intended to provide local machine-
   | specific paths and repository locations which allow the build to work in the local environment.
   |
   | For example, if you have an integration testing plugin - like cactus - that needs to know where
   | your Tomcat instance is installed, you can provide a variable here such that the variable is
   | dereferenced during the build process to configure the cactus plugin.
   |
   | As noted above, profiles can be activated in a variety of ways. One way - the activeProfiles
   | section of this document (settings.xml) - will be discussed later. Another way essentially
   | relies on the detection of a system property, either matching a particular value for the property,
   | or merely testing its existence. Profiles can also be activated by JDK version prefix, where a
   | value of '1.4' might activate a profile when the build is executed on a JDK version of '1.4.2_07'.
   | Finally, the list of active profiles can be specified directly from the command line.
   |
   | NOTE: For profiles defined in the settings.xml, you are restricted to specifying only artifact
   |       repositories, plugin repositories, and free-form properties to be used as configuration
   |       variables for plugins in the POM.
   |
   |-->
  <profiles>
    <!-- profile
     | Specifies a set of introductions to the build process, to be activated using one or more of the
     | mechanisms described above. For inheritance purposes, and to activate profiles via <activatedProfiles/>
     | or the command line, profiles have to have an ID that is unique.
     |
     | An encouraged best practice for profile identification is to use a consistent naming convention
     | for profiles, such as 'env-dev', 'env-test', 'env-production', 'user-jdcasey', 'user-brett', etc.
     | This will make it more intuitive to understand what the set of introduced profiles is attempting
     | to accomplish, particularly when you only have a list of profile id's for debug.
     |
     | This profile example uses the JDK version to trigger activation, and provides a JDK-specific repo.
    <profile>
      <id>jdk-1.4</id>

      <activation>
        <jdk>1.4</jdk>
      </activation>

      <repositories>
        <repository>
          <id>jdk14</id>
          <name>Repository for JDK 1.4 builds</name>
          <url>http://www.myhost.com/maven/jdk14</url>
          <layout>default</layout>
          <snapshotPolicy>always</snapshotPolicy>
        </repository>
      </repositories>
    </profile>
    -->

<profile>
    <id>jdk-1.8</id>
     <activation>
          <activeByDefault>true</activeByDefault>
          <jdk>1.8</jdk>
      </activation>
	<properties>
		<maven.compiler.source>1.8</maven.compiler.source>
		<maven.compiler.target>1.8</maven.compiler.target>
		<maven.compiler.compilerVersion>1.8</maven.compiler.compilerVersion>
	</properties>
</profile>

    <!--
     | Here is another profile, activated by the system property 'target-env' with a value of 'dev',
     | which provides a specific path to the Tomcat instance. To use this, your plugin configuration
     | might hypothetically look like:
     |
     | ...
     | <plugin>
     |   <groupId>org.myco.myplugins</groupId>
     |   <artifactId>myplugin</artifactId>
     |
     |   <configuration>
     |     <tomcatLocation>${tomcatPath}</tomcatLocation>
     |   </configuration>
     | </plugin>
     | ...
     |
     | NOTE: If you just wanted to inject this configuration whenever someone set 'target-env' to
     |       anything, you could just leave off the <value/> inside the activation-property.
     |
    <profile>
      <id>env-dev</id>

      <activation>
        <property>
          <name>target-env</name>
          <value>dev</value>
        </property>
      </activation>

      <properties>
        <tomcatPath>/path/to/tomcat/instance</tomcatPath>
      </properties>
    </profile>
    -->
  </profiles>

  <!-- activeProfiles
   | List of profiles that are active for all builds.
   |
  <activeProfiles>
    <activeProfile>alwaysActiveProfile</activeProfile>
    <activeProfile>anotherAlwaysActiveProfile</activeProfile>
  </activeProfiles>
  -->
</settings>
2
3
4
5
6
7
8
9
10
11
12
13
14
15
16
17
18
19
20
21
22
23
24
25
26
27
28
29
30
31
32
33
34
35
36
37
38
39
40
41
42
43
44
45
46
47
48
49
50
51
52
53
54
55
56
57
58
59
60
61
62
63
64
65
66
67
68
69
70
71
72
73
74
75
76
77
78
79
80
81
82
83
84
85
86
87
88
89
90
91
92
93
94
95
96
97
98
99
100
101
102
103
104
105
106
107
108
109
110
111
112
113
114
115
116
117
118
119
120
121
122
123
124
125
126
127
128
129
130
131
132
133
134
135
136
137
138
139
140
141
142
143
144
145
146
147
148
149
150
151
152
153
154
155
156
157
158
159
160
161
162
163
164
165
166
167
168
169
170
171
172
173
174
175
176
177
178
179
180
181
182
183
184
185
186
187
188
189
190
191
192
193
194
195
196
197
198
199
200
201
202
203
204
205
206
207
208
209
210
211
212
213
214
215
216
217
218
219
220
221
222
223
224
225
226
227
228
229
230
231
232
233
234
235
236
237
238
239
240
241
242
243
244
245
246
247
248
249
250
251
252
253
254
255
256
257
258
259
260
261
262
263
264
265
266
267
268
269
270
271
272
273
274
275
276
277
278
279
280
281
282
283
284
285
286
287
288
289
290
291
292
293
294
295
296
297
298
299
300
301
302
303
304
305
306