K8S-Node
[TOC]
# 1. 容器技术概述
# 1.1 容器技术基础
# Lab1. 创建虚拟机
https://www.vmware.com/cn.html
# Lab2. 安装 ubuntu
https://mirror.nju.edu.cn/ubuntu-releases/22.04/ubuntu-22.04.1-live-server-amd64.iso
https://k8s.ruitong.cn:8080/?dir=K8s
# Lab3. 安装 docker
| 参考URL | 说明 | ||
|---|---|---|---|
| 1 | https://docs.docker.com/engine/install/ubuntu/ | 国外 | |
| 2 | https://developer.aliyun.com/mirror/docker-ce?spm=a2c6h.13651102.0.0.3e221b11NzQkC4 | 国内 | |
| 3 | https://cr.console.aliyun.com/cn-hangzhou/instances/mirrors | 镜像仓库加速 | 先注册一个帐号,并登陆 |
| https://mirror.nju.edu.cn/help/docker-ce | README |
step 1: 安装必要的一些系统工具
$ sudo apt-get update
$ sudo apt-get -y install apt-transport-https ca-certificates curl software-properties-common

step 2: 安装GPG证书
$ curl -fsSL https://mirrors.aliyun.com/docker-ce/linux/ubuntu/gpg | sudo apt-key add -

Step 3: 写入软件源信息
$ sudo add-apt-repository "deb [arch=amd64] https://mirror.nju.edu.cn/docker-ce/linux/ubuntu $(lsb_release -cs) stable"
...
Press [ENTER] to continue or Ctrl-c to cancel. <Enter>

Step 4.1: 更新
$ sudo apt-get -y update

查找Docker-CE的版本
$ apt-cache madison docker-ce

Step 4.2: 安装Docker-CE
$ sudo apt-get -y install docker-ce
2
3
4
5
6
7
8
9
10
11
12
13
14
15
16
17
18
19
20
配置镜像加速器

创建文件夹
$ sudo mkdir -p /etc/docker

创建文件
$ sudo tee /etc/docker/daemon.json <<-'EOF'
{
   "registry-mirrors": ["https://docker.nju.edu.cn"]
}
EOF

重新载入
$ sudo systemctl daemon-reload

重启服务
$ sudo systemctl restart docker

验证服务状态
$ systemctl status docker

验证镜像加速服务器
$ sudo docker info | grep -iA 1 registry.*mirror
 Registry Mirrors:
  https://docker.nju.edu.cn/
2
3
4
5
6
7
8
9
10
11
12
13
14
15
16
17
18
19
20
21
22
23
24
25
# 1.2 容器基础操作
# Lab4. 运行一个容器
docker run, images, ps
切换身份
# sudo -i

运行一个容器,会自动拉取镜像
# docker run -p 8080:80 -d httpd
Unable to find image 'httpd:latest' locally
latest: Pulling from library/httpd
a2abf6c4d29d: Pull complete
dcc4698797c8: Pull complete
41c22baa66ec: Pull complete
67283bbdd4a0: Pull complete
d982c879c57e: Pull complete
Digest: sha256:0954cc1af252d824860b2c5dc0a10720af2b7a3d3435581ca788dff8480c7b32
Status: Downloaded newer image for httpd:latest
9ccfdb9313de4b7743f3f49cd7f99e8ae2fbaaa77d826af630bf12c449febdcd

查看本地镜像
# docker images
REPOSITORY   TAG       IMAGE ID       CREATED        SIZE
`httpd`        latest    dabbfbe0c57b   2 months ago   144MB

查看正在运行的容器(容器就是一个进程)
# docker ps
CONTAINER ID   IMAGE     COMMAND              CREATED         STATUS         PORTS                  NAMES
9ccfdb9313de   httpd     "httpd-foreground"   2 minutes ago   `Up` 2 minutes   0.0.0.0:8080->80/tcp   `dazzling_bohr`

验证容器可以使用端口8080访问
# curl localhost:8080
<html><body><h1>It works!</h1></body></html>
2
3
4
5
6
7
8
9
10
11
12
13
14
15
16
17
18
19
20
21
22
23
24
25
26
27
28
29
# Lab5. 容器生命周期管理
docker start, stop
停止容器
# docker stop dazzling_bohr
dazzling_bohr

查看正在运行的容器
# docker ps
CONTAINER ID   IMAGE     COMMAND   CREATED   STATUS    PORTS     NAMES

查看所有的容器(包括已停止)
# docker ps -a
CONTAINER ID   IMAGE     COMMAND              CREATED          STATUS                          PORTS     NAMES
9ccfdb9313de   httpd     "httpd-foreground"   10 minutes ago   `Exited` (0) About a minute ago             dazzling_bohr

启动容器
# docker start dazzling_bohr
dazzling_bohr

查看正在运行的容器
# docker ps
CONTAINER ID   IMAGE     COMMAND              CREATED          STATUS         PORTS                  NAMES
9ccfdb9313de   httpd     "httpd-foreground"   12 minutes ago   `Up` 4 seconds   0.0.0.0:8080->80/tcp   dazzling_bohr
2
3
4
5
6
7
8
9
10
11
12
13
14
15
16
17
18
19
20
21
# Lab6. 进入容器的方法1
docker attach
A场景,容器运行后直接退出。容器当中没有服务或正在运行的程序
# docker run -d centos
# docker ps

B场景,容器一直运行不会退。快捷键不可用
# docker run --name a1 -d centos \
  /bin/bash -c "while true; do sleep 1; echo haha; done"
# docker ps

# docker attach a1
<Ctrl-C>						不可用
<Ctrl-p><Ctrl-q>		不可用
只能关闭当前终端或结束当前进程

*C场景,-it interactive交互模式,tty终端。可使用快捷键
# docker run --name a2 -it -d centos \
	/bin/bash -c "while true; do sleep 1; echo haha; done"
# docker ps
# docker attach a2
<Ctrl-p><Ctrl-q>		可用。可正常退出容器
2
3
4
5
6
7
8
9
10
11
12
13
14
15
16
17
18
19
20
# Lab7.进入容器的方法2
docker exec
# docker ps
CONTAINER ID   IMAGE     COMMAND                  CREATED          STATUS          PORTS     NAMES
903e1389d91d   centos    "/bin/bash -c 'while…"   12 minutes ago   Up 12 minutes             confident_rhodes
`5783569707c0`   centos    "/bin/bash -c 'while…"   14 minutes ago   Up 14 minutes             funny_napier

# docker exec -it <Tab><Tab>
confident_rhodes  funny_napier

进入容器
# docker exec -it funny_napier /bin/bash
[root@5783569707c0 /]# ls
bin  etc   lib	  lost+found  mnt  proc  run   srv  tmp  var
dev  home  lib64  media       opt  root  sbin  sys  usr
[root@5783569707c0 /]# pwd
/
[root@5783569707c0 /]# cat /etc/redhat-release
CentOS Linux release 8.4.2105
[root@5783569707c0 /]# exit

#
2
3
4
5
6
7
8
9
10
11
12
13
14
15
16
17
18
19
20
# 2. 容器镜像
# 2.1 容器镜像结构
# Lab8. 理解镜像结构
查看本地镜像
# docker images

从镜像仓库拉取镜像 ubuntu
# docker pull ubuntu
# docker images

查看镜像相关信息
# docker image inspect ubuntu:latest

使用镜像运行容器
# docker run -itd ubuntu
# docker ps

查看容器根目录
# docker exec -it pensive_mcnulty ls /
查看本地根目录
# ls /
2
3
4
5
6
7
8
9
10
11
12
13
14
15
16
17
18
# 2.2 构建容器镜像
# Lab9. docker-commit 命令
运行一个容器。`--privileged`和`/sbin/init`,他们两个的作用是为了给`systemctl`使用
# docker run --name test1 -itd --privileged centos /sbin/init
b8216e5e3f5a4e4f5ab778d4b2b4dde3b99866d983ad94c0d43454ffd99be9b3
容器状态
# docker ps
CONTAINER ID   IMAGE     COMMAND                  CREATED          STATUS          PORTS     NAMES
591952204f83   centos    "/sbin/init"             8 seconds ago    Up 7 seconds              test1

进入你的容器
# docker exec -it test1 /bin/bash
安装软件,没成功
[root@b8216e5e3f5a /]# yum -y install httpd
Failed to set locale, defaulting to C.UTF-8
CentOS Linux 8 - AppStream                    39  B/s |  38  B     00:00
Error: Failed to download metadata for repo 'appstream': Cannot prepare internal mirrorlist: No URLs in mirrorlist

删除已有软件仓库
参考:https://developer.aliyun.com/mirror/centos?spm=a2c6h.13651102.0.0.3e221b119puefY
[root@b8216e5e3f5a /]# rm /etc/yum.repos.d/*.repo -f

确认容器中存在哪个命令
[root@b8216e5e3f5a /]# wget
bash: wget: command not found
[root@b8216e5e3f5a /]# whereis curl
curl: `/usr/bin/curl`


[root@b8216e5e3f5a /]# curl -s \
	https://mirrors.aliyun.com/repo/Centos-vault-8.5.2111.repo \
	-o /etc/yum.repos.d/CentOS-Base.repo

确认仓库
[root@b8216e5e3f5a /]# yum repolist
Failed to set locale, defaulting to C.UTF-8
repo id            repo name
AppStream          CentOS-8.5.2111 - AppStream - mirrors.aliyun.com
base               CentOS-8.5.2111 - Base - mirrors.aliyun.com
extras             CentOS-8.5.2111 - Extras - mirrors.aliyun.com

安装软件
[root@b8216e5e3f5a /]# yum -y install httpd
...输出省略...
Complete!

生成索引页
[root@b8216e5e3f5a /]# echo haha > /var/www/html/index.html

设置服务开机自启,立即启动
[root@b8216e5e3f5a /]# systemctl enable --now httpd
Created symlink /etc/systemd/system/multi-user.target.wants/httpd.service → /usr/lib/systemd/system/httpd.service.

测试web站点
[root@b8216e5e3f5a /]# curl localhost
haha

退出容器
[root@b8216e5e3f5a /]# exit

# docker ps
CONTAINER ID   IMAGE     COMMAND        CREATED         STATUS         PORTS     NAMES
b8216e5e3f5a   centos    "/sbin/init"   6 minutes ago   Up 6 minutes             `test1`
# docker images
REPOSITORY   TAG       IMAGE ID       CREATED        SIZE
httpd        latest    dabbfbe0c57b   2 months ago   144MB
ubuntu       latest    ba6acccedd29   4 months ago   72.8MB
centos       latest    5d0da3dc9764   5 months ago   231MB

将当前运行的容器,保存为新镜像
*# docker commit test1 test1
sha256:f46b9612f5beb0a4233ded79399204057f0f54ac44577d74920dc38a794b998d

# docker images
REPOSITORY   TAG       IMAGE ID       CREATED          SIZE
`test1`      latest    f46b9612f5be   41 seconds ago   280MB
httpd        latest    dabbfbe0c57b   2 months ago     144MB
ubuntu       latest    ba6acccedd29   4 months ago     72.8MB
centos       latest    5d0da3dc9764   5 months ago     231MB

使用镜像test1,创建新的容器
# docker run --name test2 -itd --privileged test1 /sbin/init
5b05167447e2743030f528e0d2dfb16cfc7d0b792a49651b583faf5e69c59561

# docker exec -it test2 /bin/bash
[root@5b05167447e2 /]# rpm -q httpd
httpd-2.4.37-43.module_el8.5.0+1022+b541f3b1.x86_64
[root@5b05167447e2 /]# cat /var/www/html/index.html
haha
[root@5b05167447e2 /]# systemctl status httpd
● httpd.service - The Apache HTTP Server
   Loaded: loaded (/usr/lib/systemd/system/httpd.service; enabled; vendor pr>
   Active: `active (running)` ...输出省略...
[root@5b05167447e2 /]# curl localhost
haha
[root@5b05167447e2 /]# exit

# docker history test1
IMAGE          CREATED          CREATED BY                                      SIZE      COMMENT
`f46b9612f5be   12 minutes ago   /sbin/init                                      48.5MB`
5d0da3dc9764   5 months ago     /bin/sh -c #(nop)  CMD ["/bin/bash"]            0B
<missing>      5 months ago     /bin/sh -c #(nop)  LABEL org.label-schema.sc…   0B
<missing>      5 months ago     /bin/sh -c #(nop) ADD file:805cb5e15fb6e0bb0…   231MB

# docker history centos
IMAGE          CREATED        CREATED BY                                      SIZE      COMMENT
5d0da3dc9764   5 months ago   /bin/sh -c #(nop)  CMD ["/bin/bash"]            0B
<missing>      5 months ago   /bin/sh -c #(nop)  LABEL org.label-schema.sc…   0B
<missing>      5 months ago   /bin/sh -c #(nop) ADD file:805cb5e15fb6e0bb0…   231MB
2
3
4
5
6
7
8
9
10
11
12
13
14
15
16
17
18
19
20
21
22
23
24
25
26
27
28
29
30
31
32
33
34
35
36
37
38
39
40
41
42
43
44
45
46
47
48
49
50
51
52
53
54
55
56
57
58
59
60
61
62
63
64
65
66
67
68
69
70
71
72
73
74
75
76
77
78
79
80
81
82
83
84
85
86
87
88
89
90
91
92
93
94
95
96
97
98
99
100
101
102
103
104
105
106
107
# Lab10. dockfile 示例
$ sudo -i

创建文件夹
# mkdir df

切换目录
# cd df
查看当前工作目录
# pwd

生成文件 index.html
# echo haha > index.html
# ls

*# vim dockerfile
2
3
4
5
6
7
8
9
10
11
12
13
14
15
FROM httpd
COPY index.html /
RUN echo haha
2
3
通过 dockerfile 文件,建立 image
*# docker build -t test2 .
Sending build context to Docker daemon  3.072kB
Step 1/3 : FROM httpd
 ---> a8ea074f4566
Step 2/3 : COPY index.html /
 ---> Using cache
 ---> e7056f1a4768
Step 3/3 : RUN echo haha
 ---> Running in bc67e25c5eb1
haha
Removing intermediate container bc67e25c5eb1
 ---> 55bba83d97fb
Successfully built 55bba83d97fb
Successfully tagged test2:latest

确认
# docker images
REPOSITORY   TAG       IMAGE ID       CREATED         SIZE
test2        latest    86965f4efffe   3 minutes ago   144MB
httpd        latest    dabbfbe0c57b   2 months ago    144MB
...输出省略...
2
3
4
5
6
7
8
9
10
11
12
13
14
15
16
17
18
19
20
21
22
# Lab11. dockfile 缓存特性
# vim dockerfile
FROM httpd
COPY index.html /
RUN echo haha
MAINTAINER adder99@163.com
2
3
4
注意输出,层存在有缓存
# docker build -t test3 .
Sending build context to Docker daemon  3.072kB
Step 1/4 : FROM httpd
 ---> a8ea074f4566
Step 2/4 : COPY index.html /
 ---> `Using cache`
 ---> e7056f1a4768
Step 3/4 : RUN echo haha
 ---> `Using cache`
 ---> 55bba83d97fb
Step 4/4 : MAINTAINER alex@163.com
 ---> Running in f1b964adca56
Removing intermediate container f1b964adca56
 ---> f89944ec89c8
Successfully built f89944ec89c8
Successfully tagged test3:latest
2
3
4
5
6
7
8
9
10
11
12
13
14
15
16
17
更改指令顺序
# vim dockerfile
2
FROM httpd
MAINTAINER adder99@163.com
COPY index.html /
RUN echo haha
2
3
4
注意输出,层变了没有缓存
# docker build -t test3 .
Sending build context to Docker daemon  3.072kB
Step 1/4 : FROM httpd
 ---> a8ea074f4566
Step 2/4 : MAINTAINER alex@163.com
 ---> Running in 19dbfc6564bb
Removing intermediate container 19dbfc6564bb
 ---> f09bc419e24b
Step 3/4 : COPY index.html /
 ---> 814027f1d794
Step 4/4 : RUN echo haha
 ---> Running in 50c44db04f7e
haha
Removing intermediate container 50c44db04f7e
 ---> 7bffb633acc0
Successfully built 7bffb633acc0
Successfully tagged test3:latest
2
3
4
5
6
7
8
9
10
11
12
13
14
15
16
17
18
# 🚩 Lab12. docker tag
查看本地镜像
# docker images
REPOSITORY   TAG       IMAGE ID       CREATED        SIZE
`httpd`        latest    dabbfbe0c57b   2 months ago   144MB
...输出省略...

查看镜像信息
# docker image inspect httpd | grep -i version
                "HTTPD_VERSION=2.4.52",
        "DockerVersion": "20.10.7",
                "HTTPD_VERSION=2.4.52",

给镜像打个新标签
# docker tag httpd httpd:v8.6

确认。ID相同,TAG不同,SIZE大小相同。它就是一个镜像
# docker images
REPOSITORY    TAG        IMAGE ID         CREATED        SIZE
httpd        `latest`    `dabbfbe0c57b`   2 months ago   144MB
httpd        `v8.6`      `dabbfbe0c57b`   2 months ago   144MB
...输出省略...
2
3
4
5
6
7
8
9
10
11
12
13
14
15
16
17
18
19
20
21
# Lab13. 镜像仓库
- 公共镜像仓库
- hub.docker.com (opens new window)
- catalog.redat.com
- quay.io
- gcr.io(谷歌镜像仓库,国内默认无法访问)
- 私有镜像仓库
# 🚩 Lab13a. 搭建私有registry仓库
创建文件夹
# mkdir /root/myregistry

运行容器
*# docker run -d -p 1000:5000 \
  -v /root/myregistry:/var/lib/registry registry
49ff98a0632a3526ba3ffcbab96d259375ac5c5c89a62818414ea0f17dd3d087
# docker ps
CONTAINER ID   IMAGE      COMMAND                  CREATED          STATUS          PORTS                    NAMES
49ff98a0632a   registry   "/entrypoint.sh /etc…"   24 seconds ago   Up 23 seconds   0.0.0.0:1000->5000/tcp   dazzling_euclid

检查容器
# docker inspect dazzling_euclid
...输出省略...
        "HostConfig": {
            "Binds": [
                "/root/myregistry:/var/lib/registry"
            ],
...输出省略...
            "PortBindings": {
                "5000/tcp": [
                    {
                        "HostIp": "",
                        "HostPort": "1000"
                    }
...输出省略...

确认监听端口
# ss -antup | grep 1000
tcp   LISTEN 0       4096                        *:1000                 *:*      users:(("docker-proxy",pid=4124,fd=4))

查看本地镜像
# docker images
REPOSITORY   TAG       IMAGE ID       CREATED        SIZE
httpd        v8.6      dabbfbe0c57b   2 months ago   144MB
...输出省略...

更改标签
# docker tag httpd:v8.6 192.168.73.137:1000/httpd:v8.6

上传到私有仓库,不成功
# docker push 192.168.73.137:1000/httpd:v8.6
The push refers to repository [192.168.73.137:1000/httpd]
Get https://192.168.73.137:1000/v2/: http: server gave HTTP response to HTTPS client

上一条命令的返回值是非0,都是不成功
# echo $?
1

添加"insecure-registries",注意第2行结尾的逗号
*# vim /etc/docker/daemon.json
2
3
4
5
6
7
8
9
10
11
12
13
14
15
16
17
18
19
20
21
22
23
24
25
26
27
28
29
30
31
32
33
34
35
36
37
38
39
40
41
42
43
44
45
46
47
48
49
50
51
{
  "registry-mirrors": ["https://ktjk1d0g.mirror.aliyuncs.com"],
  "insecure-registries": ["192.168.73.137:1000",""]
}
2
3
4
# systemctl daemon-reload
# systemctl restart docker

服务重启后,容器默认不会启动
# docker ps
CONTAINER ID   IMAGE     COMMAND   CREATED   STATUS    PORTS     NAMES

查找容器名称
# docker ps -a
CONTAINER ID   IMAGE      COMMAND                  CREATED         STATUS                      PORTS     NAMES
49ff98a0632a   registry   "/entrypoint.sh /etc…"   6 minutes ago   Exited (2) 19 seconds ago             dazzling_euclid

启动容器
# docker start dazzling_euclid
dazzling_euclid

确定端口存在,即容器启动成功
# ss -antup | grep 1000
tcp   LISTEN 0       4096                        *:1000                 *:*      users:(("docker-proxy",pid=4613,fd=4))

再次推送镜像到私有镜像仓库,成功
*# docker push 192.168.73.137:1000/httpd:v8.6
The push refers to repository [192.168.73.137:1000/httpd]
deefaa620a71: Pushed
9cff3206f9a6: Pushed
15e4bf5d0804: Pushed
1da636a1aa95: Pushed
2edcec3590a4: Pushed
v8.6: digest: sha256:57c1e4ff150e2782a25c8cebb80b574f81f06b74944caf972f27e21b76074194 size: 1365

确认镜像目录分层
# ls -R /root/myregistry/

客户端
# curl 192.168.73.137:1000/_catalog
# docker-registry-cli
2
3
4
5
6
7
8
9
10
11
12
13
14
15
16
17
18
19
20
21
22
23
24
25
26
27
28
29
30
31
32
33
34
35
36
PS: https://k8s.ruitong.cn:8443/?dir=k8s/docker-registry-cli
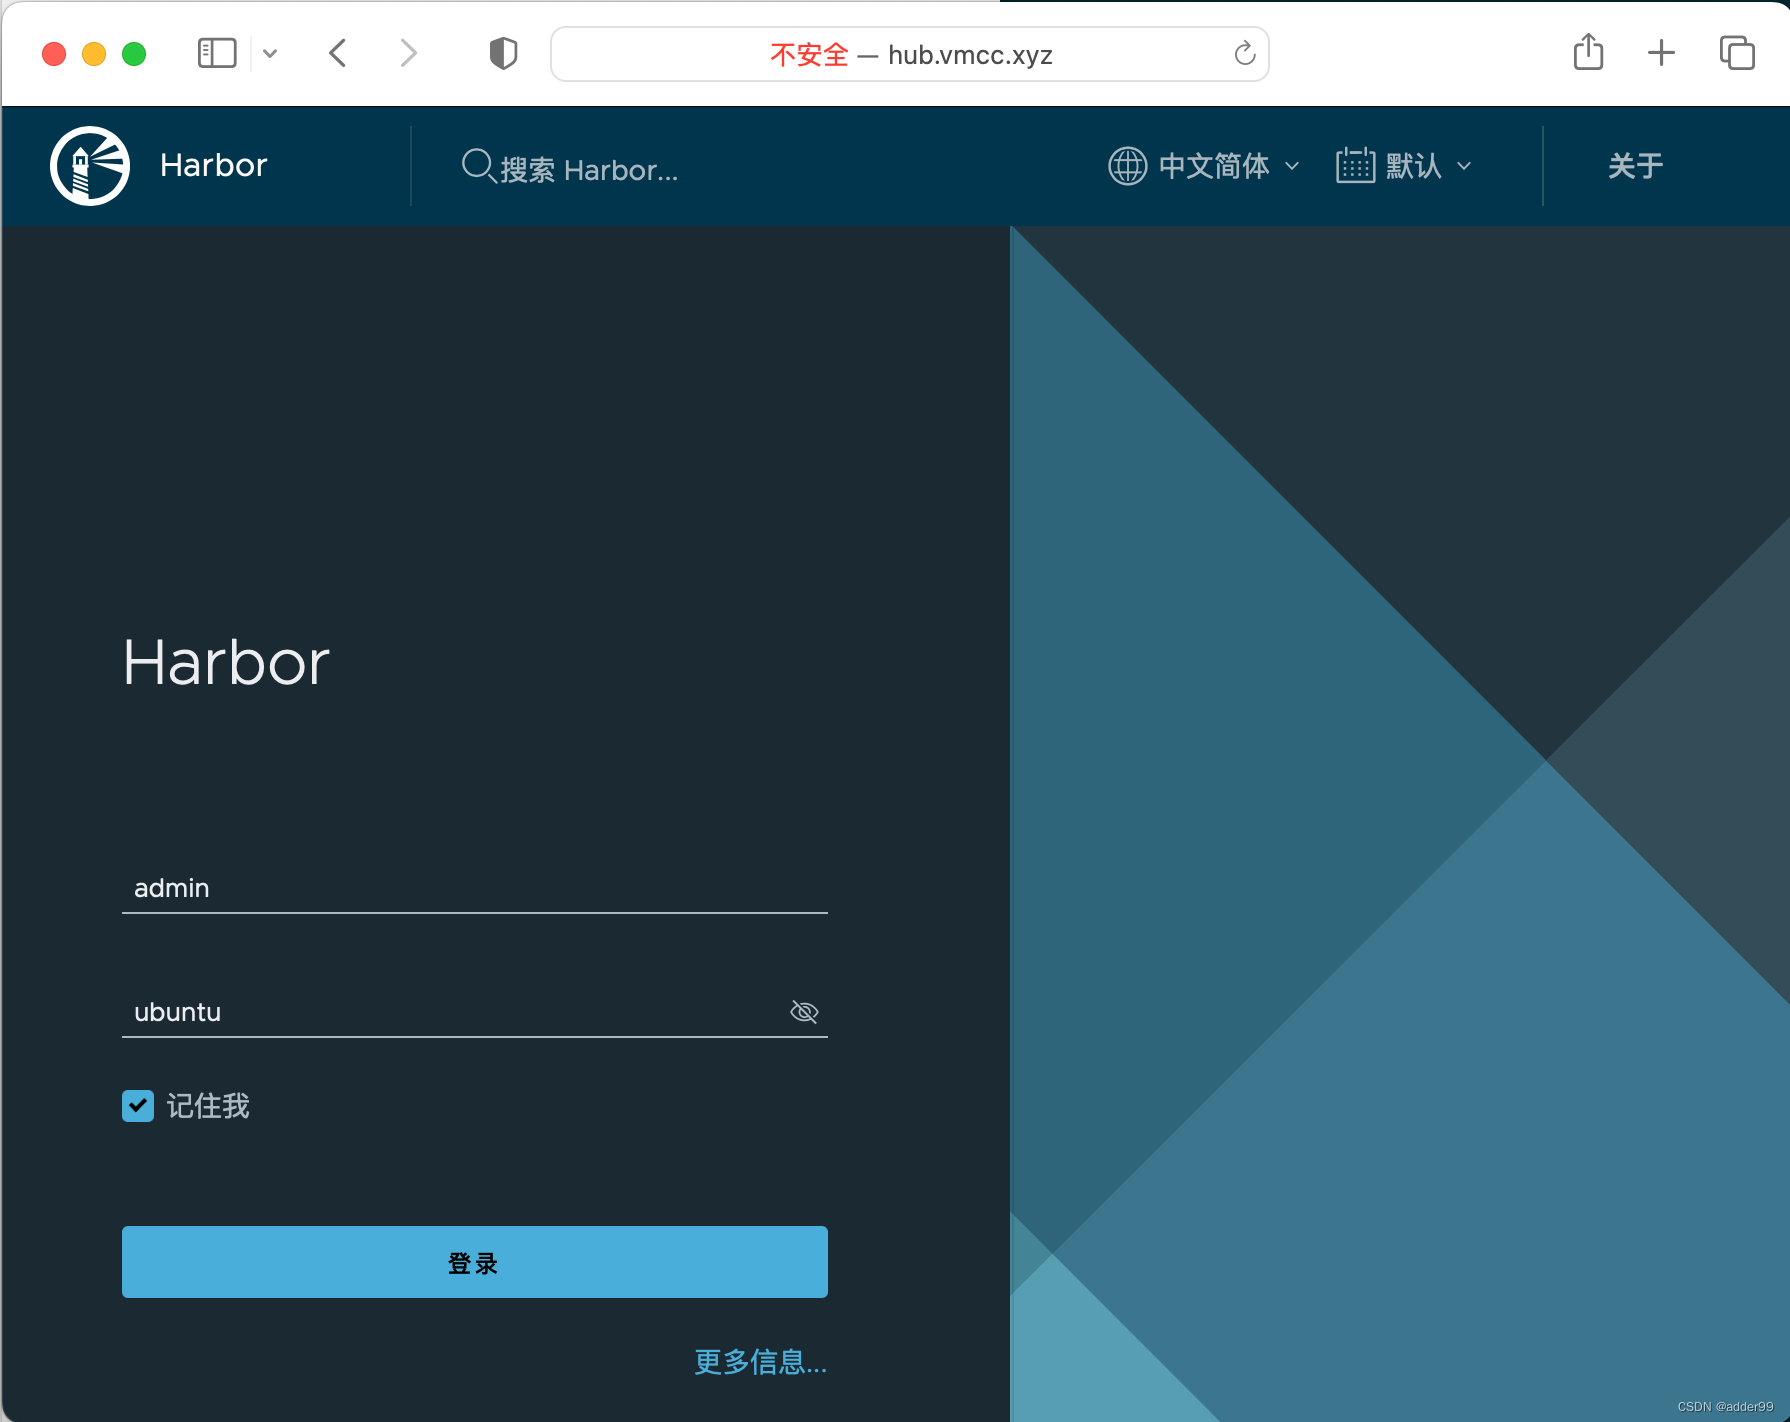
# 🚩 Lab13b. 搭建私有registry仓库-harbor
https://goharbor.io/
Make sure that your target host meets the Harbor Installation Prerequisites (opens new window).
安裝相應軟件
$ sudo apt -y install docker-compose
1
2Download the Harbor Installer (opens new window)
$ curl -# https://k8s.ruitong.cn:8443/K8s/harbor-offline-installer-v2.6.0.tgz \
  -o harbor-offline-installer-v2.6.0.tgz

$ tar -xf harbor-offline-installer-v2.6.0.tgz

$ cd harbor
1
2
3
4
5
6Configure the Harbor YML File (opens new window)
$ cp harbor.yml.tmpl harbor.yml
$ vim harbor.yml
1
2...省略... hostname: hub.vmcc.xyz #https: # # https port for harbor, default is 443 # port: 443 # # The path of cert and key files for nginx # certificate: /your/certificate/path # private_key: /your/private/key/path harbor_admin_password: ubuntu ...省略...1
2
3
4
5
6
7
8
9
10
11
12Run the Installer Script (opens new window)
$ sudo ./install.sh
:<<EOF
`[Step 0]: checking if docker is installed ...`

Note: docker version: 20.10.17

`[Step 1]: checking docker-compose is installed ...`

Note: docker-compose version: 1.29.2

`[Step 2]: loading Harbor images ...`
943e52e64a9c: Loading layer  37.55MB/37.55MB
ec4474eb929a: Loading layer  126.3MB/126.3MB
76a16ac76196: Loading layer  3.584kB/3.584kB
c9a227aab4d3: Loading layer  3.072kB/3.072kB
fed2fe52a194: Loading layer   2.56kB/2.56kB
f2e03a3cec12: Loading layer  3.072kB/3.072kB
8dcae4944d97: Loading layer  3.584kB/3.584kB
f65f790b33e6: Loading layer  20.99kB/20.99kB
Loaded image: goharbor/harbor-log:v2.5.1
04a4fa4755bc: Loading layer  8.682MB/8.682MB
93df81c08563: Loading layer  3.584kB/3.584kB
6746249771e3: Loading layer   2.56kB/2.56kB
39713d62ba42: Loading layer  90.78MB/90.78MB
2c6097e3483e: Loading layer  91.57MB/91.57MB
Loaded image: goharbor/harbor-jobservice:v2.5.1
28faf190784e: Loading layer  119.1MB/119.1MB
4bf648d216c7: Loading layer  3.072kB/3.072kB
8328b2227bc7: Loading layer   59.9kB/59.9kB
b2c84581a687: Loading layer  61.95kB/61.95kB
Loaded image: goharbor/redis-photon:v2.5.1
fcd508c17344: Loading layer  5.535MB/5.535MB
071bc493297d: Loading layer  90.86MB/90.86MB
7d6557033913: Loading layer  3.072kB/3.072kB
363d9d8e3c89: Loading layer  4.096kB/4.096kB
2491c9fa16fc: Loading layer  91.65MB/91.65MB
Loaded image: goharbor/chartmuseum-photon:v2.5.1
1c66a5c87d19: Loading layer    168MB/168MB
3ff2cb7516ba: Loading layer  68.07MB/68.07MB
c96114332979: Loading layer   2.56kB/2.56kB
f25097c8830a: Loading layer  1.536kB/1.536kB
4ca0e58712f2: Loading layer  12.29kB/12.29kB
3609283e5de7: Loading layer  2.621MB/2.621MB
ca6199c4adca: Loading layer  354.8kB/354.8kB
Loaded image: goharbor/prepare:v2.5.1
92e9424f3797: Loading layer  8.682MB/8.682MB
b1655572ade9: Loading layer  3.584kB/3.584kB
de9547e737b9: Loading layer   2.56kB/2.56kB
9a4ed152c42e: Loading layer  78.72MB/78.72MB
0217eee5e2af: Loading layer  5.632kB/5.632kB
4d557d233f65: Loading layer  99.84kB/99.84kB
05bb453495b9: Loading layer  15.87kB/15.87kB
3afd9c3c47dd: Loading layer  79.63MB/79.63MB
1ec26a76ac56: Loading layer   2.56kB/2.56kB
Loaded image: goharbor/harbor-core:v2.5.1
0e39ba51999a: Loading layer  5.531MB/5.531MB
435625ca67ad: Loading layer  8.543MB/8.543MB
a9c8eef7ea6e: Loading layer  15.88MB/15.88MB
e38648deeb1c: Loading layer  29.29MB/29.29MB
f3d1dca68eb7: Loading layer  22.02kB/22.02kB
fe36d72e7580: Loading layer  15.88MB/15.88MB
Loaded image: goharbor/notary-server-photon:v2.5.1
350aa4470b2f: Loading layer  7.449MB/7.449MB
Loaded image: goharbor/nginx-photon:v2.5.1
e2371f04b17f: Loading layer  5.536MB/5.536MB
83f525652b46: Loading layer  4.096kB/4.096kB
442e7fdfcbd3: Loading layer  3.072kB/3.072kB
4a3bede6780d: Loading layer  17.34MB/17.34MB
77c5aed80a3c: Loading layer  18.13MB/18.13MB
Loaded image: goharbor/registry-photon:v2.5.1
e0447020da6f: Loading layer  1.097MB/1.097MB
ae9e1371d564: Loading layer  5.889MB/5.889MB
efbccdfa4022: Loading layer  168.2MB/168.2MB
fecd4ce6ff1f: Loading layer  16.52MB/16.52MB
e37fd2d49a62: Loading layer  4.096kB/4.096kB
45ad00c4b89f: Loading layer  6.144kB/6.144kB
e11809276aac: Loading layer  3.072kB/3.072kB
627dceaf1a71: Loading layer  2.048kB/2.048kB
72eb4d7dc7c9: Loading layer   2.56kB/2.56kB
9108824fb7d5: Loading layer   2.56kB/2.56kB
8529abcd8574: Loading layer   2.56kB/2.56kB
2ee460d3eeea: Loading layer  8.704kB/8.704kB
Loaded image: goharbor/harbor-db:v2.5.1
abec2ee0ba30: Loading layer  5.536MB/5.536MB
5d044d4aa39f: Loading layer  4.096kB/4.096kB
fd7cb12cb81e: Loading layer  17.34MB/17.34MB
481df09d669e: Loading layer  3.072kB/3.072kB
95f5e25d73c1: Loading layer  29.16MB/29.16MB
8e57207b1fb7: Loading layer  47.29MB/47.29MB
Loaded image: goharbor/harbor-registryctl:v2.5.1
35d3f63a45bf: Loading layer  5.531MB/5.531MB
7d948f67c6f4: Loading layer  8.543MB/8.543MB
0a28b06c1cef: Loading layer  14.47MB/14.47MB
6c78054008db: Loading layer  29.29MB/29.29MB
8fb4eaef7a24: Loading layer  22.02kB/22.02kB
e3f995aaa1a6: Loading layer  14.47MB/14.47MB
Loaded image: goharbor/notary-signer-photon:v2.5.1
87089e743ac5: Loading layer  6.063MB/6.063MB
36c316be5ec8: Loading layer  4.096kB/4.096kB
ce490e4c64fc: Loading layer  3.072kB/3.072kB
07cf9a97147f: Loading layer  47.75MB/47.75MB
e64f08012108: Loading layer  12.62MB/12.62MB
e0e70a0ecd53: Loading layer  61.15MB/61.15MB
Loaded image: goharbor/trivy-adapter-photon:v2.5.1
adb7aaa5bd89: Loading layer  7.449MB/7.449MB
8fcf272e40b2: Loading layer  7.362MB/7.362MB
5264dfd1b912: Loading layer      1MB/1MB
Loaded image: goharbor/harbor-portal:v2.5.1
80506c5946f1: Loading layer  8.682MB/8.682MB
726e23d5e1c3: Loading layer  21.03MB/21.03MB
0f1a09a26afb: Loading layer  4.608kB/4.608kB
37e3398b412c: Loading layer  21.83MB/21.83MB
Loaded image: goharbor/harbor-exporter:v2.5.1


`[Step 3]: preparing environment ...`

`[Step 4]: preparing harbor configs ...`
prepare base dir is set to /root/harbor
WARNING:root:WARNING: HTTP protocol is insecure. Harbor will deprecate http protocol in the future. Please make sure to upgrade to https
Generated configuration file: /config/portal/nginx.conf
Generated configuration file: /config/log/logrotate.conf
Generated configuration file: /config/log/rsyslog_docker.conf
Generated configuration file: /config/nginx/nginx.conf
Generated configuration file: /config/core/env
Generated configuration file: /config/core/app.conf
Generated configuration file: /config/registry/config.yml
Generated configuration file: /config/registryctl/env
Generated configuration file: /config/registryctl/config.yml
Generated configuration file: /config/db/env
Generated configuration file: /config/jobservice/env
Generated configuration file: /config/jobservice/config.yml
Generated and saved secret to file: /data/secret/keys/secretkey
Successfully called func: create_root_cert
Generated configuration file: `/compose_location/docker-compose.yml`
Clean up the input dir

`[Step 5]: starting Harbor ...`
Creating network "harbor_harbor" with the default driver
Creating harbor-log ... done
Creating harbor-db     ... done
Creating redis         ... done
Creating registryctl   ... done
Creating registry      ... done
Creating harbor-portal ... done
Creating harbor-core   ... done
Creating harbor-jobservice ... done
Creating nginx             ... done
✔ ----Harbor has been installed and started `successfully`.----
EOF
1
2
3
4
5
6
7
8
9
10
11
12
13
14
15
16
17
18
19
20
21
22
23
24
25
26
27
28
29
30
31
32
33
34
35
36
37
38
39
40
41
42
43
44
45
46
47
48
49
50
51
52
53
54
55
56
57
58
59
60
61
62
63
64
65
66
67
68
69
70
71
72
73
74
75
76
77
78
79
80
81
82
83
84
85
86
87
88
89
90
91
92
93
94
95
96
97
98
99
100
101
102
103
104
105
106
107
108
109
110
111
112
113
114
115
116
117
118
119
120
121
122
123
124
125
126
127
128
129
130
131
132
133
134
135
136
137
138
139
140
141
142
143
144
145
146
147
148
149
150
物理机-GUI
$ sudo tee -a /etc/hosts <<EOF
192.168.147.128	hub.vmcc.xyz
EOF
2
3
客户端-CLI
$ sudo vim /etc/docker/daemon.json
    {
      "registry-mirrors": ["https://docker.nju.edu.cn/"],
      "insecure-registries": ["192.168.147.128"]
    }

$ sudo systemctl daemon-reload
$ sudo systemctl restart docker

$ sudo docker-compose down
$ sudo docker-compose up -d

$ sudo docker login 192.168.147.128
admin
ubuntu

$ sudo docker tag centos 192.168.147.128/library/centos:latest
$ sudo docker images

$ sudo docker push 192.168.147.128/library/centos
2
3
4
5
6
7
8
9
10
11
12
13
14
15
16
17
18
19
20
# 3. 容器网络
# 3.1 容器网络
列出当前容器网络
# docker network ls
2
| none | host | bridge | |
|---|---|---|---|
| NIC | container / lo | container == physical | container / eth0-net1 container / eth1-net2 |
| IP | 127.0.0.1 | 192.168.73.137/物理机 | 172.18.0.2 172.10.10.3 |
# Lab14. none 网络
查看none网络配置
# docker network inspect none

查手册
# man docker run
/--network	搜索--network
<n>					Next下一个
<N>					Next上一个
<q>					退出手册

指定网络类型,运行容器
# docker run -itd --network none centos
f71cdaf893b0eb88a5010bd3d2acd356f08a33ab855cfd5a25c81acfe0f18374

# docker inspect f7
...输出省略...
            "Networks": {
                "none": {
                    "IPAMConfig": null,
...输出省略...

进入容器,查看网络配置(只有lo)
# docker exec -it f /bin/bash
[root@f71cdaf893b0 /]# ip a
1: `lo`: <LOOPBACK,UP,LOWER_UP> mtu 65536 qdisc noqueue state UNKNOWN group default qlen 1000
    link/loopback 00:00:00:00:00:00 brd 00:00:00:00:00:00
    inet 127.0.0.1/8 scope host lo
       valid_lft forever preferred_lft forever

[root@f71cdaf893b0 /]# <Ctrl-D>
2
3
4
5
6
7
8
9
10
11
12
13
14
15
16
17
18
19
20
21
22
23
24
25
26
27
28
29
30
# Lab15. host 网络
# docker run -itd --network host --name h1 centos
19eca6316c274bf5127145ca6d6ea278e707eaa43c329569c3af01c2ced1971a
# docker run -itd --network host --name h2 centos
627e0a8e8e39490dc1df702fe6503de03ad8752dc6371054fa15d48d0447dd5a

# docker ps
CONTAINER ID   IMAGE     COMMAND       CREATED         STATUS         PORTS     NAMES
627e0a8e8e39   centos    "/bin/bash"   3 seconds ago   Up 3 seconds             h2
19eca6316c27   centos    "/bin/bash"   7 seconds ago   Up 7 seconds             h1
...输出省略...

确认本机网络
# ip a
1: lo: <LOOPBACK,UP,LOWER_UP> mtu 65536 qdisc noqueue state UNKNOWN group default qlen 1000
    link/loopback 00:00:00:00:00:00 brd 00:00:00:00:00:00
    inet 127.0.0.1/8 scope host lo
       valid_lft forever preferred_lft forever
    inet6 ::1/128 scope host
       valid_lft forever preferred_lft forever
2: ens33: <BROADCAST,MULTICAST,UP,LOWER_UP> mtu 1500 qdisc fq_codel state UP group default qlen 1000
    link/ether 00:0c:29:bf:e4:a0 brd ff:ff:ff:ff:ff:ff
    altname enp2s1
    inet 192.168.73.137/24 brd 192.168.73.255 scope global dynamic noprefixroute ens33
       valid_lft 1180sec preferred_lft 1180sec
    inet6 fe80::ecfb:a225:eb42:6279/64 scope link noprefixroute
       valid_lft forever preferred_lft forever
3: docker0: <NO-CARRIER,BROADCAST,MULTICAST,UP> mtu 1500 qdisc noqueue state DOWN group default
    link/ether 02:42:17:05:e2:03 brd ff:ff:ff:ff:ff:ff
    inet 172.17.0.1/16 brd 172.17.255.255 scope global docker0
       valid_lft forever preferred_lft forever

进入容器h1后,查看网络
# docker exec -it h1 /bin/bash
[root@kiosk-virtual-machine /]# ip a
1: lo: <LOOPBACK,UP,LOWER_UP> mtu 65536 qdisc noqueue state UNKNOWN group default qlen 1000
    link/loopback 00:00:00:00:00:00 brd 00:00:00:00:00:00
    inet 127.0.0.1/8 scope host lo
       valid_lft forever preferred_lft forever
    inet6 ::1/128 scope host
       valid_lft forever preferred_lft forever
2: ens33: <BROADCAST,MULTICAST,UP,LOWER_UP> mtu 1500 qdisc fq_codel state UP group default qlen 1000
    link/ether 00:0c:29:bf:e4:a0 brd ff:ff:ff:ff:ff:ff
    altname enp2s1
    inet 192.168.73.137/24 brd 192.168.73.255 scope global dynamic noprefixroute ens33
       valid_lft 1154sec preferred_lft 1154sec
    inet6 fe80::ecfb:a225:eb42:6279/64 scope link noprefixroute
       valid_lft forever preferred_lft forever
3: docker0: <NO-CARRIER,BROADCAST,MULTICAST,UP> mtu 1500 qdisc noqueue state DOWN group default
    link/ether 02:42:17:05:e2:03 brd ff:ff:ff:ff:ff:ff
    inet 172.17.0.1/16 brd 172.17.255.255 scope global docker0
       valid_lft forever preferred_lft forever
[root@kiosk-virtual-machine /]# exit

进入容器h2后,查看网络
# docker exec -it h2 /bin/bash
[root@kiosk-virtual-machine /]# ip a
1: lo: <LOOPBACK,UP,LOWER_UP> mtu 65536 qdisc noqueue state UNKNOWN group default qlen 1000
    link/loopback 00:00:00:00:00:00 brd 00:00:00:00:00:00
    inet 127.0.0.1/8 scope host lo
       valid_lft forever preferred_lft forever
    inet6 ::1/128 scope host
       valid_lft forever preferred_lft forever
2: ens33: <BROADCAST,MULTICAST,UP,LOWER_UP> mtu 1500 qdisc fq_codel state UP group default qlen 1000
    link/ether 00:0c:29:bf:e4:a0 brd ff:ff:ff:ff:ff:ff
    altname enp2s1
    inet 192.168.73.137/24 brd 192.168.73.255 scope global dynamic noprefixroute ens33
       valid_lft 1133sec preferred_lft 1133sec
    inet6 fe80::ecfb:a225:eb42:6279/64 scope link noprefixroute
       valid_lft forever preferred_lft forever
3: docker0: <NO-CARRIER,BROADCAST,MULTICAST,UP> mtu 1500 qdisc noqueue state DOWN group default
    link/ether 02:42:17:05:e2:03 brd ff:ff:ff:ff:ff:ff
    inet 172.17.0.1/16 brd 172.17.255.255 scope global docker0
       valid_lft forever preferred_lft forever
[root@kiosk-virtual-machine /]# exit
2
3
4
5
6
7
8
9
10
11
12
13
14
15
16
17
18
19
20
21
22
23
24
25
26
27
28
29
30
31
32
33
34
35
36
37
38
39
40
41
42
43
44
45
46
47
48
49
50
51
52
53
54
55
56
57
58
59
60
61
62
63
64
65
66
67
68
69
70
71
72
73
74
# Lab16. Bridge 网络
查看所有网卡,包含docker0
# ip a
1: lo: <LOOPBACK,UP,LOWER_UP> mtu 65536 qdisc noqueue state UNKNOWN group default qlen 1000
    link/loopback 00:00:00:00:00:00 brd 00:00:00:00:00:00
    inet 127.0.0.1/8 scope host lo
       valid_lft forever preferred_lft forever
    inet6 ::1/128 scope host
       valid_lft forever preferred_lft forever
2: ens33: <BROADCAST,MULTICAST,UP,LOWER_UP> mtu 1500 qdisc fq_codel state UP group default qlen 1000
    link/ether 00:0c:29:bf:e4:a0 brd ff:ff:ff:ff:ff:ff
    altname enp2s1
    inet 192.168.73.137/24 brd 192.168.73.255 scope global dynamic noprefixroute ens33
       valid_lft 1175sec preferred_lft 1175sec
    inet6 fe80::ecfb:a225:eb42:6279/64 scope link noprefixroute
       valid_lft forever preferred_lft forever
3: `docker0`: <NO-CARRIER,BROADCAST,MULTICAST,UP> mtu 1500 qdisc noqueue state DOWN group default
    link/ether 02:42:17:05:e2:03 brd ff:ff:ff:ff:ff:ff
    inet 172.17.0.1/16 brd 172.17.255.255 scope global docker0
       valid_lft forever preferred_lft forever

默认未安装
# ifconfig

Command 'ifconfig' not found, but can be installed with:

apt install net-tools

按提示安装
# apt install net-tools
...输出省略...

# ifconfig
`docker0`: flags=4099<UP,BROADCAST,MULTICAST>  mtu 1500
        inet 172.17.0.1  netmask 255.255.0.0  broadcast 172.17.255.255
        ether 02:42:17:05:e2:03  txqueuelen 0  (Ethernet)
        RX packets 0  bytes 0 (0.0 B)
        RX errors 0  dropped 0  overruns 0  frame 0
        TX packets 0  bytes 0 (0.0 B)
        TX errors 0  dropped 0 overruns 0  carrier 0  collisions 0

ens33: flags=4163<UP,BROADCAST,RUNNING,MULTICAST>  mtu 1500
        inet 192.168.73.137  netmask 255.255.255.0  broadcast 192.168.73.255
        inet6 fe80::ecfb:a225:eb42:6279  prefixlen 64  scopeid 0x20<link>
        ether 00:0c:29:bf:e4:a0  txqueuelen 1000  (Ethernet)
        RX packets 3169  bytes 679722 (679.7 KB)
        RX errors 0  dropped 0  overruns 0  frame 0
        TX packets 1985  bytes 242632 (242.6 KB)
        TX errors 0  dropped 0 overruns 0  carrier 0  collisions 0

lo: flags=73<UP,LOOPBACK,RUNNING>  mtu 65536
        inet 127.0.0.1  netmask 255.0.0.0
        inet6 ::1  prefixlen 128  scopeid 0x10<host>
        loop  txqueuelen 1000  (Local Loopback)
        RX packets 544  bytes 50523 (50.5 KB)
        RX errors 0  dropped 0  overruns 0  frame 0
        TX packets 544  bytes 50523 (50.5 KB)
        TX errors 0  dropped 0 overruns 0  carrier 0  collisions 0

# ifconfig docker0
docker0: flags=4099<UP,BROADCAST,MULTICAST>  mtu 1500
        inet 172.17.0.1  netmask 255.255.0.0  broadcast 172.17.255.255
        ether 02:42:17:05:e2:03  txqueuelen 0  (Ethernet)
        RX packets 0  bytes 0 (0.0 B)
        RX errors 0  dropped 0  overruns 0  frame 0
        TX packets 0  bytes 0 (0.0 B)
        TX errors 0  dropped 0 overruns 0  carrier 0  collisions 0

# docker network inspect bridge
...输出省略...
        "Driver": "bridge",
        "EnableIPv6": false,
        "IPAM": {
            "Driver": "default",
            "Options": null,
            "Config": [
                {
                    "Subnet": "172.17.0.0/16",
                    "Gateway": "172.17.0.1"
...输出省略...

启动容器后,<Ctrl-C>终止
# docker run -it --name httpd1 httpd
AH00558: httpd: Could not reliably determine the server's fully qualified domain name, using 172.17.0.2. Set the 'ServerName' directive globally to suppress this message
AH00558: httpd: Could not reliably determine the server's fully qualified domain name, using 172.17.0.2. Set the 'ServerName' directive globally to suppress this message
[Tue Mar 08 14:37:18.605673 2022] [mpm_event:notice] [pid 1:tid 140469840489792] AH00489: Apache/2.4.52 (Unix) configured -- resuming normal operations
[Tue Mar 08 14:37:18.610004 2022] [core:notice] [pid 1:tid 140469840489792] AH00094: Command line: 'httpd -D FOREGROUND'
^C
[Tue Mar 08 14:37:47.709363 2022] [mpm_event:notice] [pid 1:tid 140469840489792] AH00491: caught SIGTERM, shutting down


# docker start httpd1
httpd1

确认"NetworkID"和docker0的ID相同,"IPAddress"同网段
# docker inspect httpd1
...输出省略...
                    "NetworkID": "41ff0dd08d0dc2fc3a024dd11220d28a765b9259b4cb3bf30fd472e5d0249de8",
                    "EndpointID": "7081c6af7c0a6804bc0037999c256c8c5b02f5dedeea26e48caa36775afcb667",
                    "Gateway": "172.17.0.1",
                    "IPAddress": "172.17.0.2",
...输出省略...

# ifconfig docker0
docker0: flags=4163<UP,BROADCAST,RUNNING,MULTICAST>  mtu 1500
        inet `172.17.0.1`  netmask 255.255.0.0  broadcast 172.17.255.255
        inet6 fe80::42:17ff:fe05:e203  prefixlen 64  scopeid 0x20<link>
        ether 02:42:17:05:e2:03  txqueuelen 0  (Ethernet)
        RX packets 0  bytes 0 (0.0 B)
        RX errors 0  dropped 0  overruns 0  frame 0
        TX packets 28  bytes 4247 (4.2 KB)
        TX errors 0  dropped 0 overruns 0  carrier 0  collisions 0
2
3
4
5
6
7
8
9
10
11
12
13
14
15
16
17
18
19
20
21
22
23
24
25
26
27
28
29
30
31
32
33
34
35
36
37
38
39
40
41
42
43
44
45
46
47
48
49
50
51
52
53
54
55
56
57
58
59
60
61
62
63
64
65
66
67
68
69
70
71
72
73
74
75
76
77
78
79
80
81
82
83
84
85
86
87
88
89
90
91
92
93
94
95
96
97
98
99
100
101
102
103
104
105
106
107
108
109
110
111
# docker network create --driver bridge net1
f420579a43392df4df8a0140252aa1f5ae77487acbed5a0377c3e0fdaafc4a44
# docker network ls
NETWORK ID     NAME      DRIVER    SCOPE
41ff0dd08d0d   bridge    bridge    local
ab5baf7233d9   host      host      local
f420579a4339   net1      bridge    local
8f6bcfc84d2b   none      null      local

# docker network inspect net1
...输出省略...
        "Driver": "bridge",
        "EnableIPv6": false,
        "IPAM": {
            "Driver": "default",
            "Options": {},
            "Config": [
                {
                    "Subnet": "172.18.0.0/16",
                    "Gateway": "172.18.0.1"

# docker network create --driver bridge --subnet 172.10.10.0/24 --gateway 172.10.10.1 net2
33ccdc950e0327b18b4e281bd9ac9300223ffdd8a229a2c3a235d79f6524aa12
# docker network ls
NETWORK ID     NAME      DRIVER    SCOPE
41ff0dd08d0d   bridge    bridge    local
ab5baf7233d9   host      host      local
f420579a4339   net1      bridge    local
33ccdc950e03   `net2`      bridge    local
8f6bcfc84d2b   none      null      local

c1 net1
# docker run -itd --name c1 --network net1 centos
609835dad8b5ed94f8a534f50cf926b0f07d54bb4069800dd2f097f6435e6718

c2 net2, dynamic
# docker run -itd --name c2 --network net2 centos
930630ec62393b25302324f2fa5abb07f0a023fd2b58744849fb5c77445da78c

c3 net2, static
# docker run -itd --name c3 --network net2 --ip 172.10.10.10 centos
4cd271c0750b98ea6f035d0341c603018d41526abec29c6ed3d23fe9c96e83d0

# docker inspect c1 | grep -i ipaddress
            "SecondaryIPAddresses": null,
            "IPAddress": "",
                    "IPAddress": "172.18.0.2",
# docker inspect c2 | grep -i ipaddress
            "SecondaryIPAddresses": null,
            "IPAddress": "",
                    "IPAddress": "172.10.10.2",
# docker inspect c3 | grep -i ipaddress
            "SecondaryIPAddresses": null,
            "IPAddress": "",
                    "IPAddress": "172.10.10.10",

网络通
# docker exec -it c2 ping -c 4 172.10.10.10
PING 172.10.10.10 (172.10.10.10) 56(84) bytes of data.
64 bytes from 172.10.10.10: icmp_seq=1 ttl=64 time=0.061 ms
64 bytes from 172.10.10.10: icmp_seq=2 ttl=64 time=0.067 ms
64 bytes from 172.10.10.10: icmp_seq=3 ttl=64 time=0.058 ms
64 bytes from 172.10.10.10: icmp_seq=4 ttl=64 time=0.051 ms

--- 172.10.10.10 ping statistics ---
4 packets transmitted, 4 received, 0% packet loss, time 3050ms
rtt min/avg/max/mdev = 0.051/0.059/0.067/0.007 ms

网络不通,使用组合键<Ctrl-C>
# docker exec -it c2 ping -c 4 172.18.0.2
PING 172.18.0.2 (172.18.0.2) 56(84) bytes of data.
^C
--- 172.18.0.2 ping statistics ---
4 packets transmitted, 0 received, 100% packet loss, time 3064ms

将容器c1添加到net2桥接网络
# docker network connect net2 c1
# docker inspect c1 | grep -i ipaddress
            "SecondaryIPAddresses": null,
            "IPAddress": "",
                    "IPAddress": "172.18.0.2",
                    "IPAddress": "172.10.10.3",

网络全通
# docker exec -it c1 ping -c 1 172.10.10.1
PING 172.10.10.1 (172.10.10.1) 56(84) bytes of data.
64 bytes from 172.10.10.1: icmp_seq=1 ttl=64 time=0.083 ms

--- 172.10.10.1 ping statistics ---
1 packets transmitted, 1 received, 0% packet loss, time 0ms
rtt min/avg/max/mdev = 0.083/0.083/0.083/0.000 ms
# docker exec -it c1 ping -c 1 172.10.10.10
PING 172.10.10.10 (172.10.10.10) 56(84) bytes of data.
64 bytes from 172.10.10.10: icmp_seq=1 ttl=64 time=0.090 ms

--- 172.10.10.10 ping statistics ---
1 packets transmitted, 1 received, 0% packet loss, time 0ms
rtt min/avg/max/mdev = 0.090/0.090/0.090/0.000 ms
2
3
4
5
6
7
8
9
10
11
12
13
14
15
16
17
18
19
20
21
22
23
24
25
26
27
28
29
30
31
32
33
34
35
36
37
38
39
40
41
42
43
44
45
46
47
48
49
50
51
52
53
54
55
56
57
58
59
60
61
62
63
64
65
66
67
68
69
70
71
72
73
74
75
76
77
78
79
80
81
82
83
84
85
86
87
88
89
90
91
92
93
94
95
96
97
98
# 4. 容器存储
# 4.1 容器存储机制
| ID | |||
|---|---|---|---|
| 1 | tmpfs | 默认新建的容器,数据存在内存当中 | |
| 2 | volume | -v 容器内的路径 | 宿主机路径不存在,会自动创建==/var/lib/docker/volumes/...== |
| 3 | bind mount | -v 宿主机路径:容器内路径 | 宿主机路径不存在,会自动创建 |
# Lab17. 持久存储之volume
列出卷
# docker volume ls
DRIVER    VOLUME NAME

查看容器web站点主目录
# docker run -d httpd
2b969d04cae5d6e1c6963573405679bf9bf7246c7f2624e948bca5922eced61b
# docker ps
CONTAINER ID   IMAGE     COMMAND              CREATED         STATUS         PORTS     NAMES
2b969d04cae5   httpd     "httpd-foreground"   4 seconds ago   Up 3 seconds   80/tcp    strange_tu
# docker exec -it strange_tu /bin/bash
root@2b969d04cae5:/usr/local/apache2# ls /usr/local/apache2/conf/httpd.conf
root@2b969d04cae5:/usr/local/apache2# grep ^DocumentRoot /usr/local/apache2/conf/httpd.conf
DocumentRoot "/usr/local/apache2/htdocs"
root@2b969d04cae5:/usr/local/apache2#
exit

-v只要有这个选项,主是持久存储
# docker run -d -p 8080:80 -v /usr/local/apache2/htdocs/ httpd
67b946992c5225bf642be94faf734b84ec4fc280d33bab43f8cd3ec6d6ad6d0a
# docker ps
CONTAINER ID   IMAGE     COMMAND              CREATED         STATUS         PORTS                  NAMES
67b946992c52   httpd     "httpd-foreground"   2 seconds ago   Up 2 seconds   0.0.0.0:8080->80/tcp   `agitated_chatelet`
2b969d04cae5   httpd     "httpd-foreground"   2 minutes ago   Up 2 minutes   80/tcp                 strange_tu

# docker volume ls
DRIVER    VOLUME NAME
local     `1e68643dc6221b2b19e072e03f428ef52c216c6ee9f09d2da50d811fa71b5ab9`

# docker volume inspect 1e68643dc6221b2b19e072e03f428ef52c216c6ee9f09d2da50d811fa71b5ab9
...输出省略...
        "Mountpoint": "/var/lib/docker/volumes/1e68643dc6221b2b19e072e03f428ef52c216c6ee9f09d2da50d811fa71b5ab9/_data",
        "Name": "1e68643dc6221b2b19e072e03f428ef52c216c6ee9f09d2da50d811fa71b5ab9",
...输出省略...

# docker inspect agitated_chatelet
...输出省略...
        "Mounts": [
            {
                "Type": "volume",
                "Name": "1e68643dc6221b2b19e072e03f428ef52c216c6ee9f09d2da50d811fa71b5ab9",
                "Source": "/var/lib/docker/volumes/1e68643dc6221b2b19e072e03f428ef52c216c6ee9f09d2da50d811fa71b5ab9/_data",
                "Destination": "/usr/local/apache2/htdocs",
...输出省略...

# cat /var/lib/docker/volumes/1e68643dc6221b2b19e072e03f428ef52c216c6ee9f09d2da50d811fa71b5ab9/_data/index.html
<html><body><h1>It works!</h1></body></html>
# curl http://localhost:8080
<html><body><h1>It works!</h1></body></html>
2
3
4
5
6
7
8
9
10
11
12
13
14
15
16
17
18
19
20
21
22
23
24
25
26
27
28
29
30
31
32
33
34
35
36
37
38
39
40
41
42
43
44
45
46
47
48
49
修改本地(宿主机)文件,自动 docker cp
# echo haha > /var/lib/docker/volumes/1e68643dc6221b2b19e072e03f428ef52c216c6ee9f09d2da50d811fa71b5ab9/_data/index.html
# curl http://localhost:8080
haha
2
3
4
默认运行的容器不可删除
# docker rm agitated_chatelet
Error response from daemon: You cannot remove a running container 67b946992c5225bf642be94faf734b84ec4fc280d33bab43f8cd3ec6d6ad6d0a. Stop the container before attempting removal or force remove

--force可强制删除正在运行的容器
# docker rm agitated_chatelet --force
agitated_chatelet

容器删除后,卷依然存在
# docker volume ls
DRIVER    VOLUME NAME
local     1e68643dc6221b2b19e072e03f428ef52c216c6ee9f09d2da50d811fa71b5ab9

卷存在== 文件存在
# cat /var/lib/docker/volumes/1e68643dc6221b2b19e072e03f428ef52c216c6ee9f09d2da50d811fa71b5ab9/_data/index.html
haha
2
3
4
5
6
7
8
9
10
11
12
13
14
15
16
可以手动删除卷
# docker volume rm 1e68643dc6221b2b19e072e03f428ef52c216c6ee9f09d2da50d811fa71b5ab9
1e68643dc6221b2b19e072e03f428ef52c216c6ee9f09d2da50d811fa71b5ab9

确认卷删除
# docker volume ls
DRIVER    VOLUME NAME
2
3
4
5
6
7
# Lab18. 持久存储之bind mount
# ls /root
df  myregistry  snap
# docker run -d -p 8081:80 -v /root/htdocs:/usr/local/apache2/htdocs/ httpd
271527b345fdcfc444948856a456b4d160305b30b3f2b5b1ec1d864c648fc18c

# ls -d /root/htdocs/

# echo haha > /root/htdocs/index.html
# curl http://localhost:8081
haha

# docker exec -it 27 /bin/bash
root@271527b345fd:/usr/local/apache2# cat /usr/local/apache2/htdocs/index.html
haha
root@271527b345fd:/usr/local/apache2#
exit
2
3
4
5
6
7
8
9
10
11
12
13
14
15
16
# docker stop 27
27
# docker rm 27
27
# ls /root/htdocs/
index.html
# cat /root/htdocs/index.html
haha
2
3
4
5
6
7
8
# 4.2 数据共享
# Lab19. 容器间数据共享之bind mount
# docker run -d --name h1 -p 1001:80 -v /root/htdocs:/usr/local/apache2/htdocs httpd
f0a55b1b960c81231d764301e0b62c358dc391fcb49f93f4db0aa7fe29188a01
# docker run -d --name h2 -p 1002:80 -v /root/htdocs:/usr/local/apache2/htdocs httpd
e8916f0ca1403171799c8ae4c4b3839aaa4f0a62bf1fed0c7fd20ef8dbef29ad

# cat /root/htdocs/index.html
haha
# curl localhost:1001
haha
# curl localhost:1002
haha

# echo hehe > /root/htdocs/index.html
# cat /root/htdocs/index.html
hehe
# curl localhost:1001
hehe
# curl localhost:1002
hehe
2
3
4
5
6
7
8
9
10
11
12
13
14
15
16
17
18
19
# Lab20.容器间数据共享之volume container
--volumes-from 容器名
新创建的容器,卷类型从上一个容器复制 == 卷类型相同
新建容器vc,使用bind mount方式
# docker run -d --name vc -v /root/htdocs:/usr/local/apache2/htdocs httpd
075513aeddd3c7c771df60911f69e3b003cbce633650a547343586095bd7c39a

列出容器名称
# docker run -d --name h3 -p 1003:80 \
  --volumes-from <Tab><Tab>
h1  h2  vc

新建两个容器,使用vc容器的卷
# docker run -d --name h3 -p 1003:80 --volumes-from vc httpd
d10673dd799c822c52dd6355e89aa1a55a0cf601412369a30589d8ca71bcdae3
# docker run -d --name h4 -p 1004:80 --volumes-from vc httpd
45c905078444e1e47d775fd340d05891878775a99cae05803eb69b17e95f53c1

检查配置信息
# docker inspect vc | grep -A 4 Mounts
        "Mounts": [
            {
                "Type": "bind",
                "Source": "/root/htdocs",
                "Destination": "/usr/local/apache2/htdocs",
# docker inspect h3 | grep -A 4 Mounts
        "Mounts": [
            {
                "Type": "bind",
                "Source": "/root/htdocs",
                "Destination": "/usr/local/apache2/htdocs",
# docker inspect h4 | grep -A 4 Mounts
        "Mounts": [
            {
                "Type": "bind",
                "Source": "/root/htdocs",
                "Destination": "/usr/local/apache2/htdocs",

测试
# echo new > /root/htdocs/index.html

1003==h3容器的内容,1004==h4容器的内容
# curl localhost:1003
new
# curl localhost:1004
new
2
3
4
5
6
7
8
9
10
11
12
13
14
15
16
17
18
19
20
21
22
23
24
25
26
27
28
29
30
31
32
33
34
35
36
37
38
39
40
41
42
43
# 5. 容器底层实现技术
# 5.1 Namespace 和 Cgroup
# Lab21. Namespace和Cgroup
# docker run -itd centos /bin/bash
c7ca03f322fa999926bee76c56920c03a2729aa7e5481c4d3388207c78b23ebd
# docker ps
CONTAINER ID   IMAGE     COMMAND       CREATED         STATUS         PORTS     NAMES
c7ca03f322fa   centos    "/bin/bash"   4 seconds ago   Up 3 seconds             hardcore_spence

容器中的进程ID为 1
# docker exec -it c ps axf
    PID TTY      STAT   TIME COMMAND
     14 pts/1    Rs+    0:00 ps axf
    `1` pts/0    Ss+    0:00 /bin/bash

宿主机中的进程ID为 2621
# docker inspect c7ca03f322fa | grep -i pid
            "Pid": 2621,
            "PidMode": "",
            "PidsLimit": null,
# ps aux | grep 2621
root       `2621` 0.0  0.0  12052  3048 pts/0    Ss+  16:18   0:00 /bin/bash
root        2752  0.0  0.0  12116   720 pts/1    S+   16:20   0:00 grep --color=auto 2621

# ls -l /proc/2621/ns/
total 0
lrwxrwxrwx 1 root root 0 3月  15 16:22 cgroup -> 'cgroup:[4026531835]'
lrwxrwxrwx 1 root root 0 3月  15 16:19 ipc -> 'ipc:[4026532602]'
lrwxrwxrwx 1 root root 0 3月  15 16:19 mnt -> 'mnt:[4026532600]'
lrwxrwxrwx 1 root root 0 3月  15 16:18 net -> 'net:[4026532605]'
lrwxrwxrwx 1 root root 0 3月  15 16:19 pid -> 'pid:[4026532603]'
lrwxrwxrwx 1 root root 0 3月  15 16:22 pid_for_children -> 'pid:[4026532603]'
lrwxrwxrwx 1 root root 0 3月  15 16:22 time -> 'time:[4026531834]'
lrwxrwxrwx 1 root root 0 3月  15 16:22 time_for_children -> 'time:[4026531834]'
lrwxrwxrwx 1 root root 0 3月  15 16:22 user -> 'user:[4026531837]'
lrwxrwxrwx 1 root root 0 3月  15 16:19 uts -> 'uts:[4026532601]'

# docker exec -it hardcore_spence /bin/bash
[root@c7ca03f322fa /]#
[root@c7ca03f322fa /]# ls -l /proc/1/ns/
total 0
lrwxrwxrwx 1 root root 0 Mar 15 08:23 cgroup -> 'cgroup:[4026531835]'
lrwxrwxrwx 1 root root 0 Mar 15 08:23 ipc -> 'ipc:[4026532602]'
lrwxrwxrwx 1 root root 0 Mar 15 08:23 mnt -> 'mnt:[4026532600]'
lrwxrwxrwx 1 root root 0 Mar 15 08:23 net -> 'net:[4026532605]'
lrwxrwxrwx 1 root root 0 Mar 15 08:23 pid -> 'pid:[4026532603]'
lrwxrwxrwx 1 root root 0 Mar 15 08:23 pid_for_children -> 'pid:[4026532603]'
lrwxrwxrwx 1 root root 0 Mar 15 08:23 time -> 'time:[4026531834]'
lrwxrwxrwx 1 root root 0 Mar 15 08:23 time_for_children -> 'time:[4026531834]'
lrwxrwxrwx 1 root root 0 Mar 15 08:23 user -> 'user:[4026531837]'
lrwxrwxrwx 1 root root 0 Mar 15 08:23 uts -> 'uts:[4026532601]'
[root@c7ca03f322fa /]# exit
2
3
4
5
6
7
8
9
10
11
12
13
14
15
16
17
18
19
20
21
22
23
24
25
26
27
28
29
30
31
32
33
34
35
36
37
38
39
40
41
42
43
44
45
46
47
48
49
# mount -t cgroup
cgroup on /sys/fs/cgroup/systemd type cgroup (rw,nosuid,nodev,noexec,relatime,xattr,name=systemd)
cgroup on /sys/fs/cgroup/misc type cgroup (rw,nosuid,nodev,noexec,relatime,misc)
cgroup on /sys/fs/cgroup/cpu,cpuacct type cgroup (rw,nosuid,nodev,noexec,relatime,cpu,cpuacct)
cgroup on /sys/fs/cgroup/net_cls,net_prio type cgroup (rw,nosuid,nodev,noexec,relatime,net_cls,net_prio)
cgroup on /sys/fs/cgroup/cpuset type cgroup (rw,nosuid,nodev,noexec,relatime,cpuset)
cgroup on /sys/fs/cgroup/memory type cgroup (rw,nosuid,nodev,noexec,relatime,memory)
cgroup on /sys/fs/cgroup/devices type cgroup (rw,nosuid,nodev,noexec,relatime,devices)
cgroup on /sys/fs/cgroup/blkio type cgroup (rw,nosuid,nodev,noexec,relatime,blkio)
cgroup on /sys/fs/cgroup/hugetlb type cgroup (rw,nosuid,nodev,noexec,relatime,hugetlb)
cgroup on /sys/fs/cgroup/freezer type cgroup (rw,nosuid,nodev,noexec,relatime,freezer)
cgroup on /sys/fs/cgroup/pids type cgroup (rw,nosuid,nodev,noexec,relatime,pids)
cgroup on /sys/fs/cgroup/rdma type cgroup (rw,nosuid,nodev,noexec,relatime,rdma)
cgroup on /sys/fs/cgroup/perf_event type cgroup (rw,nosuid,nodev,noexec,relatime,perf_event)
2
3
4
5
6
7
8
9
10
11
12
13
14
# 5.2 容器资源限制
# Lab22. cpu和mem资源限制
这组实验需要开启3个终端

终端1,https://hub.docker.com/r/progrium/stress
# docker run  --name yl1 -it -c 1024 progrium/stress --cpu 1
终端2,CPU 100%
# top
<q>退出

终端2,https://hub.docker.com/r/polinux/stress-ng
# docker run --name yl2 -it -c 1024 polinux/stress-ng --cpu 1
终端3,两个容器各点一半CPU,因为权重值相同
# top
<q>

-f, --filter=
# docker ps -f name="yl*"
# cat /sys/fs/cgroup/cpu/docker/3a8dfa463c2fd19b4c293d2b71cb3f5601a0743e09902eed8f67161ccbd0d213/cpu.shares
# cat /sys/fs/cgroup/cpu/docker/3a8dfa463c2fd19b4c293d2b71cb3f5601a0743e09902eed8f67161ccbd0d213/tasks
# ps -aux | grep 3986
# ps -aux | grep 4016
# cat /proc/3986/cgroup

实验看到现象后,终端1和2分别<Ctrl-C>中止
2
3
4
5
6
7
8
9
10
11
12
13
14
15
16
17
18
19
20
21
22
23
# ls /sys/fs/cgroup/memory/

# docker run -it -m 400M --memory-swap=500M progrium/stress --vm 1 --vm-bytes 450M
2
3
# 6. PaaS概述
# 6.1 什么是PaaS
| 缩写 | IaaS/架构 | PaaS/平台 | SaaS/软件 |
|---|---|---|---|
| 全拼 | Infrastructure-as-a-Service | Platform-as-a-Service | Software-as-a-Service |
| 中文 | 基础设施即服务 | 平台即服务 | 软件即服务 |
| 示例 | 亚马逊,阿里云、华为云、腾讯云等 | Google、Microsoft Azure 等 | 阿里的钉钉、苹果的 iCloud 等 |
| 软件 | OpenStack | OpenShift、K8s | Office 365 |
# 6.2 PaaS与编排工具概述
# 7. Kubernetes架构介绍
# 7.1 Kubernetes架构
# Lab23. 集群安装
https://vmcc.xyz:8443/?dir=k8s
$ kubectl -n kube-system get pod -owide

$ ls /etc/kubernetes/manifests/
etcd.yaml
`kube-apiserver.yaml`
kube-controller-manager.yaml
kube-scheduler.yaml

$ kubectl -n kube-system get pods --field-selector spec.nodeName=k8s-master
NAME                                       READY   STATUS    RESTARTS      AGE
calico-kube-controllers-84c476996d-mg9hd   1/1     Running   1 (43m ago)   76m
calico-node-4js9b                          1/1     Running   1 (43m ago)   76m
coredns-74586cf9b6-2djpg                   1/1     Running   1 (43m ago)   90m
coredns-74586cf9b6-vxg4w                   1/1     Running   1 (43m ago)   90m
etcd-k8s-master                            1/1     Running   1 (43m ago)   90m
kube-apiserver-k8s-master                  1/1     Running   1 (43m ago)   90m
kube-controller-manager-k8s-master         1/1     Running   1 (43m ago)   90m
kube-proxy-bpdh4                           1/1     Running   1 (43m ago)   90m
kube-scheduler-k8s-master                  1/1     Running   1 (43m ago)   90m

$ kubectl -n kube-system get pods --field-selector spec.nodeName=k8s-worker1
NAME                READY   STATUS    RESTARTS      AGE
calico-node-vpl5z   1/1     Running   1 (44m ago)   73m
kube-proxy-lhx5l    1/1     Running   1 (44m ago)   73m
2
3
4
5
6
7
8
9
10
11
12
13
14
15
16
17
18
19
20
21
22
23
24
Kubernetes 文档 (opens new window) / 概念 (opens new window) / 概述 (opens new window) / 使用 Kubernetes 对象 (opens new window) / 字段选择器 (opens new window)
$ nc 127.0.0.1 6443
<Ctrl-C>
$ ss -antup | grep 6443

服务
# systemctl status kubelet
2
3
4
5
6
# 7.2 namespace
# Lab24. namespapce
$ kubectl api-resources --namespaced=true

$ kubectl get namespace

$ kubectl get pod --namespace=kube-system
$ kubectl get pod -n kube-system
2
3
4
5
6
# 8. Deployment管理与使用
# 8.2 创建 Deployment
# Lab25. Deployment-cmd
$ kubectl create deployment mydep --image=nginx

$ kubectl get deployment

$ kubectl describe deploy mydep

$ kubectl get deployment
2
3
4
5
6
7
# Lab26. Deployment-yaml (opens new window)
https://hub.docker.com/_/nginx
| ID | NAME | IMAGE | REPLICAS |
|---|---|---|---|
| 1 | deployment-v1.yaml | nginx:1.14.2 | 2 |
| 2 | deployment-v2.yaml | nginx:1.20.2 | 3 |
| 3 | deployment-v3.yaml | nginx:1.21.6 | 3 |
$ vim deployment-v1.yaml
apiVersion: apps/v1
kind: Deployment
metadata:
  name: nginx-deployment
spec:
  selector:
    matchLabels:
      app: nginx
  replicas: 2 # tells deployment to run 2 pods matching the template
  template:
    metadata:
      labels:
        app: nginx
    spec:
      containers:
      - name: nginx
        image: nginx:1.14.2
        ports:
        - containerPort: 80
2
3
4
5
6
7
8
9
10
11
12
13
14
15
16
17
18
19
$ kubectl create -f deployment-v1.yaml

$ kubectl get deployment
2
3
# 8.3 升级和弹性收缩
# Lab27. Deployment弹性伸缩
$ vim deployment-v2.yaml
apiVersion: apps/v1
kind: Deployment
metadata:
  name: nginx-deployment
spec:
  selector:
    matchLabels:
      app: nginx
  replicas: 3
  template:
    metadata:
      labels:
        app: nginx
    spec:
      containers:
      - name: nginx
        image: nginx:1.20.2
        ports:
        - containerPort: 80
2
3
4
5
6
7
8
9
10
11
12
13
14
15
16
17
18
19
$ kubectl apply -f deployment-v2.yaml

$ kubectl get deployment
2
3
kubectl scale
$ kubectl scale deployment nginx-deployment --replicas=2

$ kubectl get deployment
2
3
Kubectl edit
$ kubectl edit deployment nginx-deployment
# Lab28. Deployment升级软件版本
$ kubectl get rs

$ kubectl get pods

$ vim deployment-v3.yaml
2
3
4
5
apiVersion: apps/v1
kind: Deployment
metadata:
  name: nginx-deployment
spec:
  selector:
    matchLabels:
      app: nginx
  replicas: 3
  template:
    metadata:
      labels:
        app: nginx
    spec:
      containers:
      - name: nginx
        image: nginx:1.21.6
        ports:
        - containerPort: 80
2
3
4
5
6
7
8
9
10
11
12
13
14
15
16
17
18
19
$ kubectl apply -f deployment-v3.yaml

$ kubectl get pods

$ kubectl describe deployments.apps nginx-deployment
2
3
4
5
rollout
--record
$ kubectl rollout history deployment nginx-deployment

$ kubectl apply -f deployment-v1.yaml --record
$ kubectl apply -f deployment-v2.yaml --record
$ kubectl apply -f deployment-v3.yaml --record

$ kubectl rollout history deployment nginx-deployment

$ kubectl rollout history deployment nginx-deployment --revision=5

$ kubectl rollout undo deployment nginx-deployment --to-revision=5
2
3
4
5
6
7
8
9
10
11
# 9. Pod管理与使用
# 9.2 使用pod
# Lab29. 创建一个pod
-f file
$ vim mypod.yaml
kind: Pod
apiVersion: v1
metadata:
  name: mypod
spec:
  containers:
    - name: mypod
      image: busybox
      args:
      - /bin/sh
      - -c
      - sleep 3h
2
3
4
5
6
7
8
9
10
11
12
$ kubectl create -f mypod.yaml

$ kubectl get pod mypod

$ kubectl get pod mypod -owide

$ ssh root@k8s-worker2 docker ps | grep mypod
2
3
4
5
6
7
$ kubectl describe pod mypod

$ kubectl exec -it mypod -- /bin/sh
/ # exit

$ kubectl exec -it mypod --container mypod -- /bin/sh
/ # exit
2
3
4
5
6
7
# Lab30. 创建第二个pod
-f==-== yaml文件的内容
kubectl apply -f- <<EOF
kind: Pod
apiVersion: v1
metadata:
  name: helloworld
spec:
  restartPolicy: Never
  containers:
    - name: helloworld
      image: hello-world
EOF
2
3
4
5
6
7
8
9
10
11
12
$ kubectl describe pod helloworld

$ kubectl get pods
2
3
$ kubectl delete pod helloworld

$ kubectl delete pod mypod
2
3
# Lab. cmd
$ k run nginx2 --image nginx
$ k run nginx3 --image nginx --dry-run=client -o yaml > b.yml
$ k get pod nginx1 -o yaml > nginx1.yml
# 10. Label与Label Selector
- 创建标签
- yaml
- cmd
- run --labels ...
- label ...
- 查看标签
- --show-labels
- 使用标签
- -l, --selector=''
- -L, --label-columns=[]
- 删除标签
- KEY-
# 10.1 Label
# Lab31. 设置标签
- 添加标签-创建时
kubectl apply -f- <<EOF
kind: Pod
apiVersion: v1
metadata:
  name: labelpod
  labels:
    app: busybox
    version: new
spec:
  containers:
    - name: labelpod
      image: busybox
      args:
      - /bin/sh
      - -c
      - sleep 30000
EOF
2
3
4
5
6
7
8
9
10
11
12
13
14
15
16
17
$ k run labelpod1 --image busybox --labels="app=busybox,version=new" -- sleep 8h
- 查看标签(--show-labels)
$ kubectl get pods labelpod --show-labels
NAME       READY   STATUS    RESTARTS   AGE   LABELS
labelpod   1/1     Running   0          20s   `app=busybox`,`version=new`
2
3
- 添加标签-存在时
$ kubectl label pods labelpod time=2022

$ kubectl get pods labelpod --show-labels
2
3
- 删除标签
$ kubectl label pod labelpod time-
pod/labelpod unlabeled
2
# 10.2 Label Selector
# Lab32. 标签选择器
$ kubectl get pods -l time=2022 --show-labels

$ kubectl get pods -l time!=2022 --show-labels

$ kubectl get pod -L app

$ kubectl get pod -l app=nginx
2
3
4
5
6
7
$ kubectl label nodes k8s-worker1 env=test

$ kubectl get node -L env

$ kubectl get nodes --show-labels
2
3
4
5
kubectl apply -f- <<EOF
apiVersion: apps/v1
kind: Deployment
metadata:
  name: nginx-deployment
  labels:
    app: nginx
spec:
  replicas: 3
  selector:
    matchLabels:
      app: nginx
  template:
    metadata:
      labels:
        app: nginx
    spec:
      containers:
      - name: nginx
        image: nginx:1.7.9
        ports:
        - containerPort: 80
# 增加 2 行
      nodeSelector:
        env: test
EOF
2
3
4
5
6
7
8
9
10
11
12
13
14
15
16
17
18
19
20
21
22
23
24
25
26
$ kubectl get pods -l app=nginx -owide
kubectl apply -f- <<EOF
apiVersion: apps/v1
kind: Deployment
metadata:
  name: nginx-deployment
  labels:
    app: nginx
spec:
  replicas: 3
  selector:
    matchLabels:
      app: nginx
  template:
    metadata:
      labels:
        app: nginx
    spec:
      containers:
      - name: nginx
        image: nginx:1.7.9
        ports:
        - containerPort: 80
# 增加 9 行
      affinity:
        nodeAffinity:
         requiredDuringSchedulingIgnoredDuringExecution:
            nodeSelectorTerms:
            - matchExpressions:
              - key: env
                operator: In
                values:
                - test
EOF
2
3
4
5
6
7
8
9
10
11
12
13
14
15
16
17
18
19
20
21
22
23
24
25
26
27
28
29
30
31
32
33
34
$ kubectl get pods -l app=nginx -owide
# 11. Service服务发现
# 11.2 服务发现
- Type
- ClusterIP(None == headless)
- NodePort
# Lab33. 创建Service
kubectl apply -f- <<EOF
apiVersion: apps/v1
kind: Deployment
metadata:
  name: httpd
spec:
  replicas: 3
  selector:
    matchLabels:
      app: httpd
  template:
    metadata:
      labels:
        app: httpd
    spec:
      containers:
      - name: httpd
        image: httpd
        ports:
        - containerPort: 80
---
apiVersion: v1
kind: Service
metadata:
  name: httpd-svc
spec:
  selector:
    app: httpd
  ports:
  - protocol: TCP
    port: 8080
    targetPort: 80
EOF
2
3
4
5
6
7
8
9
10
11
12
13
14
15
16
17
18
19
20
21
22
23
24
25
26
27
28
29
30
31
32
33
34
$ kubectl get svc
NAME         TYPE        CLUSTER-IP      EXTERNAL-IP   PORT(S)    AGE
httpd-svc    ClusterIP  `10.100.247.72`  <none>       `8080`/TCP   10s
kubernetes   ClusterIP   10.96.0.1       <none>        443/TCP    23d

$ curl 10.100.247.72:8080
<html><body><h1>It works!</h1></body></html>
2
3
4
5
6
7
$ kubectl get endpoints httpd-svc
NAME        ENDPOINTS                                            AGE
httpd-svc   172.16.126.13:80,172.16.126.14:80,172.16.194.82:80   30m

$ curl 172.16.126.13
<html><body><h1>It works!</h1></body></html>
2
3
4
5
6
$ kubectl describe svc httpd-svc
Name:              httpd-svc
Namespace:         default
Labels:            <none>
Annotations:       <none>
Selector:          app=httpd
Type:             `ClusterIP`
IP Family Policy:  SingleStack
IP Families:       IPv4
IP:                10.100.247.72
IPs:               10.100.247.72
Port:              <unset>  8080/TCP
TargetPort:        80/TCP
Endpoints:         172.16.126.13:80,172.16.126.14:80,172.16.194.82:80
Session Affinity:  None
Events:            <none>
2
3
4
5
6
7
8
9
10
11
12
13
14
15
16
# Lab34. 创建可供外部访问的Service
kubectl apply -f- <<EOF
apiVersion: v1
kind: Service
metadata:
  name: httpd-svc
spec:
  # 添加 1 行
  type: NodePort
  selector:
    app: httpd
  ports:
  - protocol: TCP
    port: 8080
    targetPort: 80
    # 添加 1 行,不指明随机(默认:30000-32767)
    nodePort: 30144
EOF
2
3
4
5
6
7
8
9
10
11
12
13
14
15
16
17
18
$ kubectl get svc httpd-svc
NAME        TYPE       CLUSTER-IP      EXTERNAL-IP   PORT(S)          AGE
httpd-svc  `NodePort`  10.100.247.72   <none>        8080:`30144`/TCP 29m

使用物理机测试
$ for i in k8s-master k8s-worker1 k8s-worker2; do
  curl $i:30144
  done
<html><body><h1>It works!</h1></body></html>
<html><body><h1>It works!</h1></body></html>
<html><body><h1>It works!</h1></body></html>
2
3
4
5
6
7
8
9
10
11
# 11.3 集群中的DNS
# Lab35. 集群中的DNS
$ kubectl -n kube-system get pods | grep dns
`coredns`-6d8c4cb4d-28tj5    1/1     Running   1 (23d ago)   23d
`coredns`-6d8c4cb4d-jxxtc    1/1     Running   1 (23d ago)   23d
2
3
$ kubectl get svc httpd-svc
NAME        TYPE       CLUSTER-IP       EXTERNAL-IP   PORT(S)          AGE
httpd-svc   NodePort  `10.100.247.72`   <none>        8080:30144/TCP   50m

$ kubectl run clientpod --image busybox -- sleep 3h
$ kubectl exec -it clientpod -- /bin/sh
/ # nslookup 10.100.247.72
Server:    10.96.0.10
Address 1: 10.96.0.10 kube-dns.kube-system.svc.cluster.local

Name:      10.100.247.72
Address 1: 10.100.247.72 `httpd-svc.default.svc.cluster.local`
/ # wget httpd-svc:8080
Connecting to httpd-svc:8080 (10.108.227.185:8080)
saving to 'index.html'
index.html           100%    45  0:00:00 ETA
'index.html' saved

/ # exit
2
3
4
5
6
7
8
9
10
11
12
13
14
15
16
17
18
19
# 11.4 Headless service
# Lab36. Headless Service
kubectl apply -f- <<EOF
apiVersion: apps/v1
kind: Deployment
metadata:
  name: headless
spec:
  replicas: 3
  selector:
    matchLabels:
      app: headless
  template:
    metadata:
      labels:
        app: headless
    spec:
      containers:
      - name: httpd
        image: httpd
        ports:
        - containerPort: 80
---
apiVersion: v1
kind: Service
metadata:
  name: headless-svc
spec:
  selector:
    app: headless
  ports:
    - protocol: TCP
      port: 80
      targetPort: 80
  clusterIP: None
EOF
2
3
4
5
6
7
8
9
10
11
12
13
14
15
16
17
18
19
20
21
22
23
24
25
26
27
28
29
30
31
32
33
34
35
$ kubectl get svc
NAME           TYPE        CLUSTER-IP      EXTERNAL-IP   PORT(S)          AGE
headless-svc   ClusterIP  `None`           <none>        80/TCP           23s
httpd-svc      NodePort    10.100.247.72   <none>        8080:30144/TCP   58m
kubernetes     ClusterIP   10.96.0.1       <none>        443/TCP          23d

$ kubectl exec -it clientpod -- /bin/sh
/ # nslookup headless-svc
Server:    10.96.0.10
Address 1: 10.96.0.10 kube-dns.kube-system.svc.cluster.local

Name:      headless-svc
Address 1: 172.16.126.13 172-16-126-13.httpd-svc.default.svc.cluster.local
Address 2: 172.16.126.14 172-16-126-14.httpd-svc.default.svc.cluster.local
Address 3: 172.16.194.82 172-16-194-82.httpd-svc.default.svc.cluster.local

/ # wget headless-svc
Connecting to headless-svc (172.16.126.14:80)
index.html           100%    45   0:00:00 ETA
2
3
4
5
6
7
8
9
10
11
12
13
14
15
16
17
18
19
# 12. DaemonSet与Job
# 12.1 DaemonSet
每个节点,都安装一个服务
- 日志
- 存储
当前环境中 calio, kube-proxy 都是
现象:
- 只在master上布署 calico
- 每个节点上只运行一个pod
# Lab37. DaemonSet-1
$ kubectl -n kube-system get daemonsets
NAME          DESIRED   CURRENT   READY   UP-TO-DATE   AVAILABLE   NODE SELECTOR            AGE
`calico-node` 3         3         3       3            3           kubernetes.io/os=linux   29d
`kube-proxy`  3         3         3       3            3           kubernetes.io/os=linux   29d
2
3
4
$ kubectl -n kube-system describe daemonsets kube-proxy | grep -i label
Labels:        `k8s-app=kube-proxy`
  Labels:          `k8s-app=kube-proxy`

$ kubectl -n kube-system get pod -l k8s-app=kube-proxy -o wide
NAME               READY   STATUS    RESTARTS      AGE   IP                NODE          NOMINATED NODE   READINESS GATES
kube-proxy-8pv56   1/1     Running   1 (29d ago)   29d   192.168.147.129   `k8s-worker1`   <none>           <none>
kube-proxy-9q8bq   1/1     Running   1 (29d ago)   29d   192.168.147.128   `k8s-master`    <none>           <none>
kube-proxy-tqvrs   1/1     Running   1 (29d ago)   29d   192.168.147.130   `k8s-worker2`   <none>           <none>
2
3
4
5
6
7
8
9
$ kubectl -n kube-system describe daemonsets calico-node | grep -i label
Labels:        `k8s-app=calico-node`
  Labels:           `k8s-app=calico-node`

$ kubectl -n kube-system get pod -l k8s-app=calico-node -o wide
NAME                READY   STATUS    RESTARTS      AGE   IP                NODE          NOMINATED NODE   READINESS GATES
calico-node-75k64   1/1     Running   1 (29d ago)   29d   192.168.147.130   `k8s-worker2`   <none>           <none>
calico-node-cxqxc   1/1     Running   1 (29d ago)   29d   192.168.147.128   `k8s-master`    <none>           <none>
calico-node-g5wj7   1/1     Running   1 (29d ago)   29d   192.168.147.129   `k8s-worker1`   <none>           <none>
2
3
4
5
6
7
8
9
# Lab38. DaemonSet-2
kubectl apply -f- <<EOF
apiVersion: apps/v1
kind: DaemonSet
metadata:
  name: nginx-daemonset
spec:
  selector:
    matchLabels:
      app: nginx
  template:
    metadata:
      labels:
       app: nginx
    spec:
      containers:
      - name: nginx
        image: nginx:1.7.9
        ports:
        - containerPort: 80
EOF
2
3
4
5
6
7
8
9
10
11
12
13
14
15
16
17
18
19
20
21
$ kubectl get pod -o wide
NAME                    READY   STATUS    RESTARTS   AGE   IP              NODE          NOMINATED NODE   READINESS GATES
nginx-daemonset-vqfpw   1/1     Running   0          63s   172.16.126.1    `k8s-worker2`   <none>           <none>
nginx-daemonset-z87sj   1/1     Running   0          63s   172.16.194.65   `k8s-worker1`   <none>           <none>

$ kubectl delete pod nginx-daemonset-vqfpw
pod "nginx-daemonset-vqfpw" deleted

$ kubectl get pod -o wide
NAME                    READY   STATUS    RESTARTS   AGE     IP              NODE          NOMINATED NODE   READINESS GATES
`nginx-daemonset-4r8mj` 1/1     Running   0         `2s`     172.16.126.2    k8s-worker2   <none>           <none>
nginx-daemonset-z87sj   1/1     Running   0          3m15s   172.16.194.65   k8s-worker1   <none>           <none>
2
3
4
5
6
7
8
9
10
11
12
$ ssh root@k8s-worker1 halt -p

$ kubectl get daemonset
NAME              DESIRED   CURRENT   READY   UP-TO-DATE   AVAILABLE   NODE SELECTOR   AGE
nginx-daemonset  `1`        1         1       1            1           <none>          7m37s
2
3
4
5
# 12.2 Job
# Lab39. job
kubectl apply -f- <<EOF
apiVersion: batch/v1
kind: Job
metadata:
  name: pi
spec:
  template:
    spec:
      containers:
      - name: pi
        image: perl:5.34.0
        command: ["perl",  "-Mbignum=bpi", "-wle", "print bpi(2000)"]
      restartPolicy: Never
  backoffLimit: 4
EOF
2
3
4
5
6
7
8
9
10
11
12
13
14
15
16
$ kubectl get job
NAME   COMPLETIONS   DURATION   AGE
pi     1/1           33s        68s

$ kubectl get pods
NAME                    READY   STATUS      RESTARTS   AGE
`pi-ht7xr`              0/1    `Completed`  0          2m13s

$ kubectl logs pi-ht7xr
3.1415926...
2
3
4
5
6
7
8
9
10
# 12.3 CronJob
# Lab40. CronJob
kubectl apply -f- <<EOF
apiVersion: batch/v1
kind: CronJob
metadata:
  name: hello
spec:
  schedule: "*/1 * * * *"
  jobTemplate:
    spec:
      template:
        spec:
          containers:
          - name: hello
            image: busybox
            args:
            - /bin/sh
            - -c
            - date; echo Hello from the Kubernetes cluster
          restartPolicy: OnFailure
EOF
2
3
4
5
6
7
8
9
10
11
12
13
14
15
16
17
18
19
20
21
$ kubectl describe cronjobs.batch hello
...输出省略...
Events:
  Type    Reason            Age   From                Message
  ----    ------            ----  ----
  Normal  SuccessfulCreate  79m   cronjob-controller  Created job hello-27547692
  Normal  SawCompletedJob   79m   cronjob-controller  Saw completed job: hello-27547692, status: Complete
  Normal  SuccessfulCreate  78m   cronjob-controller  Created job hello-27547693
  Normal  SawCompletedJob   78m   cronjob-controller  Saw completed job: hello-27547693, status: Complete
  Normal  SuccessfulCreate  77m   cronjob-controller  Created job hello-27547694
  Normal  SawCompletedJob   77m   cronjob-controller  Saw completed job: hello-27547694, status: Complete
...输出省略...
2
3
4
5
6
7
8
9
10
11
12
# 13. Pod健康检查
# 13.2 使用探针
# Lab41. livenessProbe-exec
kubectl apply -f- <<EOF
apiVersion: v1
kind: Pod
metadata:
  labels:
    test: liveness
  name: liveness-exec
spec:
  containers:
  - name: liveness
    args:
    - /bin/sh
    - -c
    - touch /tmp/healthy; sleep 30; rm -rf /tmp/healthy; sleep 600
    image: busybox
    livenessProbe:
      exec:
        command:
        - cat
        - /tmp/healthy
      initialDelaySeconds: 5
      periodSeconds: 5
EOF
2
3
4
5
6
7
8
9
10
11
12
13
14
15
16
17
18
19
20
21
22
23
24
$ kubectl get pod liveness-exec -w
NAME            READY   STATUS    RESTARTS     AGE
liveness-exec   1/1     Running  `1`(5s ago)   80s

$ kubectl describe pod liveness-exec

$ kubectl describe pod liveness-exec | grep -i liveness:.*exec
    Liveness:       exec [cat /tmp/healthy] delay=5s timeout=1s period=5s #success=1 #failure=3
2
3
4
5
6
7
8
kubectl apply -f- <<EOF
apiVersion: v1
kind: Pod
metadata:
  labels:
    test: liveness
# name: liveness-exec
  name: liveness-exec3
spec:
  containers:
  - name: liveness
    args:
    - /bin/sh
    - -c
    - touch /tmp/healthy; sleep 30; rm -rf /tmp/healthy; sleep 600
    image: busybox
    livenessProbe:
      exec:
        command:
        - cat
        - /tmp/healthy
      initialDelaySeconds: 5
      periodSeconds: 5
      # 增加 1 行
      timeoutSeconds: 3
EOF
2
3
4
5
6
7
8
9
10
11
12
13
14
15
16
17
18
19
20
21
22
23
24
25
26
27
$ kubectl describe pod liveness-exec3 | grep -i liveness:.*exec
    Liveness:       exec [cat /tmp/healthy] delay=5s timeout=`3s` period=5s #success=1 #failure=3
2
# Lab42. livenessProbe-http
kubectl apply -f- <<EOF
apiVersion: v1
kind: Pod
metadata:
  labels:
    test: liveness
  name: liveness-http
spec:
  containers:
  - name: liveness
    image: mirrorgooglecontainers/liveness
    args:
    - /server
    livenessProbe:
      httpGet:
        path: /healthz
        port: 8080
        httpHeaders:
        - name: X-Custom-Header
          value: Awesome
      initialDelaySeconds: 3
      periodSeconds: 3
EOF
2
3
4
5
6
7
8
9
10
11
12
13
14
15
16
17
18
19
20
21
22
23
24
$ kubectl get pod liveness-http
NAME            READY   STATUS    RESTARTS   AGE
liveness-http   1/1     Running   0          41s

$ kubectl describe pod liveness-http | grep -i liveness:.*http
    Liveness:      `http-get` http://:8080/healthz delay=3s timeout=1s period=3s #success=1 #failure=3
2
3
4
5
6
# Lab43. livenessProbe-tcp
kubectl apply -f- <<EOF
apiVersion: v1
kind: Pod
metadata:
  name: ubuntu
  labels:
    app: ubuntu
spec:
  containers:
  - name: ubuntu
    image: ubuntu
    args:
    - /bin/sh
    - -c
    - apt-get update && apt-get -y install openbsd-inetd telnetd && /etc/init.d/openbsd-inetd start; sleep 30000
    livenessProbe:
      tcpSocket:
        port: 23
      initialDelaySeconds: 60
      periodSeconds: 20
EOF
2
3
4
5
6
7
8
9
10
11
12
13
14
15
16
17
18
19
20
21
22
$ kubectl get pod ubuntu
NAME     READY   STATUS    RESTARTS   AGE
ubuntu   1/1     Running   0          2m32s

$ kubectl describe pod ubuntu | grep -i live
    Liveness:      `tcp-socket` :23 delay=60s timeout=1s period=20s #success=1 #failure=3
2
3
4
5
6
# 13.3 使用就绪探针
# Lab44. readinessProbe-exec
kubectl apply -f- <<EOF
apiVersion: apps/v1
kind: Deployment
metadata:
  name: httpd-deployment
spec:
  replicas: 3
  selector:
    matchLabels:
      app: httpd
  template:
    metadata:
      labels:
        app: httpd
    spec:
      containers:
      - name: httpd
        image: httpd
        ports:
        - containerPort: 80
        readinessProbe:
          exec:
            command:
            - cat
            - /usr/local/apache2/htdocs/index.html
          initialDelaySeconds: 5
          periodSeconds: 5
---
apiVersion: v1
kind: Service
metadata:
  name: httpd-svc
spec:
  selector:
    app: httpd
  ports:
  - protocol: TCP
    port: 8080
    targetPort: 80
EOF
2
3
4
5
6
7
8
9
10
11
12
13
14
15
16
17
18
19
20
21
22
23
24
25
26
27
28
29
30
31
32
33
34
35
36
37
38
39
40
41
$ kubectl get endpoints httpd-svc
NAME        ENDPOINTS                                            AGE
httpd-svc   172.16.126.57:80,172.16.126.58:80,172.16.126.59:80   97s

$ kubectl get pod -l app=httpd
NAME                              READY   STATUS    RESTARTS   AGE
httpd-deployment-c459d5dd-6pxl5   1/1     Running   0          84s
httpd-deployment-c459d5dd-79nvd   1/1     Running   0          84s
httpd-deployment-c459d5dd-vmlh2   1/1     Running   0          84s
2
3
4
5
6
7
8
9
$ kubectl exec -it httpd-deployment-c459d5dd-6pxl5 -- /bin/sh
# rm /usr/local/apache2/htdocs/index.html
# exit
2
3
$ kubectl get endpoints httpd-svc
NAME        ENDPOINTS                           AGE
httpd-svc   172.16.126.57:80,172.16.126.58:80   5m12s

$ kubectl get pods -l app=httpd
NAME                              READY   STATUS    RESTARTS   AGE
httpd-deployment-c459d5dd-6pxl5   0/1     Running   0          5m42s
httpd-deployment-c459d5dd-79nvd   1/1     Running   0          5m42s
httpd-deployment-c459d5dd-vmlh2   1/1     Running   0          5m42s

$ kubectl describe pod httpd-deployment-c459d5dd-6pxl5
...输出省略...
  Warning  Unhealthy  58s (x22 over 2m33s)  kubelet            Readiness probe failed: cat: /usr/local/apache2/htdocs/index.html: No such file or directory
2
3
4
5
6
7
8
9
10
11
12
13
# 14. Kubernetes网络
- CNI
- 网络安全
- 网络策略 networkpolicy - K8s
- 防火墙 firewall - 主机
- 安全组 security group - 云主机
# 14.1 Kubernetes 网络模型
# Lab45. Node与Pod之间通信实验
$ kubectl run nginx --image=nginx --port 80

$ kubectl get pod -owide
NAME   READY   STATUS   RESTARTS   AGE     IP             NODE          NOMINATED NODE   READINESS GATES
nginx  1/1     Running  0          27s     172.16.126.3  `k8s-worker2`  <none>           <none>

$ curl 172.16.126.3
<!DOCTYPE html>
<html>
<head>
<title>Welcome to nginx!</title>
<style>
...输出省略...

$ ip route
...输出省略...
172.16.235.196 dev cali46502c0485c scope link
172.16.235.197 dev cali29fae187fa2 scope link
172.16.235.198 dev cali2bab3c78e13 scope link
...输出省略...
2
3
4
5
6
7
8
9
10
11
12
13
14
15
16
17
18
19
20
# Lab46. Pod与Pod之间通信实验
$ kubectl run busybox --image=busybox -- sleep 3h

$ kubectl get pod -o wide
NAME       READY   STATUS     RESTARTS     AGE    IP                     NODE
busybox    1/1         Running    0                 27s       172.16.194.71   k8s-worker1
...输出省略
2
3
4
5
6
$ kubectl exec -it busybox -- /bin/sh
/ # ping 172.16.126.3
PING 172.16.126.3 (172.16.126.3): 56 data bytes
64 bytes from 172.16.126.3: seq=0 ttl=62 time=0.611 ms
...输出省略...
/ # telnet 172.16.126.3 80
Connected to 172.16.126.3
get
...输出省略...
<hr><center>nginx/1.21.5</center>
</body>
</html>
Connection closed by foreign host
/ # exit
2
3
4
5
6
7
8
9
10
11
12
13
14
# Lab46. 集群外访问-NodePort
$ kubectl get pod --show-labels
NAME     READY   STATUS  RESTARTS   AGE. LABELS
busybox  1/1        Running  0                17m  run=busybox
nginx    1/1        Running  0                42m  run=nginx
...
2
3
4
5
kubectl apply -f- <<EOF
apiVersion: v1
kind: Service
metadata:
  name: nginx-access
spec:
  selector:
    run: nginx
  type: NodePort
  ports:
  - port: 80
    targetPort: 80
    nodePort: 30080
EOF
2
3
4
5
6
7
8
9
10
11
12
13
14
15
$ kubectl get svc -o wide
NAME          TYPE       CLUSTER-IP     EXTERNAL-IP  PORT(S)           AGE  SELECTOR
kubernetes    ClusterIP  10.96.0.1      <none>       443/TCP           30d   <none>
nginx-access  NodePort   10.110.109.55  <none>       80:`30080`/TCP    68s   run=nginx

$ curl http://k8s-master:30080
...
<h1>Welcome to nginx!</h1>
...

$ ss -ntlp | grep 30080
LISTEN  0       4096              0.0.0.0:30080          0.0.0.0:*
2
3
4
5
6
7
8
9
10
11
12
# 15. Kubernetes存储
# 15.1 EmptyDir
# Lab47. 创建一个使用EmptyDir的Pod
kubectl apply -f- <<EOF
apiVersion: v1
kind: Pod
metadata:
  name: em
spec:
  containers:
  - image: ubuntu
    name: test-container
    # 下 3 行
    volumeMounts:
    - mountPath: /cache
      name: cache-volume
    args:
    - /bin/sh
    - -c
    - sleep 30000
# 下 3 行
  volumes:
  - name: cache-volume
    emptyDir: {}
EOF
2
3
4
5
6
7
8
9
10
11
12
13
14
15
16
17
18
19
20
21
22
23
$ kubectl describe pod em | grep -A 1 Mount
    Mounts:
     `/cache`from `cache-volume` (rw)

$ kubectl describe pod em | grep -A 4 ^Volume
Volumes:
  `cache-volume`:
    Type:       `EmptyDir` (a temporary directory that shares a pod's lifetime)
    Medium:
    SizeLimit:  `<unset>`
2
3
4
5
6
7
8
9
10
$ kubectl exec -it em -- /bin/sh
# ls /cache
# touch /cache/my.txt
# exit
2
3
4
# Lab48. EmptyDir容量限制
kubectl apply -f- <<EOF
apiVersion: v1
kind: Pod
metadata:
  name: em1
spec:
  containers:
  - image: ubuntu
    name: test-container
    volumeMounts:
    - mountPath: /cache
      name: cache-volume
    args:
    - /bin/sh
    - -c
    - sleep 30000
  volumes:
  - name: cache-volume
  # 下 2 行区别
    emptyDir:
      sizeLimit: 1Gi
EOF
2
3
4
5
6
7
8
9
10
11
12
13
14
15
16
17
18
19
20
21
22
23
$ kubectl describe pod em1 | grep -A 4 ^Volume
Volumes:
  cache-volume:
    Type:       EmptyDir (a temporary directory that shares a pod's lifetime)
    Medium:
    SizeLimit: `1Gi`
2
3
4
5
6
$ kubectl exec -it em1 -- /bin/sh
# df -h
Filesystem                         Size  Used Avail Use% Mounted on
overlay                             38G  4.5G   32G  13% /
/dev/mapper/ubuntu--vg-ubuntu--lv  `38G` 4.5G   32G  13% /cache
shm                                 64M     ...
# dd if=/dev/zero of=/cache/test2g bs=1M count=2048
# exit
2
3
4
5
6
7
8
$ kubectl get pod em1
NAME   READY   STATUS    RESTARTS   AGE
em1    0/1    `Evicted`  1          53m
2
3
# 15.2 hostPath
# Lab49. hostPath
$ kubectl -n kube-system get pod kube-proxy-8pv56 -o yaml | grep -A 12 volumes:
  volumes:
  ...输出省略...
  - hostPath:
      path: /run/xtables.lock
      type: FileOrCreate
    name: xtables-lock
  - hostPath:
      path: /lib/modules
      type: ""
    name: lib-modules
2
3
4
5
6
7
8
9
10
11
kubectl apply -f- <<EOF
apiVersion: v1
kind: Pod
metadata:
  name: hppod
spec:
  containers:
  - image: ubuntu
    name: hp-container
    volumeMounts:
    - mountPath: /hp-dir
      name: hp-volume
    args:
    - /bin/sh
    - -c
    - sleep 30000
  volumes:
  - name: hp-volume
    hostPath:
      path: /mnt/hostpathdir
      type: DirectoryOrCreate
EOF
2
3
4
5
6
7
8
9
10
11
12
13
14
15
16
17
18
19
20
21
22
23
$ kubectl get pod hppod -o wide
NAME    READY   STATUS    RESTARTS   AGE   IP             NODE          NOMINATED NODE   READINESS GATES
hppod   1/1     Running   0          29s   172.16.126.9  `k8s-worker2`  <none>           <none>

$ ssh root@k8s-worker2 ls /mnt
hostpathdir
2
3
4
5
6
# 15.3 PV和PVC
# Lab50. PV和PVC
[kiosk@192.168.147.128]$
sudo apt -y install nfs-kernel-server && \
sudo mkdir /nfs
echo '/nfs *(rw,no_root_squash)' | sudo tee /etc/exports
sudo systemctl enable nfs-server
sudo systemctl restart nfs-server
showmount -e
2
3
4
5
6
7
kubectl apply -f- <<EOF
apiVersion: v1
kind: PersistentVolume
metadata:
  name: mypv
spec:
  capacity:
    storage: 1Gi
  accessModes:
    - ReadWriteOnce
  persistentVolumeReclaimPolicy: Recycle
  nfs:
    path: /nfs
    server: 192.168.147.128
EOF
2
3
4
5
6
7
8
9
10
11
12
13
14
15
16
$ kubectl get pv
NAME   CAPACITY   ACCESS MODES   RECLAIM POLICY   STATUS      CLAIM   STORAGECLASS   REASON   AGE
mypv   1Gi        RWO            Recycle          Available                                   9s
2
3
kubectl apply -f- <<EOF
apiVersion: v1
kind: PersistentVolumeClaim
metadata:
  name: mypvc
spec:
  accessModes:
    - ReadWriteOnce
  volumeName: mypv
  resources:
    requests:
      storage: 1Gi
EOF
2
3
4
5
6
7
8
9
10
11
12
13
14
$ kubectl get pvc
NAME    STATUS   VOLUME   CAPACITY   ACCESS MODES   STORAGECLASS   AGE
mypvc   Bound    mypv     1Gi        RWO                           7s
2
3
$ kubectl delete pvc mypvc && kubectl get pod
persistentvolumeclaim "mypvc" deleted
NAME                               READY   STATUS                   RESTARTS       AGE
...输出省略...
`recycler-for-mypv`                0/1     ContainerCreating        0              0s
2
3
4
5
kubectl apply -f- <<EOF
apiVersion: v1
kind: PersistentVolume
metadata:
  name: mypv
spec:
  capacity:
    storage: 1Gi
  accessModes:
    - ReadWriteOnce
# 只修改 1 行
  persistentVolumeReclaimPolicy: Retain
  nfs:
    path: /nfs
    server: 192.168.147.128
EOF
2
3
4
5
6
7
8
9
10
11
12
13
14
15
16
17
$ kubectl get pv
NAME   CAPACITY   ACCESS MODES   RECLAIM POLICY   STATUS      CLAIM   STORAGECLASS   REASON   AGE
mypv   1Gi        RWO           `Retain`          Available
2
3
kubectl apply -f- <<EOF
apiVersion: v1
kind: PersistentVolumeClaim
metadata:
  name: mypvc
spec:
  accessModes:
    - ReadWriteOnce
  volumeName: mypv
  resources:
    requests:
      storage: 1Gi
EOF
2
3
4
5
6
7
8
9
10
11
12
13
14
$ kubectl delete pvc mypvc
persistentvolumeclaim "mypvc" deleted

$ kubectl get pv
NAME   CAPACITY   ACCESS MODES   RECLAIM POLICY   STATUS     CLAIM           STORAGECLASS   REASON   AGE
mypv   1Gi        RWO            Retain          `Released`  default/mypvc                           5m46s
2
3
4
5
6
# 16. ConfigMap与Secret
# 16.1 ConfigMap介绍
# Lab51. 创建ConfigMap
sudo mkdir -p /runfile/configmap

sudo tee /runfile/configmap/game.properties <<EOF
lives=3
enemies.cheat=true
enemies.cheat.level=noGoodRotten
EOF

sudo tee /runfile/configmap/ui.properties <<EOF
color.good=purple
how.nice.to.look=fairlyNice
EOF
2
3
4
5
6
7
8
9
10
11
12
- Folder --from-file
$ kubectl create configmap game-config --from-file=/runfile/configmap

$ kubectl get configmap
NAME               DATA   AGE
`game-config`      2      5s
kube-root-ca.crt   1      31d

$ kubectl describe configmaps game-config
...输出省略...
Data
====
game.properties:
----
lives=3
enemies.cheat=true
enemies.cheat.level=noGoodRotten

ui.properties:
----
color.good=purple
how.nice.to.look=fairlyNice
...输出省略...
2
3
4
5
6
7
8
9
10
11
12
13
14
15
16
17
18
19
20
21
22
- File: ini --from-file
$ kubectl create configmap game-config-3 \
  --from-file=/runfile/configmap/game.properties \
  --from-file=/runfile/configmap/ui.properties

$ kubectl get configmap
NAME               DATA   AGE
game-config        2      112s
`game-config-3`    2      12s
kube-root-ca.crt   1      31d

$ kubectl describe configmaps game-config-3
...输出省略...
Data
====
game.properties:
----
lives=3
enemies.cheat=true
enemies.cheat.level=noGoodRotten

ui.properties:
----
color.good=purple
how.nice.to.look=fairlyNice
...输出省略...
2
3
4
5
6
7
8
9
10
11
12
13
14
15
16
17
18
19
20
21
22
23
24
25
--from-literal
$ kubectl create configmap special-config \
--from-literal=special.how=very \
--from-literal=special.type=charm

$ kubectl get configmaps
NAME               DATA   AGE
game-config        2      2m54s
game-config-3      2      74s
kube-root-ca.crt   1      31d
`special-config`   2      8s

$ kubectl describe configmaps special-config
...输出省略...
Data
====
special.how:
----
very
special.type:
----
charm
...输出省略...
2
3
4
5
6
7
8
9
10
11
12
13
14
15
16
17
18
19
20
21
22
- File: yaml --from-file
kubectl apply -f- <<EOF
apiVersion: v1
kind: ConfigMap
metadata:
  name: specialconfig-2
data:
  key1: value1
  pro.property: |
    key2: value2
    key3: value3
EOF
2
3
4
5
6
7
8
9
10
11
12
$ kubectl get configmaps
NAME               DATA   AGE
game-config        2      4m
game-config-3      2      2m20s
kube-root-ca.crt   1      31d
special-config     2      74s
`specialconfig-2`  2      15s

$ kubectl describe configmaps specialconfig-2
...输出省略...
Data
====
pro.property:
----
key2: value2
key3: value3

key1:
----
value1
...输出省略...
2
3
4
5
6
7
8
9
10
11
12
13
14
15
16
17
18
19
20
21
# Lab52. 使用ConfigMap
- envFrom
kubectl apply -f- <<EOF
apiVersion: v1
kind: Pod
metadata:
  name: cm-test-pod
spec:
  containers:
    - name: cm-container
      image: busybox
      args: [  "/bin/sh", "-c", "sleep 3000" ]
      env:
        - name: special-env
          valueFrom:
            configMapKeyRef:
              name: specialconfig-2
              key: key1
      envFrom:
        - configMapRef:
            name: specialconfig-2
  restartPolicy: Never
EOF
2
3
4
5
6
7
8
9
10
11
12
13
14
15
16
17
18
19
20
21
22
$ kubectl get pods
NAME          READY   STATUS    RESTARTS   AGE
cm-test-pod   1/1     Running   0          26s

$ kubectl exec -it cm-test-pod  -- /bin/sh
/ # env
...输出省略...
key1=value1
pro.property=key2: value2
key3: value3
...输出省略...
/ # exit
2
3
4
5
6
7
8
9
10
11
12
- volume
kubectl apply -f- <<EOF
apiVersion: v1
kind: Pod
metadata:
  name: cmpod2
spec:
  containers:
  - name: cmpod2
    image: busybox
    args: [ "/bin/sh", "-c", "sleep 3000" ]
    volumeMounts:
    - name: db
      mountPath: "/etc/db"
      readOnly: true
  volumes:
  - name: db
    configMap:
      name: specialconfig-2
EOF
2
3
4
5
6
7
8
9
10
11
12
13
14
15
16
17
18
19
20
$ kubectl get pods
NAME          READY   STATUS    RESTARTS   AGE
cm-test-pod   1/1     Running   0          6m2s
cmpod2        1/1     Running   0          28s

$ kubectl exec -it cmpod2 -- /bin/sh
/ # ls /etc/db
key1          pro.property
/ # cat /etc/db/key1
value1/ # cat /etc/db/pro.property
key2: value2
key3: value3
# exit
2
3
4
5
6
7
8
9
10
11
12
13
kubectl apply -f- <<EOF
apiVersion: v1
kind: ConfigMap
metadata:
  name: specialconfig-2
data:
  key1: value-new
  pro.property: |
    key2: value2
    key3: value3
EOF
2
3
4
5
6
7
8
9
10
11
12
$ kubectl exec -it cmpod2 -- /bin/sh
/ # cat /etc/db/key1
value-new
# exit
2
3
4
# 16.2 Secret介绍
# Lab52. 创建Secret
- file
$ echo -n "admin" > username.txt
$ echo -n "mima" > password.txt
2
$ kubectl create secret generic db-user-pass \
--from-file=./username.txt \
--from-file=./password.txt

$ kubectl get secret
NAME                  TYPE                                  DATA   AGE
`db-user-pass`        Opaque                                2      6s
default-token-7zfdn   kubernetes.io/service-account-token   3      31d

$ kubectl describe secrets db-user-pass
...输出省略...
Data
====
password.txt:  4 bytes
username.txt:  5 bytes
2
3
4
5
6
7
8
9
10
11
12
13
14
15
- file: yaml
$ echo -n "admin" | base64
YWRtaW4=

$ echo -n "mima" | base64
bWltYQ==
2
3
4
5
kubectl apply -f- <<EOF
apiVersion: v1
kind: Secret
metadata:
  name: mysecret
type: Opaque
data:
  username: YWRtaW4=
  password: bWltYQ==
EOF
2
3
4
5
6
7
8
9
10
11
$ kubectl get secrets mysecret
NAME       TYPE     DATA   AGE
mysecret   Opaque   2      13s

$ kubectl describe secrets mysecret
...输出省略...
Data
====
password:  4 bytes
username:  5 bytes
2
3
4
5
6
7
8
9
10
# Lab53. 使用Secret
挂载全部值
kubectl apply -f- <<EOF
apiVersion: v1
kind: Pod
metadata:
  name: spod
spec:
  containers:
  - image: busybox
    name: spod
    args: ["/bin/sh","-c","sleep 3000"]
    volumeMounts:
    - name: secrets
      mountPath: "/etc/secret"
      readOnly: true
  volumes:
  - name: secrets
    secret:
      secretName: mysecret
EOF
2
3
4
5
6
7
8
9
10
11
12
13
14
15
16
17
18
19
20
$ kubectl get pods spod
NAME   READY   STATUS    RESTARTS   AGE
spod   1/1     Running   0          10s

$ kubectl exec -it spod -- /bin/sh
/ # ls /etc/secret
password  username
/ # cat /etc/secret/username
admin/ # cat /etc/secret/password
mima/ # exit
2
3
4
5
6
7
8
9
10
挂载指定值
kubectl apply -f- <<EOF
apiVersion: v1
kind: Pod
metadata:
  name: spod2
spec:
  containers:
  - image: busybox
    name: spod2
    args: ["/bin/sh","-c","sleep 3000"]
    volumeMounts:
    - name: secrets
      mountPath: "/etc/secret"
      readOnly: true
  volumes:
  - name: secrets
    secret:
      secretName: mysecret
      items:
      - key: password
        path: my-group/my-passwd
EOF
2
3
4
5
6
7
8
9
10
11
12
13
14
15
16
17
18
19
20
21
22
23
$ kubectl get pod spod2
NAME    READY   STATUS    RESTARTS   AGE
spod2   1/1     Running   0          58s

$ kubectl exec -it spod2 -- /bin/sh
/ # ls /etc/secret
my-group
/ # ls /etc/secret/my-group/
my-passwd
/ # cat /etc/secret/my-group/my-passwd
mima/ # exit
2
3
4
5
6
7
8
9
10
11
# 17. StatefulSet管理与使用
- pvc
- statefulset
- service(headless - clusterIP: None)
# 17.1 使用StatefulSet
# Lab54. StatefulSet
sudo mkdir /etc/exports.d /nfs{1..3} && \
sudo tee /etc/exports.d/s.exports <<EOF
/nfs1 *(rw,no_root_squash)
/nfs2 *(rw,no_root_squash)
/nfs3 *(rw,no_root_squash)
EOF
sudo apt -y install nfs-kernel-server && \
sudo systemctl enable nfs-server && \
sudo systemctl restart nfs-server && \
showmount -e
2
3
4
5
6
7
8
9
10
11
kubectl apply -f- <<EOF
apiVersion: v1
kind: PersistentVolume
metadata:
  name: mypv1
spec:
  storageClassName: my-sc
  capacity:
    storage: 1Gi
  accessModes:
    - ReadWriteOnce
  persistentVolumeReclaimPolicy: Recycle
  nfs:
    path: /nfs1
    server: 192.168.147.128
---
apiVersion: v1
kind: PersistentVolume
metadata:
  name: mypv2
spec:
  storageClassName: my-sc
  capacity:
    storage: 1Gi
  accessModes:
    - ReadWriteOnce
  persistentVolumeReclaimPolicy: Recycle
  nfs:
    path: /nfs2
    server: 192.168.147.128
---
apiVersion: v1
kind: PersistentVolume
metadata:
  name: mypv3
spec:
  storageClassName: my-sc
  capacity:
    storage: 1Gi
  accessModes:
    - ReadWriteOnce
  persistentVolumeReclaimPolicy: Recycle
  nfs:
    path: /nfs3
    server: 192.168.147.128
EOF
2
3
4
5
6
7
8
9
10
11
12
13
14
15
16
17
18
19
20
21
22
23
24
25
26
27
28
29
30
31
32
33
34
35
36
37
38
39
40
41
42
43
44
45
46
47
$ kubectl get pv
NAME    CAPACITY   ACCESS MODES   RECLAIM POLICY   STATUS      CLAIM   STORAGECLASS   REASON   AGE
mypv1   1Gi        RWO            Recycle          Available           my-sc                   41s
mypv2   1Gi        RWO            Recycle          Available           my-sc                   41s
mypv3   1Gi        RWO            Recycle          Available           my-sc                   10s
2
3
4
5
kubectl apply -f- <<EOF
apiVersion: apps/v1
kind: StatefulSet
metadata:
  name: web
spec:
  selector:
    matchLabels:
      app: nginx
  serviceName: nginx
  replicas: 3
  template:
    metadata:
      labels:
        app: nginx
    spec:
      terminationGracePeriodSeconds: 10
      containers:
      - name: nginx
        image: nginx
        ports:
        - containerPort: 80
          name: web
        volumeMounts:
        - name: stor
          mountPath: /usr/share/nginx/html
  volumeClaimTemplates:
  - metadata:
      name: stor
    spec:
      accessModes: [ "ReadWriteOnce" ]
      storageClassName: "my-sc"
      resources:
        requests:
          storage: 1Gi
EOF
2
3
4
5
6
7
8
9
10
11
12
13
14
15
16
17
18
19
20
21
22
23
24
25
26
27
28
29
30
31
32
33
34
35
36
37
$ watch -n 1 kubectl get pod
NAME    READY   STATUS    RESTARTS   AGE
`web-0` 1/1     Running   0          79s
`web-1` 1/1     Running   0          55s
`web-2` 1/1     Running   0          30s
<Ctrl-C>

$ kubectl get pvc
NAME         STATUS   VOLUME   CAPACITY   ACCESS MODES   STORAGECLASS   AGE
stor-web-0   Bound    mypv1    1Gi        RWO            my-sc          112s
stor-web-1   Bound    mypv2    1Gi        RWO            my-sc          88s
stor-web-2   Bound    mypv3    1Gi        RWO            my-sc          63s
2
3
4
5
6
7
8
9
10
11
12
kubectl apply -f- <<EOF
apiVersion: v1
kind: Service
metadata:
  name: nginx
  labels:
    app: nginx
spec:
  ports:
  - port: 80
    name: web
  clusterIP: None
  selector:
    app: nginx
EOF
2
3
4
5
6
7
8
9
10
11
12
13
14
15
16
$ kubectl get svc nginx
NAME    TYPE        CLUSTER-IP   EXTERNAL-IP   PORT(S)   AGE
nginx   ClusterIP   None         <none>        80/TCP    15s
2
3
kubectl apply -f- <<EOF
apiVersion: v1
kind: Pod
metadata:
  name: clientpod
spec:
  containers:
    - name: clientpod
      image: busybox:1.28.3
      args:
      - /bin/sh
      - -c
      - sleep 3h
EOF
2
3
4
5
6
7
8
9
10
11
12
13
14
15
$ kubectl exec -it clientpod -- /bin/sh
/ # nslookup nginx
...输出省略...
Name:      nginx
Address 1: 172.16.194.66 web-2.nginx.default.svc.cluster.local
Address 2: 172.16.126.1 web-0.nginx.default.svc.cluster.local
Address 3: 172.16.194.65 web-1.nginx.default.svc.cluster.local
/ # nslookup web-0.nginx
...输出省略...
Name:      web-0.nginx
Address 1: 172.16.126.1 web-0.nginx.default.svc.cluster.local

/# exit
2
3
4
5
6
7
8
9
10
11
12
13
14
# Lab55. StatefulSet的故障处理
$ sudo touch /nfs1/newfile

$ kubectl exec -it web-1 -- ls /usr/share/nginx/html
newfile

$ kubectl exec -it clientpod -- nslookup web-1.nginx
...输出省略...
Address 3: 172.16.194.`65` web-1.nginx.default.svc.cluster.local

$ kubectl delete pod web-1
pod "web-1" deleted

$ kubectl exec -it clientpod -- nslookup web-1.nginx
...输出省略...
Name:      web-1.nginx
Address 1: 172.16.194.`67` web-1.nginx.default.svc.cluster.local

$ k exec -it web-1 -- ls /usr/share/nginx/html
newfile
2
3
4
5
6
7
8
9
10
11
12
13
14
15
16
17
18
19
# Lab56. 扩缩容和升级
$ watch -n 1 kubectl get pod
新开个终端
$ kubectl scale statefulset web --replicas=1

$ kubectl scale statefulset web --replicas=3
2
3
# Lab57. Pod管理策略
kubectl delete statefulsets web
kubectl delete pvc stor-web-0 stor-web-1 stor-web-2

$ kubectl get svc

$ kubectl get pv
2
3
4
5
6
kubectl apply -f- <<EOF
apiVersion: apps/v1
kind: StatefulSet
metadata:
  name: web
spec:
  selector:
    matchLabels:
      app: nginx
  serviceName: nginx
  # 增加 1 行
  podManagementPolicy: "Parallel"
  replicas: 3
  template:
    metadata:
      labels:
        app: nginx
    spec:
      terminationGracePeriodSeconds: 10
      containers:
      - name: nginx
        image: nginx
        ports:
        - containerPort: 80
          name: web
        volumeMounts:
        - name: stor
          mountPath: /usr/share/nginx/html
  volumeClaimTemplates:
  - metadata:
      name: stor
    spec:
      accessModes: [ "ReadWriteOnce" ]
      storageClassName: "my-sc"
      resources:
        requests:
          storage: 1Gi
EOF
2
3
4
5
6
7
8
9
10
11
12
13
14
15
16
17
18
19
20
21
22
23
24
25
26
27
28
29
30
31
32
33
34
35
36
37
38
39
$ watch -n 1 kubectl get pod
新开个终端
$ kubectl scale statefulset web --replicas=1

$ kubectl scale statefulset web --replicas=3
2
3
# 18. Kubernetes服务质量
# 18.1 QoS原理与使用
# Lab58. Qos
节点资源
$ kubectl get node k8s-worker1 -o yaml | grep -A 13 allo
 `allocatable`:
    cpu: "2"
    ephemeral-storage: "36496716535"
    hugepages-1Gi: "0"
    hugepages-2Mi: "0"
    memory: 3892256Ki
    pods: "110"
 `capacity`:
    cpu: "2"
    ephemeral-storage: 39601472Ki
    hugepages-1Gi: "0"
    hugepages-2Mi: "0"
    memory: 3994656Ki
    pods: "110"
2
3
4
5
6
7
8
9
10
11
12
13
14
15
Guaranteed
kubectl apply -f- <<EOF
apiVersion: v1
kind: Pod
metadata:
  name: qos-demo
spec:
  containers:
  - name: qos-demo-ctr
    image: nginx
    resources:
      limits:
        memory: "200Mi"
        cpu: "700m"
      requests:
        memory: "200Mi"
        cpu: "700m"
EOF
2
3
4
5
6
7
8
9
10
11
12
13
14
15
16
17
18
$ kubectl get pod qos-demo -o yaml | grep qosC
  qosClass: `Guaranteed`
2
Burstable
kubectl apply -f- <<EOF
apiVersion: v1
kind: Pod
metadata:
  name: qos-demo-2
spec:
  containers:
  - name: qos-demo-2-ctr
    image: nginx
    resources:
      limits:
        memory: "200Mi"
      requests:
        memory: "100Mi"
EOF
2
3
4
5
6
7
8
9
10
11
12
13
14
15
16
$ kubectl get pod qos-demo-2 -o yaml | grep qosC
  qosClass: `Burstable`
2
BestEffort
kubectl apply -f- <<EOF
apiVersion: v1
kind: Pod
metadata:
  name: qos-demo-3
spec:
  containers:
  - name: qos-demo-3-ctr
    image: nginx
EOF
2
3
4
5
6
7
8
9
10
11
$ kubectl get pod qos-demo-3 -o yaml | grep qosC
  qosClass: `BestEffort`
2
超出容器的内存限制
kubectl apply -f- <<EOF
apiVersion: v1
kind: Pod
metadata:
  name: memory-demo
spec:
  containers:
  - name: memory-demo-ctr
    image: polinux/stress
    resources:
      limits:
        memory: "100Mi"
      requests:
        memory: "50Mi"
    command: ["stress"]
    args: ["--vm", "1", "--vm-bytes", "150M", "--vm-hang", "1"]
EOF
2
3
4
5
6
7
8
9
10
11
12
13
14
15
16
17
18
$ kubectl get pod memory-demo
NAME          READY   STATUS      RESTARTS   AGE
memory-demo   0/1    `OOMKilled`  0          20s
2
3
$ kubectl describe pod memory-demo | grep -A 2 Last
    Last State:     Terminated
      Reason:       OOMKilled
      Exit Code:    1
2
3
4
超出节点可用资源
kubectl apply -f- <<EOF
apiVersion: v1
kind: Pod
metadata:
  name: memory-demo2
spec:
  containers:
  - name: memory-demo2-ctr
    image: polinux/stress
    resources:
      limits:
        memory: "1000Gi"
      requests:
        memory: "1000Gi"
    command: ["stress"]
    args: ["--vm", "1", "--vm-bytes", "150M", "--vm-hang", "1"]
EOF
2
3
4
5
6
7
8
9
10
11
12
13
14
15
16
17
18
$ kubectl get pod memory-demo2
NAME           READY   STATUS    RESTARTS   AGE
memory-demo2   0/1    `Pending`  0          22s
2
3
$ kubectl describe pod memory-demo2 | tail -n 1
  Warning  FailedScheduling  10s (x2 over 72s)  default-scheduler  0/3 nodes are available: 1 node(s) had taint {node-role.kubernetes.io/master: }, that the pod didn't tolerate, 2 Insufficient memory.
2
# 19. Kubernetes资源调度
# 19.1 k8s资源管理
$ kubectl get node k8s-worker1 -o yaml | grep -A 19 ^status
status:
  addresses:
  - address: 192.168.147.129
    type: InternalIP
  - address: k8s-worker1
    type: Hostname
  allocatable:
    cpu: "2"
    ephemeral-storage: "36496716535"
    hugepages-1Gi: "0"
    hugepages-2Mi: "0"
    memory: 3892256Ki
    pods: "110"
  capacity:
    cpu: "2"
    ephemeral-storage: 39601472Ki
    hugepages-1Gi: "0"
    hugepages-2Mi: "0"
    memory: 3994656Ki
    pods: "110"
2
3
4
5
6
7
8
9
10
11
12
13
14
15
16
17
18
19
20
21
$ kubelet -h | grep eviction-hard.*map
      --eviction-hard mapStringString                            A set of eviction thresholds (e.g. memory.available<1Gi) that if met would trigger a pod eviction. (default imagefs.available<15%,memory.available<100Mi,nodefs.available<10%,nodefs.inodesFree<5%)
2
# 19.2 k8s调度器
# 19.3 k8s高度策略
# 19.4 k8s调度优先级和抢占机制
# Lab59. Priorityclass
$ kubectl get priorityclasses
NAME                      VALUE        GLOBAL-DEFAULT   AGE
system-cluster-critical   2000000000   false            34d
system-node-critical      2000001000   false            34d

$ kubectl describe priorityclasses system-cluster-critical
Name:           system-cluster-critical
Value:          2000000000
GlobalDefault:  false
Description:    Used for system critical pods that must run in the cluster, but can be moved to another node if necessary.
Annotations:    <none>
Events:         <none>

$ kubectl describe priorityclasses system-node-critical
Name:           system-node-critical
Value:          2000001000
GlobalDefault:  false
Description:    Used for system critical pods that must not be moved from their current node.
Annotations:    <none>
Events:         <none>
2
3
4
5
6
7
8
9
10
11
12
13
14
15
16
17
18
19
20
kubectl apply -f- <<EOF
apiVersion: scheduling.k8s.io/v1
kind: PriorityClass
metadata:
  name: high-priority
value: 1000000
globalDefault: false
EOF
2
3
4
5
6
7
8
9
kubectl apply -f- <<EOF
apiVersion: v1
kind: Pod
metadata:
  name: nginx
  labels:
    env: test
spec:
  containers:
  - name: nginx
    image: nginx
    imagePullPolicy: IfNotPresent
  priorityClassName: high-priority
EOF
2
3
4
5
6
7
8
9
10
11
12
13
14
15
$ kubectl describe pod nginx | grep Priority
Priority:            `1000000`
Priority Class Name:  high-priority
2
3
kubectl apply -f- <<EOF
apiVersion: v1
kind: Pod
metadata:
  name: nginx-1
  labels:
    env: test
spec:
  containers:
  - name: nginx
    image: nginx
    imagePullPolicy: IfNotPresent
# priorityClassName: high-priority
EOF
2
3
4
5
6
7
8
9
10
11
12
13
14
15
$ kubectl describe pod nginx-1 | grep Pri
Priority:    `0`
2
# 20. Kubernetes Dashboard
# 20.1 Dashboard介绍
# Lab60. 部署 Dashboard UI (opens new window)
- 安装
*$ kubectl apply -f https://rt.vmcc.xyz:8080/K8s/dashboard/v2.7.0/aio/deploy/recommended.yaml
:<<EOF
namespace/`kubernetes-dashboard` created
serviceaccount/kubernetes-dashboard created
service/kubernetes-dashboard created
secret/kubernetes-dashboard-certs created
secret/kubernetes-dashboard-csrf created
secret/kubernetes-dashboard-key-holder created
configmap/kubernetes-dashboard-settings created
role.rbac.authorization.k8s.io/kubernetes-dashboard created
clusterrole.rbac.authorization.k8s.io/kubernetes-dashboard created
rolebinding.rbac.authorization.k8s.io/kubernetes-dashboard created
clusterrolebinding.rbac.authorization.k8s.io/kubernetes-dashboard created
deployment.apps/kubernetes-dashboard created
service/dashboard-metrics-scraper created
deployment.apps/dashboard-metrics-scraper created
EOF
2
3
4
5
6
7
8
9
10
11
12
13
14
15
16
17
$ kubectl -n kubernetes-dashboard get pods -owide
NAME                                         READY   STATUS    RESTARTS   AGE    IP              NODE          NOMINATED NODE   READINESS GATES
dashboard-metrics-scraper-799d786dbf-r7dp9   1/1     Running   0          115s   172.16.194.65   k8s-worker2   <none>           <none>
kubernetes-`dashboard`-546cbc58cd-2lvxt      1/1     `Running`   0          115s   172.16.126.1   k8s-worker2  <none>           <none>
2
3
4
通过物理机使用==chrome==访问==thisisunsafe==
https://192.168.147.128:30291
*$ kubectl -n kubernetes-dashboard \
     patch svc kubernetes-dashboard -p '{"spec":{"type":"NodePort"}}'

$ kubectl -n kubernetes-dashboard get svc
NAME                        TYPE        CLUSTER-IP       EXTERNAL-IP   PORT(S)         AGE
dashboard-metrics-scraper   ClusterIP   10.103.222.187   <none>        8000/TCP        6m2s
kubernetes-dashboard       `NodePort`   10.97.233.31     <none>        443:`30291`/TCP   6m3s
2
3
4
5
6
7
- 查看服务帐号kubernetes-dashboard的登陆 token
针对最新版本 2.7,默认未创建token
$ kubectl -n kubernetes-dashboard create token kubernetes-dashboard
:<<EOF
`eyJhbGciOiJSUzI1NiIsImtpZCI6ImgzVlpPT1l6RXJaVlJhTVZjbU4tVWt1anRUSmxncnM2WFhrSUw0dGVVUUkifQ.eyJhdWQiOlsiaHR0cHM6Ly9rdWJlcm5ldGVzLmRlZmF1bHQuc3ZjLmNsdXN0ZXIubG9jYWwiXSwiZXhwIjoxNjcxOTM4Nzc3LCJpYXQiOjE2NzE5MzUxNzcsImlzcyI6Imh0dHBzOi8va3ViZXJuZXRlcy5kZWZhdWx0LnN2Yy5jbHVzdGVyLmxvY2FsIiwia3ViZXJuZXRlcy5pbyI6eyJuYW1lc3BhY2UiOiJrdWJlcm5ldGVzLWRhc2hib2FyZCIsInNlcnZpY2VhY2NvdW50Ijp7Im5hbWUiOiJrdWJlcm5ldGVzLWRhc2hib2FyZCIsInVpZCI6IjdjZDRlNTVjLWRiZmEtNDg2OS1iMjA0LWNjZGE5NzVhYTExZCJ9fSwibmJmIjoxNjcxOTM1MTc3LCJzdWIiOiJzeXN0ZW06c2VydmljZWFjY291bnQ6a3ViZXJuZXRlcy1kYXNoYm9hcmQ6a3ViZXJuZXRlcy1kYXNoYm9hcmQifQ.d3hMeEsbBjxAPy70bfUno2EkAinl_2VbTOtoL1rJ9vp_dIWatZcR5m-L0yuB0-WaVK2elA_OZk-_w9HoWcmei9x_0hNHMjvYMKbuH1VneqsB1z_NzBsNzEL9lMm7UeHE5DkFPPRUF4oISBhpr5KVC8nOHSPqW5wGCmD02l0k0uVX3vYzXv0yQyl_D7FPyiuFnO4G5i4jzS54FcREK5PX36xVgLp5TaPJcF4bHPong3vqFyx67nlP9PgYDJBylkpKFDfnhO30EoRcRlKMOnIId654y8Zk_dy7e7oRhVjKs7v_jev4N3U9WyNP_ZMUQ_EupjNCnMiMxqRuYYGwwCX0bQ`
EOF
2
3
4
5
- 提权
$ kubectl -n kubernetes-dashboard \
  describe clusterrole cluster-admin
...输出省略...
PolicyRule:
  Resources  Non-Resource URLs  Resource Names  Verbs
  ---------  -----------------  --------------  -----
  *.*        []                 []              [*]
             [*]                []              [*]

$ kubectl -n kubernetes-dashboard \
  describe clusterrole kubernetes-dashboard
...输出省略...
PolicyRule:
  Resources             Non-Resource URLs  Resource Names  Verbs
  ---------             -----------------  --------------  -----
  nodes.metrics.k8s.io  []                 []              [get list watch]
  pods.metrics.k8s.io   []                 []              [get list watch]

*$ kubectl create clusterrolebinding \
      kubernetes-dashboard-cluster-admin \
      --clusterrole=cluster-admin \
      --serviceaccount=kubernetes-dashboard:kubernetes-dashboard

$ kubectl get clusterrolebindings -owide | grep dash
kubernetes-dashboard-cluster-admin  ClusterRole/cluster-admin  6m34s  kubernetes-dashboard/kubernetes-dashboard
kubernetes-dashboard  ClusterRole/kubernetes-dashboard  88m  kubernetes-dashboard/kubernetes-dashboard
2
3
4
5
6
7
8
9
10
11
12
13
14
15
16
17
18
19
20
21
22
23
24
25
26
登陆
https://k8s-master:30291
# Lab61. kubeconfig 方式认证
$ kubectl -n kube-system create sa dashboard-admin

$ kubectl create clusterrolebinding dashboard-admin \
  --clusterrole=cluster-admin \
  --serviceaccount=kube-system:dashboard-admin

$ DASH_TOKEN=$(kubectl -n kube-system create token dashboard-admin)
2
3
4
5
6
7
创建 dashboard-admin.kubeconfig
$ SIP=$(ip a | grep -w inet.*brd | awk '{print $2}')

1/4 生成文件,设置集群
*$ kubectl config set-cluster ck8s \
  --certificate-authority=/etc/kubernetes/pki/ca.crt \
	--embed-certs=true \
	--server=https://${SIP%/*}:6443 \
	--kubeconfig=dashboard-admin.kubeconfig

2/4 修改文件,设置上下文关系
*$ kubectl config set-context dashboard-admin@ck8s \
	--cluster=ck8s \
	--user=dashboard-admin \
	--kubeconfig=dashboard-admin.kubeconfig

3/4 修改文件,设置令牌
*$ kubectl config set-credentials dashboard-admin \
  --token=${DASH_TOKEN} \
  --kubeconfig=dashboard-admin.kubeconfig

4/4 修改文件,切换集群
*$ kubectl config use-context dashboard-admin@ck8s \
	--kubeconfig=dashboard-admin.kubeconfig
2
3
4
5
6
7
8
9
10
11
12
13
14
15
16
17
18
19
20
21
22
23
$ vimdiff ~/.kube/config dashboard-admin.kubeconfig
物理机[ chrome | firefox ]
$ scp kiosk@k8s-master:~/.kube/config .
$ scp kiosk@k8s-master:~/dashboard-admin.kubeconfig .
2
# 20.2 Dashboard功能
# 20.3 Dashboard部署应用
# 21. Helm包管理工具
# 21.1 Helm简介
- apt/ubuntu, yum/centos
- docker compose -=> harbor
- helm -=> harbor
# 21.2 使用Helm
# Lab62. 安装、使用Helm
install helm (opens new window)
https://get.helm.sh/helm-v3.10.3-linux-amd64.tar.gz
curl https://rt.vmcc.xyz:8080/K8s/helm/helm-v3.10.3-linux-amd64.tar.gz \
  -# \
  -o helm-v3.10.3-linux-amd64.tar.gz
sudo tar xf helm-v3.10.3-linux-amd64.tar.gz
sudo mv linux-amd64/helm /usr/local/bin/
2
3
4
5
6
使用 Helm
立即生效
$ source <(helm completion bash)

永久生效
$ helm completion bash >> ~/.bashrc \
  && source ~/.bashrc

$ helm version

$ helm search hub wordpress
2
3
4
5
6
7
8
9
10
$ helm repo add harbor https://helm.goharbor.io
$ helm repo update
Hang tight while we grab the latest from your chart repositories...
...Successfully got an update from the "harbor" chart repository
Update Complete. ⎈Happy Helming!⎈

$ helm repo list
NAME   	URL
harbor	https://helm.goharbor.io

$ helm search repo harbor
NAME         	CHART VERSION	APP VERSION	DESCRIPTION
`harbor/harbor`	1.11.0       	2.7.0      	An open source trusted cloud native registry th...
2
3
4
5
6
7
8
9
10
11
12
13
$ helm install harbor/harbor --generate-name
NAME: harbor-1671940119
LAST DEPLOYED: Sun Dec 25 03:48:40 2022
NAMESPACE: default
STATUS: deployed
REVISION: 1
TEST SUITE: None
NOTES:
Please wait for several minutes for Harbor deployment to complete.
Then you should be able to visit the Harbor portal at https://core.harbor.domain
For more details, please visit https://github.com/goharbor/harbor
2
3
4
5
6
7
8
9
10
11
$ helm list
NAME             	NAMESPACE	REVISION	UPDATED                                	STATUS  	CHART        	APP VERSION
`harbor-1671940119`	default  	1       	2022-12-25 03:48:40.543797179 +0000 UTC	deployed	harbor-1.11.0	2.7.0
2
3
$ helm uninstall harbor-1671940119
These resources were kept due to the resource policy:
[PersistentVolumeClaim] harbor-1671940119-chartmuseum
[PersistentVolumeClaim] harbor-1671940119-jobservice-scandata
[PersistentVolumeClaim] harbor-1671940119-jobservice
[PersistentVolumeClaim] harbor-1671940119-registry

release "harbor-1671940119" uninstalled
2
3
4
5
6
7
8
# 21.3 Chart简介
# Lab63. Chart
$ ls ~/.cache/helm/repository
harbor-1.11.0.tgz  harbor-charts.txt  harbor-index.yaml

$ tar xf ~/.cache/helm/repository/harbor-1.11.0.tgz

$ sudo apt -y install tree

$ tree harbor/
harbor/
├── Chart.yaml
├── LICENSE
├── README.md
├── cert
│   ├── tls.crt
│   └── tls.key
├── conf
│   ├── notary-server.json
│   └── notary-signer.json
├── templates
│   ├── NOTES.txt
│   ├── _helpers.tpl
│   ├── chartmuseum
│   │   ├── chartmuseum-cm.yaml
│   │   ├── chartmuseum-dpl.yaml
│   │   ├── chartmuseum-pvc.yaml
│   │   ├── chartmuseum-secret.yaml
│   │   ├── chartmuseum-svc.yaml
│   │   └── chartmuseum-tls.yaml
│   ├── core
│   │   ├── core-cm.yaml
│   │   ├── core-dpl.yaml
│   │   ├── core-pre-upgrade-job.yaml
│   │   ├── core-secret.yaml
│   │   ├── core-svc.yaml
│   │   └── core-tls.yaml
│   ├── database
│   │   ├── database-secret.yaml
│   │   ├── database-ss.yaml
│   │   └── database-svc.yaml
│   ├── exporter
│   │   ├── exporter-cm-env.yaml
│   │   ├── exporter-dpl.yaml
│   │   ├── exporter-secret.yaml
│   │   └── exporter-svc.yaml
│   ├── ingress
│   │   ├── ingress.yaml
│   │   └── secret.yaml
│   ├── internal
│   │   └── auto-tls.yaml
│   ├── jobservice
│   │   ├── jobservice-cm-env.yaml
│   │   ├── jobservice-cm.yaml
│   │   ├── jobservice-dpl.yaml
│   │   ├── jobservice-pvc-scandata.yaml
│   │   ├── jobservice-pvc.yaml
│   │   ├── jobservice-secrets.yaml
│   │   ├── jobservice-svc.yaml
│   │   └── jobservice-tls.yaml
│   ├── metrics
│   │   └── metrics-svcmon.yaml
│   ├── nginx
│   │   ├── configmap-http.yaml
│   │   ├── configmap-https.yaml
│   │   ├── deployment.yaml
│   │   ├── secret.yaml
│   │   └── service.yaml
│   ├── notary
│   │   ├── notary-secret.yaml
│   │   ├── notary-server.yaml
│   │   ├── notary-signer.yaml
│   │   └── notary-svc.yaml
│   ├── portal
│   │   ├── configmap.yaml
│   │   ├── deployment.yaml
│   │   ├── service.yaml
│   │   └── tls.yaml
│   ├── redis
│   │   ├── service.yaml
│   │   └── statefulset.yaml
│   ├── registry
│   │   ├── registry-cm.yaml
│   │   ├── registry-dpl.yaml
│   │   ├── registry-pvc.yaml
│   │   ├── registry-secret.yaml
│   │   ├── registry-svc.yaml
│   │   ├── registry-tls.yaml
│   │   ├── registryctl-cm.yaml
│   │   └── registryctl-secret.yaml
│   └── trivy
│       ├── trivy-secret.yaml
│       ├── trivy-sts.yaml
│       ├── trivy-svc.yaml
│       └── trivy-tls.yaml
└── `values.yaml`

17 directories, 68 files
2
3
4
5
6
7
8
9
10
11
12
13
14
15
16
17
18
19
20
21
22
23
24
25
26
27
28
29
30
31
32
33
34
35
36
37
38
39
40
41
42
43
44
45
46
47
48
49
50
51
52
53
54
55
56
57
58
59
60
61
62
63
64
65
66
67
68
69
70
71
72
73
74
75
76
77
78
79
80
81
82
83
84
85
86
87
88
89
90
91
92
93
94
95
96
# 21.4 Chart模板的使用
# Lab64. Helm 部署 harbor
- Download Chart (opens new window) 默认需要使用 storageClass
$ helm repo add harbor https://helm.goharbor.io
$ helm fetch harbor/harbor --untar
$ vim harbor/values.yaml
2
3
4
5
- 创建 storageClass
## nfs-server
HARBOR_FOLDER=/harbor_data
while ps aux | grep -v grep | grep apt; do sleep 1s; done
sudo apt install -y nfs-kernel-server
echo "$HARBOR_FOLDER *(rw,no_root_squash)" | sudo tee -a /etc/exports
sudo mkdir -m 777 $HARBOR_FOLDER 2>/dev/null
sudo systemctl enable nfs-server
sudo systemctl restart nfs-server
## nfs-common
USER_PASSWORD=ubuntu
NODES=$(kubectl get nodes -o custom-columns=master:.metadata.name | grep -v master)
for i in $NODES; do
sshpass -p ${USER_PASSWORD} ssh -o StrictHostKeyChecking=no $USER@${i} "
if sudo apt list nfs-common | grep -wq installed; then
echo nfs-common is already the newest version
else
while ps aux | grep -v grep | grep apt; do sleep 1s; done
sudo apt install nfs-common -y
fi"
done
## NFS subdir 外部驱动
### k8s.gcr.io/sig-storage/nfs-subdir-external-provisioner
export URL1=registry.cn-hangzhou.aliyuncs.com/k-cka
export URL2=k8s.gcr.io/sig-storage
export IMGN=nfs-subdir-external-provisioner
export IMGV=v4.0.2
NODE2=$(kubectl get nodes -o custom-columns=:.metadata.name | grep 2)
GIT_URL=https://vmcc.xyz:8443/k8s/storageClass
sshpass -p ${USER_PASSWORD} ssh -o StrictHostKeyChecking=no kiosk@$NODE2 "
sudo ctr -n k8s.io image pull $URL1/$IMGN:$IMGV
sudo ctr -n k8s.io image tag $URL1/$IMGN:$IMGV $URL2/$IMGN:$IMGV"
### https://github.com/kubernetes-sigs/nfs-subdir-external-provisioner
#### 1/3 rbac.yaml
kubectl apply -f $GIT_URL/rbac.yaml
#### 2/3 deployment.yaml
export SIP=$(ip a | awk '/brd.*ens/ {print $2}')
curl $GIT_URL/deployment.yaml -# -o /tmp/deployment.yaml
sed -e "/NFS_SERVER/{N; s?value:.*?value: ${SIP%/*}?}" \
-e "/NFS_PATH/{N; s?value:.*?value: $HARBOR_FOLDER?}" \
-e "/server/s?:.*?: ${SIP%/*}?" \
-e "/path/s?:.*?: $HARBOR_FOLDER?" \
-e '/containers/i\ nodeSelector:' \
-e "/containers/i\ kubernetes.io/hostname: $NODE2" /tmp/deployment.yaml | kubectl apply -f-
#### 3/3 class.yaml
curl $GIT_URL/class.yaml -# -o /tmp/class.yaml
sed '/name:/s?:.*?: csi-hostpath-sc?' /tmp/class.yaml | kubectl apply -f-
2
3
4
5
6
7
8
9
10
11
12
13
14
15
16
17
18
19
20
21
22
23
24
25
26
27
28
29
30
31
32
33
34
35
36
37
38
39
40
41
42
43
44
45
46
47
48
49
- 安装
$ helm install harbor-27 harbor/ \
--set expose.tls.enabled=false \
--set expose.type=nodePort \
--set persistence.persistentVolumeClaim.registry.storageClass=csi-hostpath-sc \
--set persistence.persistentVolumeClaim.registry.existingClaim=null \
--set persistence.persistentVolumeClaim.chartmuseum.storageClass=csi-hostpath-sc \
--set persistence.persistentVolumeClaim.chartmuseum.existingClaim=null \
--set persistence.persistentVolumeClaim.jobservice.jobLog.storageClass=csi-hostpath-sc \
--set persistence.persistentVolumeClaim.jobservice.jobLog.existingClaim=null \
--set persistence.persistentVolumeClaim.jobservice.scanDataExports.storageClass=csi-hostpath-sc \
--set persistence.persistentVolumeClaim.jobservice.scanDataExports.existingClaim=null \
--set persistence.persistentVolumeClaim.database.storageClass=csi-hostpath-sc \
--set persistence.persistentVolumeClaim.database.existingClaim=null \
--set persistence.persistentVolumeClaim.redis.storageClass=csi-hostpath-sc \
--set persistence.persistentVolumeClaim.redis.existingClaim=null \
--set persistence.persistentVolumeClaim.trivy.storageClass=csi-hostpath-sc \
--set persistence.persistentVolumeClaim.trivy.existingClaim=null
$ helm list
NAME NAMESPACE REVISION UPDATED STATUS CHART APP VERSION
HART APP VERSION
`harbor-27` default 1 YYYY-MM-DD 09:38:24.809567068 +0000 UTC deployed harbor-1.11.0 2.7.0
2
3
4
5
6
7
8
9
10
11
12
13
14
15
16
17
18
19
20
21
22
测试
http://k8s-master:30002/ PS:http明文时,提示帐号密码错误
# 22. RBAC权限控制
# 22.1 k8s授权概述
# Lab65. Account
创建UserAccount
$ cd /etc/kubernetes/pki
$ sudo openssl genrsa -out tom.key
2
$ sudo openssl rand -writerand /root/.rnd
$ sudo openssl req \
-new \
-key tom.key \
-out tom.csr \
-subj "/CN=tom/O=kubeusers"
2
3
4
5
6
7
$ sudo openssl x509 \
-req \
-in tom.csr \
-CA ca.crt \
-CAkey ca.key \
-CAcreateserial \
-out tom.crt \
-days 365
2
3
4
5
6
7
8
$ kubectl config set-credentials tom \
--client-certificate=tom.crt \
--client-key=tom.key
2
3
$ kubectl config set-context tom@ck8s --cluster=ck8s --user=tom
切换身份
$ sudo chmod a+r tom.key
$ kubectl config use-context tom@ck8s
2
3
测试
$ kubectl get pods
error: unable to read client-key /etc/kubernetes/pki/tom.key for tom due to open /etc/kubernetes/pki/tom.key: permission denied
$ kubectl config use-context kubernetes-admin@ck8s
$ cd
2
3
4
5
创建ServiceAccount
$ kubectl create namespace mynamespace
$ kubectl create serviceaccount example-sa -n mynamespace
2
3
$ kubectl create deployment d1 --image=nginx --replicas=3
$ kubectl get pods
NAME READY STATUS RESTARTS AGE
d1-68d57c4c7f-lbxp8 0/1 ContainerCreating 0 6s
d1-68d57c4c7f-lphcz 0/1 ContainerCreating 0 6s
d1-68d57c4c7f-m4699 0/1 ContainerCreating 0 6s
$ kubectl get pods d1-68d57c4c7f-lbxp8 -o yaml | grep serviceAccountName
serviceAccountName: `default`
$ kubectl describe pods d1-68d57c4c7f-lbxp8
2
3
4
5
6
7
8
9
10
11
12
$ kubectl -n mynamespace get sa
NAME SECRETS AGE
`default` 1 11m
example-sa 1 10m
$ kubectl -n mynamespace describe sa default | grep Tokens
Tokens: `default-token-djfrr`
$ kubectl -n mynamespace get secrets
NAME TYPE DATA AGE
`default-token-djfrr` kubernetes.io/service-account-token 3 12m
example-sa-token-qcdvj kubernetes.io/service-account-token 3 12m
2
3
4
5
6
7
8
9
10
11
12
# 22.2 RBAC插件简介
# Lab66. RBAC插件
RBAC中的对象-role
$ kubectl create role example-role \
--verb="get,watch,list" \
--resource="pods" \
-n mynamespace
2
3
4
RBAC中的对象-ClusterRole
$ kubectl create clusterrole example-clusterrole \
--verb="get,watch,list" \
--resource="pods"
2
3
RBAC中的对象- RoleBinding
$ kubectl create rolebinding example-rolebinding \
--role=example-role \
--user=user1
-n mynamespace
2
3
4
RBAC中的对象- ClusterRoleBinding
$ kubectl create clusterrolebinding example-clusterrolebinding \
--clusterrole=example-clusterrole \
--user=user1
2
3
内置ClusterRole和ClusterRolebinding
$ kubectl get clusterroles
$ kubectl describe clusterrole cluster-admin
Name: cluster-admin
Labels: kubernetes.io/bootstrapping=rbac-defaults
Annotations: rbac.authorization.kubernetes.io/autoupdate: true
PolicyRule:
Resources Non-Resource URLs Resource Names Verbs
--------- ----------------- -------------- -----
*.* [] [] [*]
[*] [] [*]
2
3
4
5
6
7
8
9
# 23. Kubernetes日志管理方案
# 23.1 k8s日志管理
$ sudo cat /var/log/pods/kube-system_kube-apiserver-k8s-master_cc2b4b37dd11e738628e66eb6e8039d6/kube-apiserver/0.log
$ sudo apt -y install jq
$ sudo cat /var/log/pods/kube-system_kube-apiserver-k8s-master_cc2b4b37dd11e738628e66eb6e8039d6/kube-apiserver/0.log | jq
2
3
4
5
6
# 23.2 EFK日志管理
# Lab67. 开始使用Elastic Stack (opens new window)
0a. 安装 helm
curl https://baltocdn.com/helm/signing.asc | sudo apt-key add - \
&& sudo apt-get install apt-transport-https --yes \
&& echo "deb https://baltocdn.com/helm/stable/debian/ all main" | sudo tee /etc/apt/sources.list.d/helm-stable-debian.list \
&& sudo apt-get update \
&& sudo apt-get install helm
2
3
4
5
6
0b. 配置 elastic 仓库
$ helm repo add elastic https://helm.elastic.co \
&& helm repo add fluent https://fluent.github.io/helm-charts \
&& helm search repo
NAME CHART VERSION APP VERSION DESCRIPTION
elastic/`elasticsearch` 7.17.3 7.17.3 Official Elastic helm chart for Elasticsearch
elastic/`kibana` 7.17.3 7.17.3 Official Elastic helm chart for Kibana
fluent/`fluent-bit` 0.20.1 1.9.3 Fast and lightweight log processor and forwarde...
fluent/fluentd 0.3.7 v1.12.4 A Helm chart for Kubernetes
...输出省略...
2
3
4
5
6
7
8
9
- 安装 Elasticsearch 分布式 RESTful 搜索和分析引擎
$ helm inspect values elastic/elasticsearch | less
...输出省略...
replicas: `3`
minimumMasterNodes: `2`
...
resources:
requests:
cpu: "1000m"
memory: "2Gi"
limits:
cpu: "1000m"
memory: "2Gi"
...
volumeClaimTemplate:
accessModes: `["ReadWriteOnce"]`
resources:
requests:
storage: `30Gi`
...
persistence:
enabled: `true`
...
2
3
4
5
6
7
8
9
10
11
12
13
14
15
16
17
18
19
20
21
22
[root@192.168.147.128]
sudo apt -y install nfs-kernel-server && \
sudo mkdir -m 777 /nfs_log{0..1} && \
sudo tee /etc/exports <<EOF
/nfs_log0 *(rw,no_root_squash)
/nfs_log1 *(rw,no_root_squash)
EOF
sudo systemctl restart nfs-server && \
showmount -e
2
3
4
5
6
7
8
9
10
kubectl apply -f- <<EOF
apiVersion: v1
kind: PersistentVolume
metadata:
name: pv-log0
spec:
capacity:
storage: 30Gi
accessModes:
- ReadWriteOnce
persistentVolumeReclaimPolicy: Recycle
nfs:
path: /nfs_log0
server: 192.168.147.128
---
apiVersion: v1
kind: PersistentVolume
metadata:
name: pv-log1
spec:
capacity:
storage: 30Gi
accessModes:
- ReadWriteOnce
persistentVolumeReclaimPolicy: Recycle
nfs:
path: /nfs_log1
server: 192.168.147.128
EOF
2
3
4
5
6
7
8
9
10
11
12
13
14
15
16
17
18
19
20
21
22
23
24
25
26
27
28
29
30
$ helm install elasticsearch elastic/elasticsearch \
--set replicas=2,minimumMasterNodes=1,image="registry.cn-hangzhou.aliyuncs.com/k-cka/elasticsearch"
:<<EOF
...此处省略...
NOTES:
1. Watch all cluster members come up.
$ kubectl get pods --namespace=default -l app=elasticsearch-master -w
2. Test cluster health using Helm test.
$ helm --namespace=default test elasticsearch
EOF
2
3
4
5
6
7
8
9
10
$ kubectl get pods --namespace=default -l app=elasticsearch-master -w
NAME READY STATUS RESTARTS AGE
...
elasticsearch-master-1 `1/1` Running 0 5m33s
elasticsearch-master-0 `1/1` Running 0 5m33s
<Ctrl-C>
2
3
4
5
6
$ helm --namespace=default test elasticsearch
...输出省略...
Phase: `Succeeded`
2
3
- fluent-bit 快速轻量级日志处理器和转发器
$ helm install fluent-bit fluent/fluent-bit
:<<EOF
...输出省略...
export POD_NAME=$(kubectl get pods --namespace default -l "app.kubernetes.io/name=fluent-bit,app.kubernetes.io/instance=fluent-bit" -o jsonpath="{.items[0].metadata.name}")
kubectl --namespace default port-forward $POD_NAME 2020:2020
curl http://127.0.0.1:2020
EOF
$ export POD_NAME=$(kubectl get pods --namespace default -l "app.kubernetes.io/name=fluent-bit,app.kubernetes.io/instance=fluent-bit" -o jsonpath="{.items[0].metadata.name}") && \
echo $POD_NAME && \
kubectl get pods $POD_NAME -w
NAME READY STATUS RESTARTS AGE
...
fluent-bit-4dg4h `1/1` Running 0 2m26s
<Ctrl-C>
$ kubectl --namespace default port-forward $POD_NAME 2020:2020
$ curl http://127.0.0.1:2020 | jq
$ kubectl edit configmap fluent-bit
Edit cancelled, no changes made.
2
3
4
5
6
7
8
9
10
11
12
13
14
15
16
17
18
19
20
21
22
23
- 安装 Kibana 用于 Elasticsearch 的基于浏览器的分析和搜索仪表板
$ helm inspect values elastic/kibana | less
...输出省略...
resources:
requests:
cpu: "1000m"
memory: "2Gi"
limits:
cpu: "1000m"
memory: "2Gi"
...输出省略...
service:
type: `ClusterIP`
...输出省略...
image: "docker.elastic.co/kibana/kibana"
* master 节点参与 POD 负载,默认不参与
$ kubectl taint nodes k8s-master node-role.kubernetes.io/master-
node/k8s-master untainted
$ helm install kibana elastic/kibana \
--set service.type=NodePort,image="registry.cn-hangzhou.aliyuncs.com/k-cka/kibana"
2
3
4
5
6
7
8
9
10
11
12
13
14
15
16
17
18
19
20
21
$ kubectl get pod -l app=kibana -w
NAME READY STATUS RESTARTS AGE
...
kibana-kibana-85d5f98b79-z24p5 `1/1` Running 0 10m
<Ctrl-C>
2
3
4
5
- 配置Kibana
$ kubectl get svc kibana-kibana
NAME TYPE CLUSTER-IP EXTERNAL-IP PORT(S) AGE
kibana-kibana NodePort 10.99.144.226 <none> 5601:`31702`/TCP 7m50s
2
3
物理机浏览器 http://k8s-master:31702
点击Exlore on my own
点击Stack Management
==Open side navigation== / Kibana / Index Patterns
点击Create index pattern
Name:==log*==, Tmestamp field ==@timestamp==, Create index pattern
/ Analytics/ Discover
- 创建测试容器
$ kubectl run busybox \
--image=busybox \
--image-pull-policy=IfNotPresent \
-- sh -c 'while true; do echo "This is a log message from container busybox!"; sleep 5; done;' && \
kubectl get pod busybox -w
NAME READY STATUS RESTARTS AGE
...
busybox `1/1` Running 0 29s
<Ctrl-C>
2
3
4
5
6
7
8
9
- 查看日志(稍等片刻)
# 24. Kubernetes监控方案
# 24.1 k8s常用监控方案
# 24.2 Prometheus概述
# Lab68. Kube-prometheus (opens new window)
# 1. 安装
https://github.com/prometheus-operator
$ sudo apt -y install git
$ git clone https://github.com/prometheus-operator/kube-prometheus.git
Cloning into 'kube-prometheus'...
remote: Enumerating objects: 16183, done.
remote: Counting objects: 100% (104/104), done.
remote: Compressing objects: 100% (60/60), done.
remote: Total 16183 (delta 57), reused 78 (delta 39), pack-reused 16079
Receiving objects: 100% (16183/16183), 8.08 MiB | 28.00 KiB/s, done.
Resolving deltas: 100% (10397/10397), done.
$ cd kube-prometheus
$ git checkout release-0.10
$ kubectl apply -f manifests/setup
...输出省略...
namespace/monitoring created
The CustomResourceDefinition "prometheuses.monitoring.coreos.com" is `invalid`: metadata.annotations: Too long: must have at most 262144 bytes
$ kubectl create -f manifests/setup/prometheusCustomResourceDefinition.yaml
$ kubectl apply -f manifests
2
3
4
5
6
7
8
9
10
11
12
13
14
15
16
17
18
19
20
21
国内有些镜像拉不下来,需要单独处理
$ kubectl -n monitoring get pods | grep -v Running
NAME READY STATUS RESTARTS AGE
`blackbox-exporter-6b79c4588b-m9255` 1/3 ImagePullBackOff 5 (28s ago) 11m
`kube-state-metrics-55f67795cd-7644m` 0/3 CrashLoopBackOff 12 (2m51s ago) 11m
`prometheus-adapter-85664b6b74-7vn4b` 0/1 CrashLoopBackOff 7 (26s ago) 11m
`prometheus-operator-6dc9f66cb7-2qbf6` 0/2 CrashLoopBackOff 12 (102s ago) 11m
2
3
4
5
6
- blackbox-exporter:v0.19.0
$ kubectl -n monitoring describe pod blackbox-exporter-6b79c4588b-m9255
Normal Pulling 8m51s (x2 over 12m) kubelet Pulling image "quay.io/prometheus/blackbox-exporter:v0.19.0"
$ for i in k8s-master k8s-worker1 k8s-worker2; do ssh $i "
sudo docker pull registry.cn-hangzhou.aliyuncs.com/k-cka/blackbox-exporter:v0.19.0
sudo docker tag registry.cn-hangzhou.aliyuncs.com/k-cka/blackbox-exporter:v0.19.0 quay.io/prometheus/blackbox-exporter:v0.19.0
"; done
2
3
4
5
6
7
- kube-state-metrics:v2.3.0
$ kubectl -n monitoring describe pod kube-state-metrics-55f67795cd-7644m
Normal BackOff 39s (x101 over 18m) kubelet Back-off pulling image "k8s.gcr.io/kube-state-metrics/kube-state-metrics:v2.3.0"
$ for i in k8s-master k8s-worker1 k8s-worker2; do ssh $i "
sudo docker pull registry.cn-hangzhou.aliyuncs.com/k-cka/kube-state-metrics:v2.3.0
sudo docker tag registry.cn-hangzhou.aliyuncs.com/k-cka/kube-state-metrics:v2.3.0 k8s.gcr.io/kube-state-metrics/kube-state-metrics:v2.3.0
"; done
2
3
4
5
6
7
- prometheus-adapter:v0.9.1
$ kubectl -n monitoring describe pod prometheus-adapter-85664b6b74-7vn4b
Normal Pulled 21m (x5 over 23m) kubelet Container image "k8s.gcr.io/prometheus-adapter/prometheus-adapter:v0.9.1" already present on machine
$ for i in k8s-master k8s-worker1 k8s-worker2; do ssh $i "
sudo docker pull registry.cn-hangzhou.aliyuncs.com/k-cka/prometheus-adapter:v0.9.1
sudo docker tag registry.cn-hangzhou.aliyuncs.com/k-cka/prometheus-adapter:v0.9.1 k8s.gcr.io/prometheus-adapter/prometheus-adapter:v0.9.1
"; done
2
3
4
5
6
7
- prometheus-operator:v0.53.1
$ kubectl -n monitoring describe pod prometheus-operator-6dc9f66cb7-2qbf6
Normal Pulled 20m (x2 over 21m) kubelet Container image "quay.io/prometheus-operator/prometheus-operator:v0.53.1" already present on machine
$ for i in k8s-master k8s-worker1 k8s-worker2; do ssh $i "
sudo docker pull registry.cn-hangzhou.aliyuncs.com/k-cka/prometheus-operator:v0.53.1
sudo docker tag registry.cn-hangzhou.aliyuncs.com/k-cka/prometheus-operator:v0.53.1 quay.io/prometheus-operator/prometheus-operator:v0.53.1
"; done
2
3
4
5
6
7
$ kubectl -n monitoring get pods
$ kubectl -n monitoring patch svc grafana -p '{"spec":{"type":"NodePort"}}'
$ kubectl -n monitoring patch svc prometheus-k8s -p '{"spec":{"type":"NodePort"}}'
$ kubectl -n monitoring get svc | egrep 'grafana|prometheus-k8s'
grafana NodePort 10.104.141.103 <none> 3000:`30214`/TCP 13m
prometheus-k8s NodePort 10.96.106.1 <none> 9090:`31721`/TCP,8080:32201/TCP 13m
$ kubectl -n monitoring get pod -owide | egrep 'grafana|prometheus-k8s'
grafana-7fd69887fb-r6f4x 1/1 Running 0 13m 172.16.126.1 `k8s-worker2` <none> <none>
prometheus-k8s-0 2/2 Running 0 17m 172.16.194.70 `k8s-worker1` <none> <none>
prometheus-k8s-1 2/2 Running 0 17m 172.16.126.5 `k8s-worker2` <none> <none>
2
3
4
5
6
7
8
9
10
11
# 2. 配置prometheus
物理机 http://k8s-worker1:31721
点击菜单 Status / Targets ,确认所有的 State 都是 ==UP==(能够正常获取监控数据)
# 3. 配置grafana
- 物理机http://k8s-worker2:30214
Email or username ==admin== Password ==admin==
# 4. 配置数据源
默认安装已经配置好了数据源
# 5. 添加Dashboard模版
https://grafana.com/grafana/dashboards
Filter,Category: ==Docker==, Data Source:==Prometheus==
点击 ==1 Node Exporter for Prometheus Dashboard EN v20201010==
Copy ID to Clipboard
物理机 http://k8s-worker2:30214 Create / Import
Import via grafana.com ==11074==,Load
VictoriaMetrics 下拉菜单中选择 ==Prometheus==,Import
# 附录
# A1. 学习方法
| step | 示例 | ||
|---|---|---|---|
| 1 | word | 查单词,释义 | pull, 拉 |
| 2 | Tab | 一下补全,两下列出 | # docTab # docker Tab, TabTab |
| 3 | man, --help | 帮助 | # man docker # docker --help |
| 4 | echo $? | 查看回显 | 0 == 正确执行 非0 == 错误执行 |
# docker --help
# man docker run
| ID | 说明 | |
|---|---|---|
| 1 | f | For.. 前进 |
| 2 | b | Back 后退 |
| 3 | /-d | 搜索==-d== |
| 4 | n | N | Next 下一个 | 上一个 |
| 5 | q | Quit 退出 |
# A2. 培训相关软件
| NAME | URL | FUNC | |
|---|---|---|---|
| 1 | 欧路词典 | www.eudic.net | 翻译软件 |
| 2 | Typora | https://typoraio.cn | MarkDown 格式文档 |
| 3 | VMware | https://www.vmware.com/cn | 虚拟化软件 |
| 4 | Ubuntu (opens new window) | https://ubuntu.com | 系统光盘 iso |
# A3. terminal-shortcut
| 1 | Ctrl-+ | Ctrl-Shift-= | 放大字体 |
| 2 | Ctrl-Shift-T | 新建标签 |
| 3 | Alt-1 | Alt-2 | 终端1、2之间切换 |
# A4. vim
| mode | 状态栏 | |||
|---|---|---|---|---|
| 1 | 命令模式 | i | 默认工作模式 | |
| 2 | 输入模式 | Esc | -- INSERT -- | 退出输入模式 |
| 3 | 末行模式 | :wq! | write quit 保存退出 |
使用命令,未安装提示安装方法
$ vim
Command 'vim' not found, but can be installed with:
`sudo apt install vim` # version 2:8.1.2269-1ubuntu5.7, or
sudo apt install vim-tiny # version 2:8.1.2269-1ubuntu5.7
sudo apt install neovim # version 0.4.3-3
sudo apt install vim-athena # version 2:8.1.2269-1ubuntu5.7
sudo apt install vim-gtk3 # version 2:8.1.2269-1ubuntu5.7
sudo apt install vim-nox # version 2:8.1.2269-1ubuntu5.7
按照提示安装
$ sudo apt install vim
[sudo] password for kiosk: `ubuntu`
2
3
4
5
6
7
8
9
10
11
12
13
14
15
$ vim my.txt
<i>
ni hao
<Esc>
:wq!
2
3
4
5
~/.vimrc
set number cuc
/word
n/ N
r數字
shiftzz
# A5. ssh-server
[Server/虚拟机]
通过关键字,查找安装包名称
$ apt search ssh | grep server
安装
$ sudo apt install openssh-server
确认服务器地址
$ ip a | grep -w inet
inet 127.0.0.1/8 scope host lo
inet `192.168.73.137/24` brd 192.168.73.255 scope global dynamic noprefixroute ens33
inet 172.17.0.1/16 brd 172.17.255.255 scope global docker0
2
3
4
5
6
7
8
9
10
11
[Client/物理机]
% ssh kiosk@192.168.73.137
kiosk@192.168.73.137\'s password: `ubuntu`
$
2
3
# A6. 搭建培训环境
手册:https://kubernetes.io/zh/docs/setup/production-environment/tools/kubeadm/install-kubeadm/
机器:
**虚拟机/VMware*3** 物理机*3,公司 云主机*3(阿里云、腾讯云、华为云)
- centos
- selinux
- firewalld
- NTP
- Kernel
# A7. 培训环境转成练习环境
接近考试环境,可以做练习题
| ID | k8s-master | COMMENT |
|---|---|---|
| 1 | Insert CDROM==*.ISO==, 连接光驱 | 使用光盘镜像 |
| 2 | $ ==sudo mount -o uid=1000 /dev/sr0 /media/== | 挂载光驱 |
| 3 | $ ==/media/cka-setup== | 切换到练习环境 |
- 确认环境正常
所有的 pod 全 Running
$ k get pods -A | grep -v Running
NAMESPACE NAME READY STATUS RESTARTS AGE
2
- 练习环境中,判分脚本
$ cka-grade
# A8. apt
$ ip a
$ ip route
$ sudo apt search apt-file
$ sudo apt install apt-file -y
$ sudo apt-file update
$ apt-file search bin/ping
$ apt show inetutils-ping
$ apt show iputils-ping
$ sudo apt install -y inetutils-ping
$ ping 8.8.8.8
$ apt-file search bin/host
$ sudo apt install -y bind9-host
$ host www.163.com
$ host www.163.com 8.8.8.8
2
3
4
5
6
7
8
9
10
11
12
13
14
15
16
17
18
19
20
# A9. 虚拟机
快照
| ID | ITEM | |
|---|---|---|
| 1 | Hyper-V | Windows 自带 |
| 2 | KVM | Linux 自带 |
| 3 | ==VMware== | 跨平台,player免费 |
| 4 | Virtual-box | 跨平台,免费 |
# A10. 云主机
- 阿里
- 华为
- amazon
- Azure
# A11. VMnet8
macOS系统 - VMware fusion
% sudo vim /Library/Preferences/VMware\ Fusion/networking
...
answer VNET_8_HOSTONLY_SUBNET 192.168.147.0
2
VMware关闭,重开生效
# A12. VMware 网络
配置没问题还无法连网,建议重装 VMware
| ID | TYPE | 物理机 | 虚拟机 |
|---|---|---|---|
1 | ==nat== | vmnet8 192.168.147.1 | ens33 192.168.147.130 |
2 | bridge | 物理网卡 | ens33 |
| 3 | host-only | vmnet1 172.25. | ens33 172.25 |
# A13. 国外的镜像如何访问
日本服务器
# docker pull ... # docker save ... # scp ... my@china:1
2
3# docker load ...1
阿里云海外构建
github.com / ==Dockerfile==
阿里云镜像,新建镜像,使用海外构建
镜像生成在阿里云的镜像仓库里
# A14. ifconfig, ip
| ID | systemd | net-tools |
|---|---|---|
| 1 | ip a | ifconfig |
| 2 | ss | netstat |
| 3 | ip route | route |
# A15. explain
$ kubectl explain deploy d1
$ kubectl edit deploy d1
$ kubectl get deploy d2 -o yaml > d2.yml
2
3
4
5
# A16. 更新集群证书 (opens new window)
特性状态:
Kubernetes v1.15 [stable]默认情况下,由 kubeadm 为集群生成的所有证书在
1年后到期更新(重新签发)集群证书需根据其部署方式而定
- 通过二进制部署的集群需手动更新集群证书
- 通过 kubeadm 部署的集群可使用 kubeadm 更新证书,也可重新编译 kubeadm 生成自定义有效期的证书
集群证书更新方式,步骤如下:
检查集群证书有效期(通常于
master节点执行):$ sudo kubeadm certs check-expiration 单独查看证书是否过期 $ openssl x509 -noout -in /etc/kubernetes/pki/apiserver.crt -dates1
2
3
4集群 master 节点上的
/etc/kubernetes/pki/*的证书在更新之前,应继续保留在节点上不可删除,删除后将导致集群异常无法恢复kubeadm 更新集群 master 节点上的证书, 而 worker 节点上
kubelet证书默认自动轮换更新,无需关心证书到期题。kube-apiserver访问 kubelet 时,并不校验 kubelet 服务端证书,kubeadm 也并不提供更新 kubelet 服务端证书的办法更新延期集群证书 1 年有效期:
根据集群部署时使用的 kubeadm-conf.yml 配置文件更新所有集群证书 $ sudo kubeadm certs renew all \ --config /home/kiosk/kubeadm-config.yaml ...输出省略... Done renewing certificates. You must restart the kube-apiserver, kube-controller-manager, kube-scheduler and etcd, so that they can use the new certificates.1
2
3
4
5查看更新后的所有集群证书 $ sudo apt -y install tree \ && tree -D /etc/kubernetes/pki1
2
3更新集群证书后,需更新集群
kubeconfig配置文件:备份集群原始配置文件 kubeconfig $ sudo mv /etc/kubernetes/*.conf ~ 根据集群部署时使用的 kubeadm-conf.yml 配置文件重新生成集群 kubeconfig 配置文件 $ sudo kubeadm init phase kubeconfig all \ --config /home/kiosk/kubeadm-config.yaml1
2
3
4
5
6更新完成后检查集群所有证书有效期:
集群所有证书有效期延期 1 年 $ sudo kubeadm certs check-expiration1
2
新生成的集群
/etc/kubernetes/admin.conf配置文件嵌套新的证书